is200 Newbie
-
Posts
2,118 -
Joined
-
Last visited
-
Days Won
8
Content Type
Profiles
Forums
Events
Store
Gallery
Tutorials
Lexus Owners Club
Gold Membership Discounts
Lexus Owners Club Video
News & Articles
Everything posted by is200 Newbie
-

Best Set Up For Front Discs And Pads Is250
is200 Newbie replied to Gramera flash's topic in Brakes & Suspension
I have Brembo vented discs and Mintex pads - they stop the car and dust isn't too bad but still a coating on the wheels. -
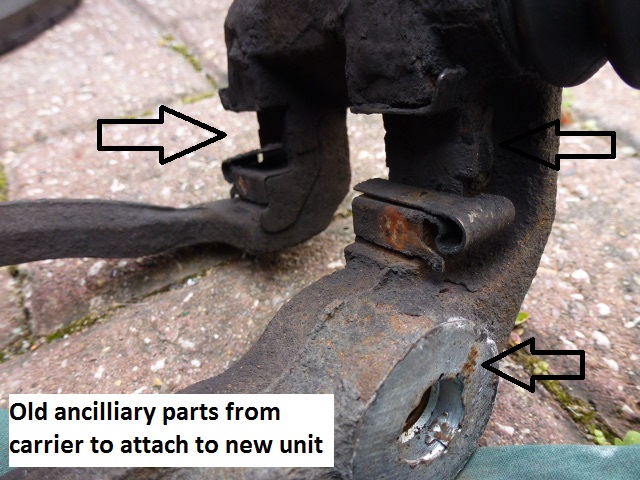
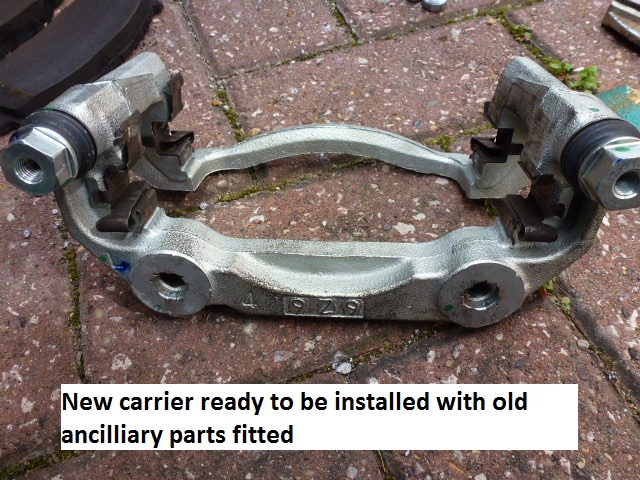
The ancillaries that may need removing from the old carrier to the new are shown below

-
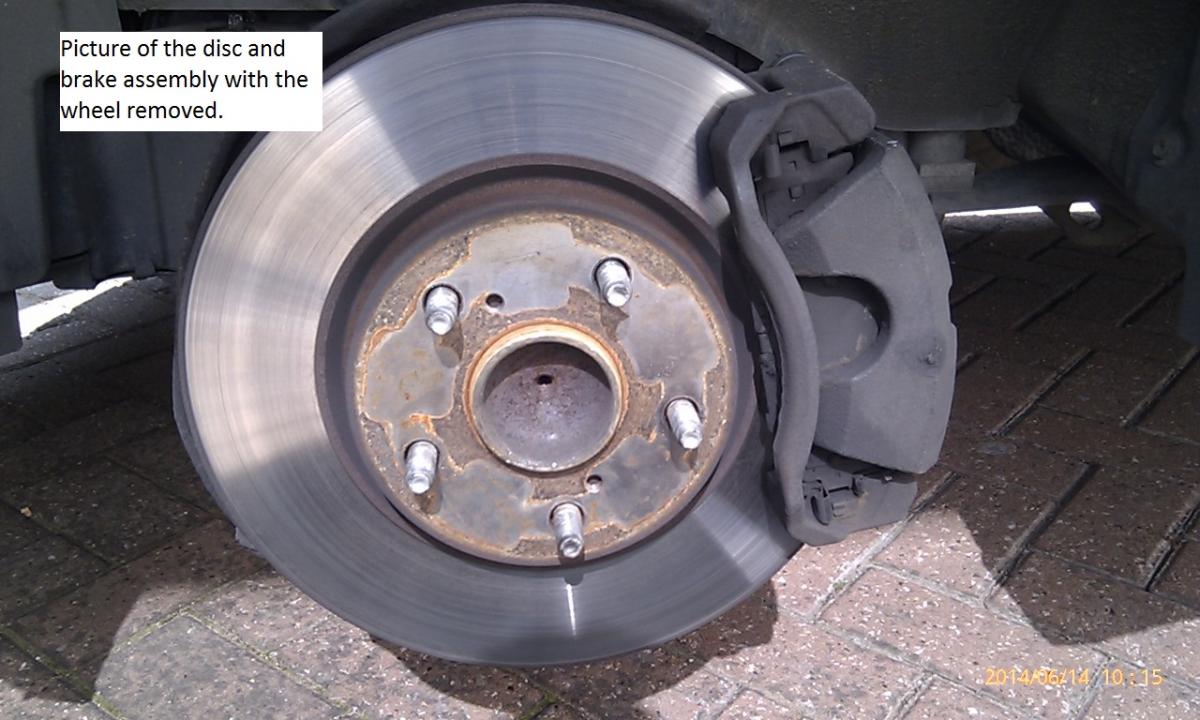
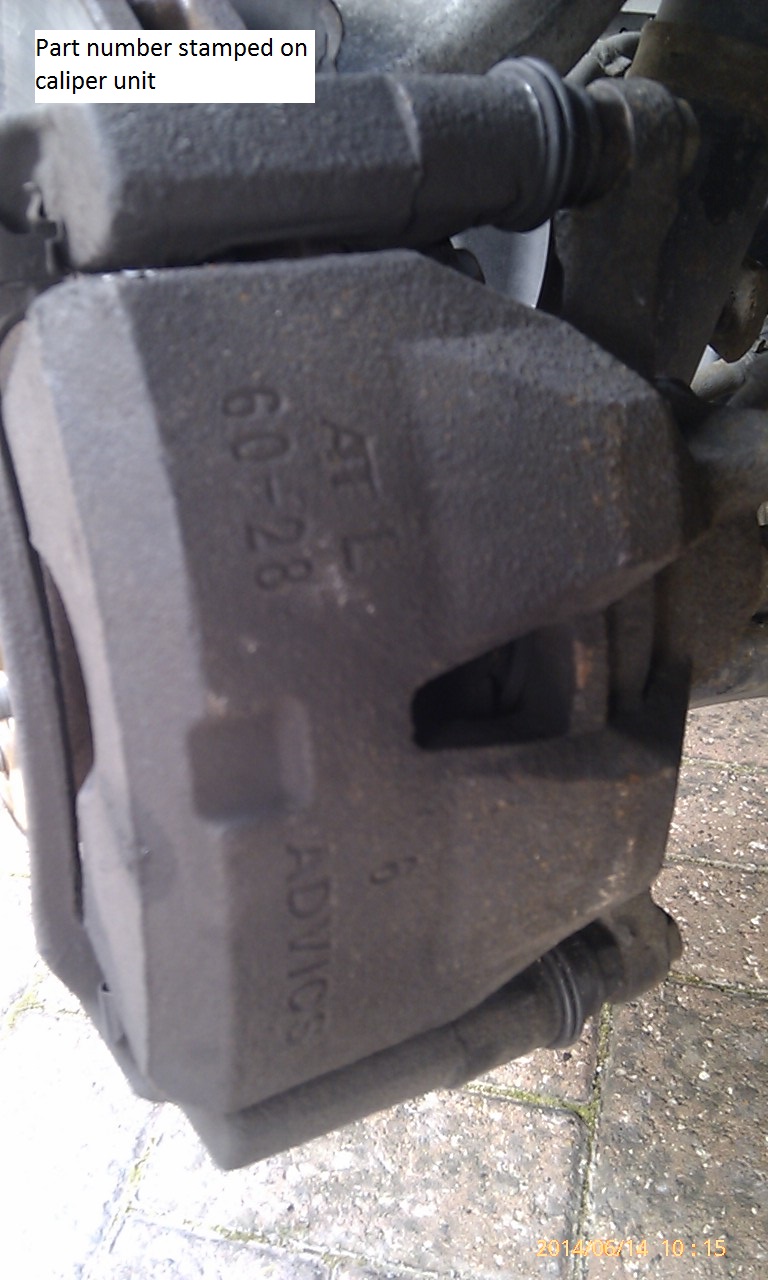
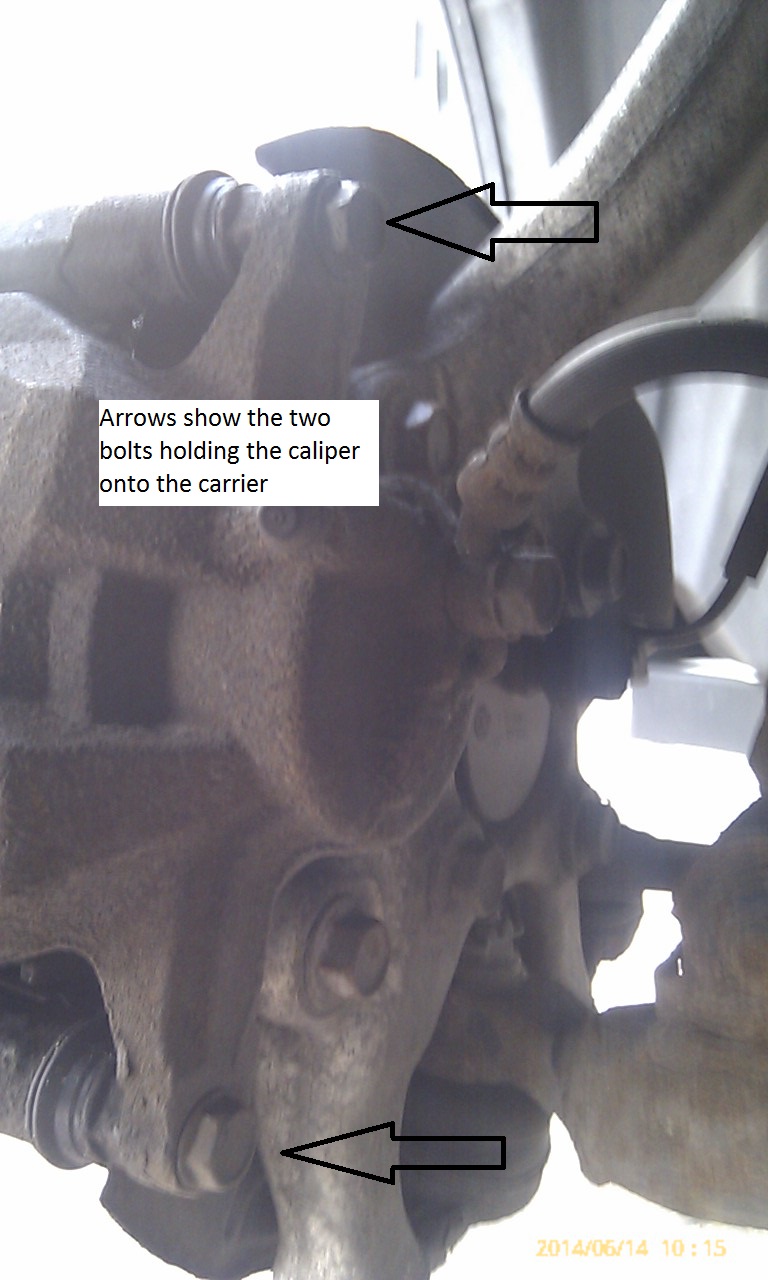
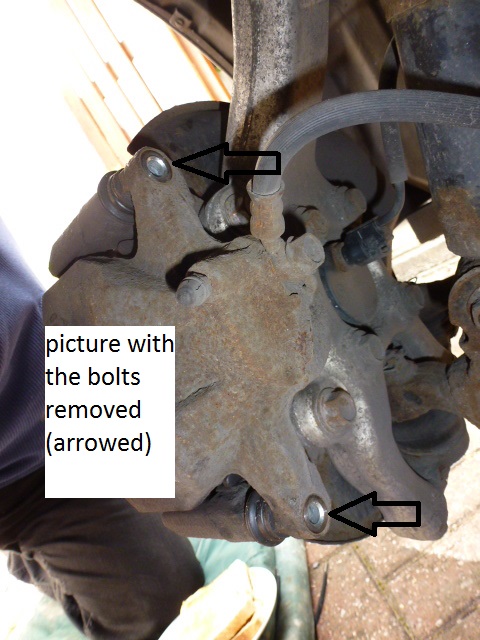
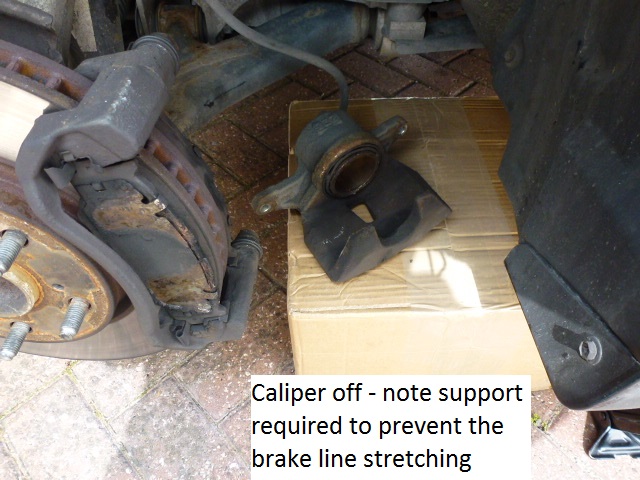
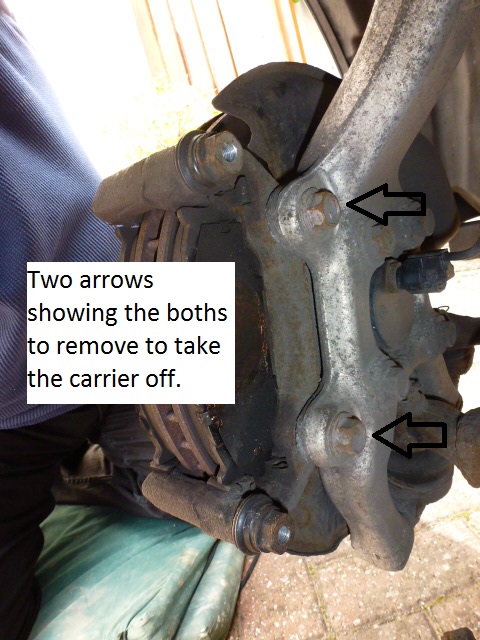
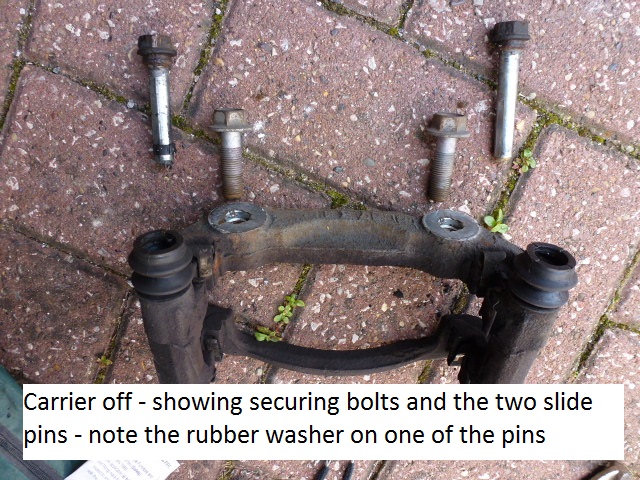
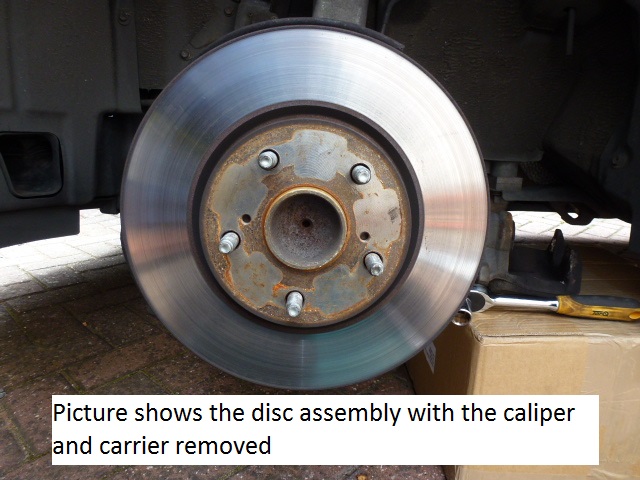
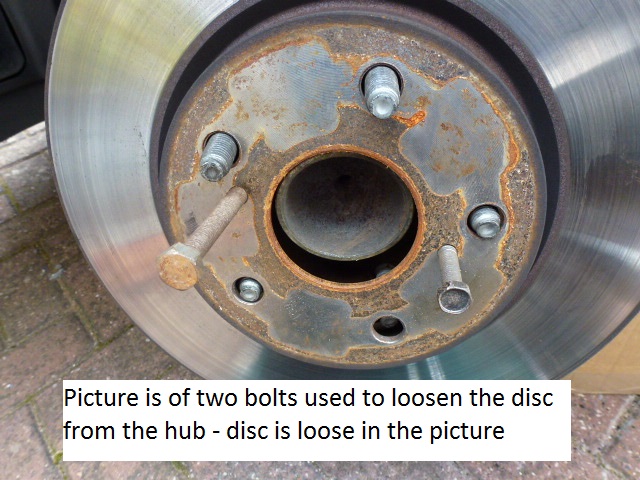
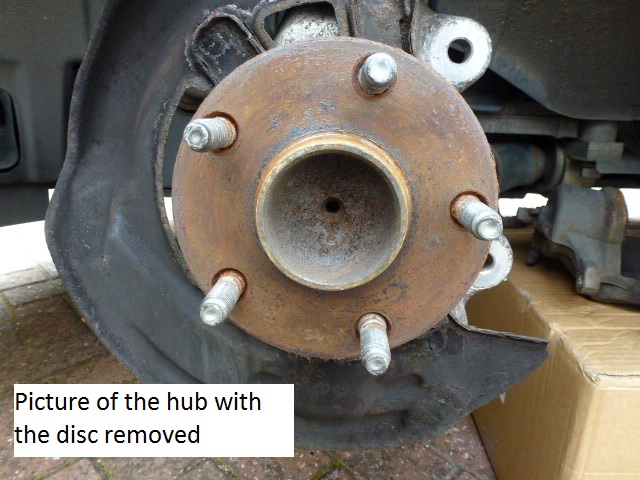
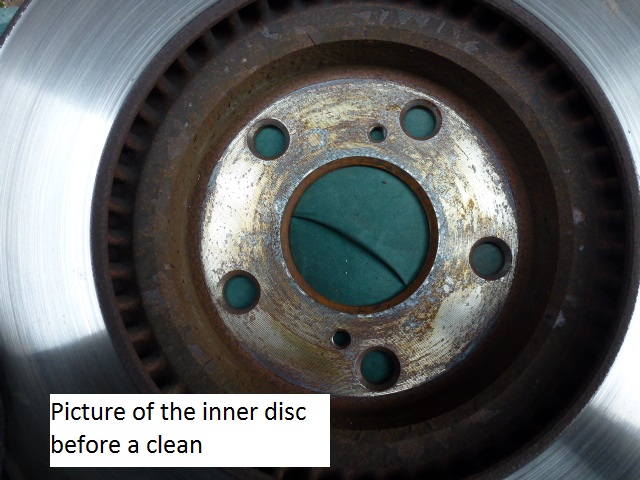
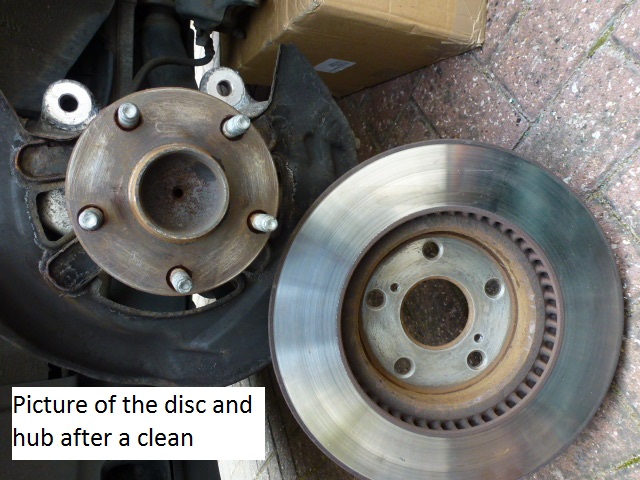
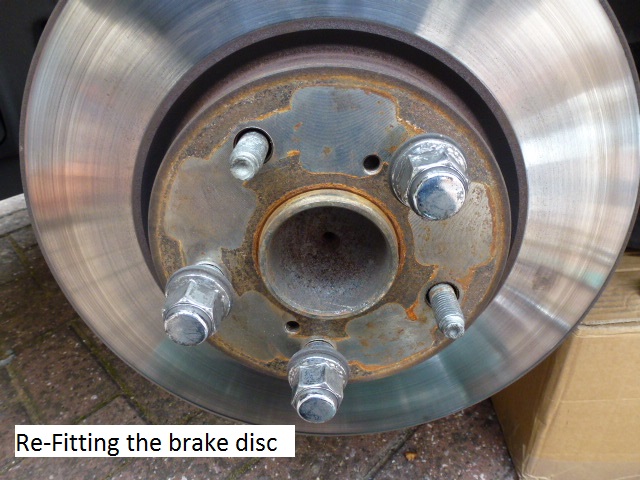
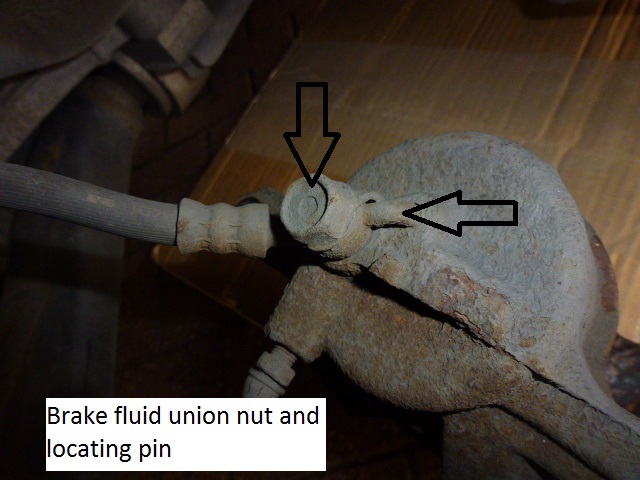
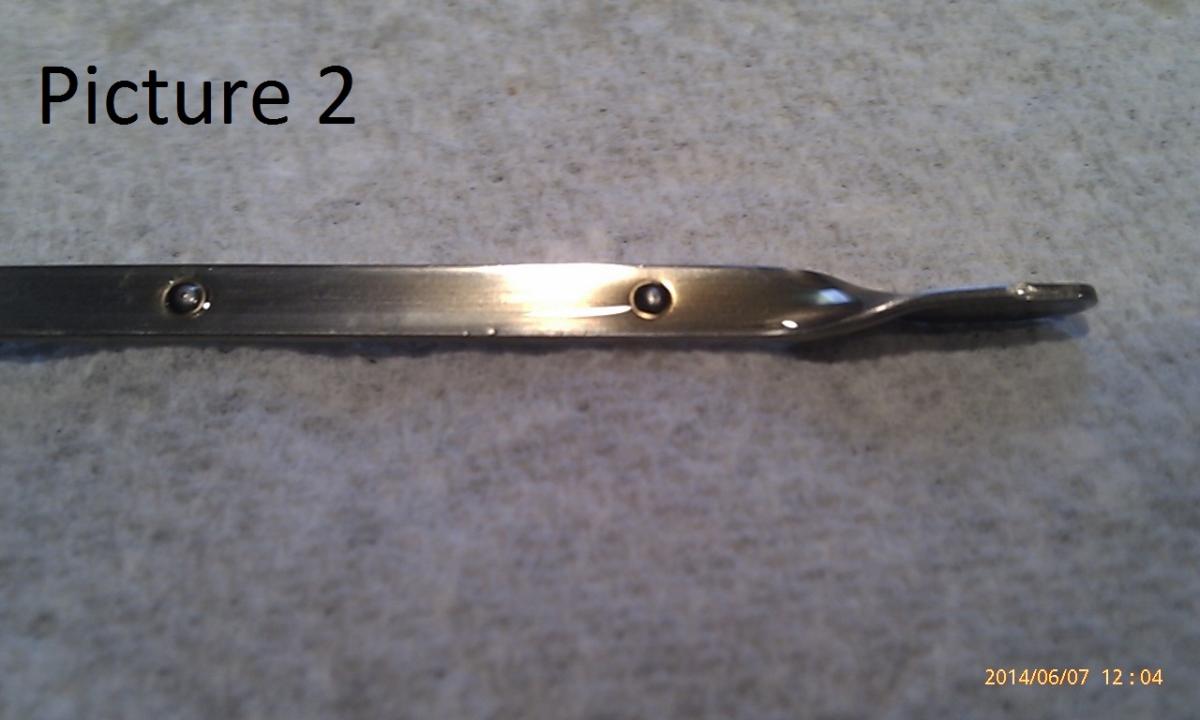
My recent MOT highlighted a brake imbalance on the front brakes. I since greased the pins which were sticky but noticed the rubber boot seal around the piston on the calliper had a big hole in it so rather than mess about with a brake seal kit I replaced the full calliper unit. The process of removing the calliper assembly and disc is below... Obviously make this safe as possible - chock the wheels before starting etc... I DONT KNOW WHY BUT THE PICTURES ATTACHED HAVE COME OUT AS THUMBNAILS WITH THE FULL PICTURES AT THE END OF THIS POST BUT CLICKING ON THE PICTURES ENLARGES THEM 1/ Remove the wheel - I tend to remove the security nut first as if left to last there is a lot of pressure on it and you could ruin the locking key or the nut itself making it hard to get off. Picture below is of the brake wheel assembly with wheel removed. 2/ Probably should have mentioned this first but the part number is stamped on the calliper unit as shown in the picture below... 3/ The picture below shows the two bolts you need to take out to remove the calliper assembly from the carrier - you will need a size 14 socket to do this. Store these in a safe place as if they are lost its a full calliper replacement. 4/ The picture below is of the calliper assembly with the two securing bolts removed - the calliper can now easily be pulled from the assembly. 5/ The picture below is of the calliper - removed from the assembly and placed on some form of support (plant pot / brick etc - something with enough height to stop the brake hose from stretching) I have used a box, as in the picture. 6/ The next picture is of the two bolts that need to be removed in order to take the carrier out. Remove the brake pads first and clean up the shims, remembering to add new copper grease to the pads to stop them squealing. Use a size 17 socket to remove the bolts on the assembly to remove it. 7/ With the carrier now off, you can remove the slide pins - (you can remove them with the carrier secured to the brake assembly) its up to you how / when at what point you remove them. Note the rubber washer on the top slide pin - I had read that this prevents brake rattle but a lot of the IS 200 owners when greasing the pins take this off. The rubber washer tends to only last a few cleans, the rubber tends to stretch and this is part of the cause of a sticking calliper as it creates a hell of a vacuum in the slide pin "tube" and stops working efficiently. Removal of this has no effect to the operation. I have purchased these in the past and i think? they were around £12 each..! Its a good idea now to clean up the pins at this point - they should be shiny and you can safely clean these up with a wire brush. Also if re-using them, check the rubber boot on the carrier secures itself quite tightly around the recess in the pin. You will find the boot stretches also and in time it just is not tight enough to hold onto the pin and as a result of this it lets dirt and water into the slide pin tube. 8/ The picture below is of the disc with the calliper assembly removed. Check the disc for grooving and rust. I had changed mine a while ago so i know this one is fine. 9/ Using two bolts (i don't know the size), shown in the picture, screw these in to remove the disc from the hub. The picture shows the disc loose from the hub. 10/ The picture below shows the hub before a clean. It is important that the face of the hub is spotless - no rust / dirt etc as this can stop the disc from mating cleanly and will cause brake judder. Clean it with sandpaper / wire brush and clean afterwards - i use an IPA solution but any cleaning solution will do. 11/ The picture below is of the inner face of the disc - again, as above, its important to get this clean. Clean as above for the hub. 12/ The picture below is of both faces cleaned 13/ Re-Installing the disc - use 3 of the wheel nuts to tighten the disc to the hub. Secure as you would when tightening your wheel (tightening opposites) When you think its tightened spin the disc - it should travel straight - if there's a "wobble" in the spin then take off and see if you have cleaned it properly or tightened it correctly. 14/ Picture shows the carrier unit with the installed old ancillaries from the old carrier - these only need putting on the new unit if it does not have them. They are only held on with two tabs and just ease off with a small flathead screwdriver and are pushed onto the new unit. They guide the brake pads into the unit. 15/ Install the carrier back onto the assembly - a size 17 socket is required, (same as for removal). Open the fluid reservoir in the engine bay. Next locate the brake hose union on the calliper and remove from the old one (size 14 socket) and place onto the new one. Unscrew the union bolt - In doing this there will be a few drops of brake fluid and if you are quick in swapping them over there will be minimal fluid loss. It will not spray out as its not under pressure. The picture shows the union in the new calliper. There is a locating pin attached to the union bolt which makes re-insertion fool proof?! Picture shows the old bolt and the locating pin and the union installed into the new calliper. 16/ After changing the union over wipe away any excess fluid and re-install the calliper onto the assembly - you will need to re-install the brake pads before doing this (remember to add the copper grease between the shims before putting the pads back in the assembly) You will now have the calliper fully installed. Next job will be to bleed the brakes and you will need two people to do this - one pumping the brake pedal and the other undoing and tightening the bleed nipple. You will find that there is not a lot of fluid required as you will only be filling up the calliper piston reservoir and the few drops that would have been lost. Bleed it until no more air comes out. Once happy (brake pedal should be hard - it will soften a bit when the cars started - put the wheel back on and take it for a short run to see if there are any issues. When back from the run check for any leaks (leaks should have been evident at the bleeding process) Enjoy your new brakes.
-
High Mileage Lexus
is200 Newbie replied to dr j's topic in Lexus IS 250 / Lexus IS 250C Club / Lexus IS 220D & IS 200D Club
That's a good lot of miles - what year is the car? -
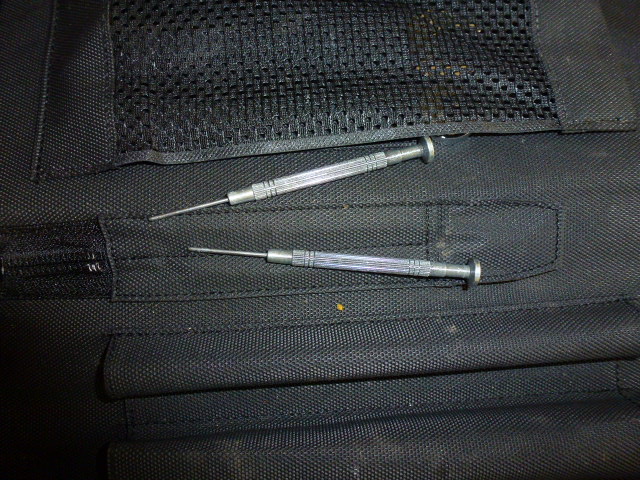
I had a look in the tool kit in the boot at the weekend to see if the previous owner had left the display removal tools to take the sat nav disc out and they have. These can be found in a pocket in the tool pouch - a picture of them is below...
-
Another week on and another 144 miles on the clock picture below is of the oil - still at the same level. Still the same colour although I can just notice a slightly darker tint to it.
-
Search for EXHAUST - it was a post I made in august last year (2013) It really depends where it has gone (if it has) - I managed to do a really good repair on mine that I thought would last but I took the decision to get it replaced with a stainless one. I had a lot of trouble with Lexus in initially getting the part - I had booked it in to get done but the wrong part was delivered to the parts store after a 2 week wait for it ..so I would need to wait a further 10 days for the correct part but I bit the bullet, cancelled the order and went for a stainless one as I could not have it off the road for a further 2 - 3 weeks. I think at the time I was looking I had a quote of around £2300 or £2500 fitted from Lexus for the centre section including the back boxes. I could not justify that price and I am glad I cancelled the order. I welt with a stainless one that cost me £450 I think, which was made for the car. ATS may be able to source these now - it you do call them it would be interesting to find the costs out. The SS exhaust is quite noisy, you can hear a rumble in the car, I would much prefer an oem one to be honest.
-
Hi Geoff -- has your exhaust gone or are you just looking to change it?
-
Rear Break Noise
is200 Newbie replied to Shepherd's topic in Lexus IS 250 / Lexus IS 250C Club / Lexus IS 220D & IS 200D Club
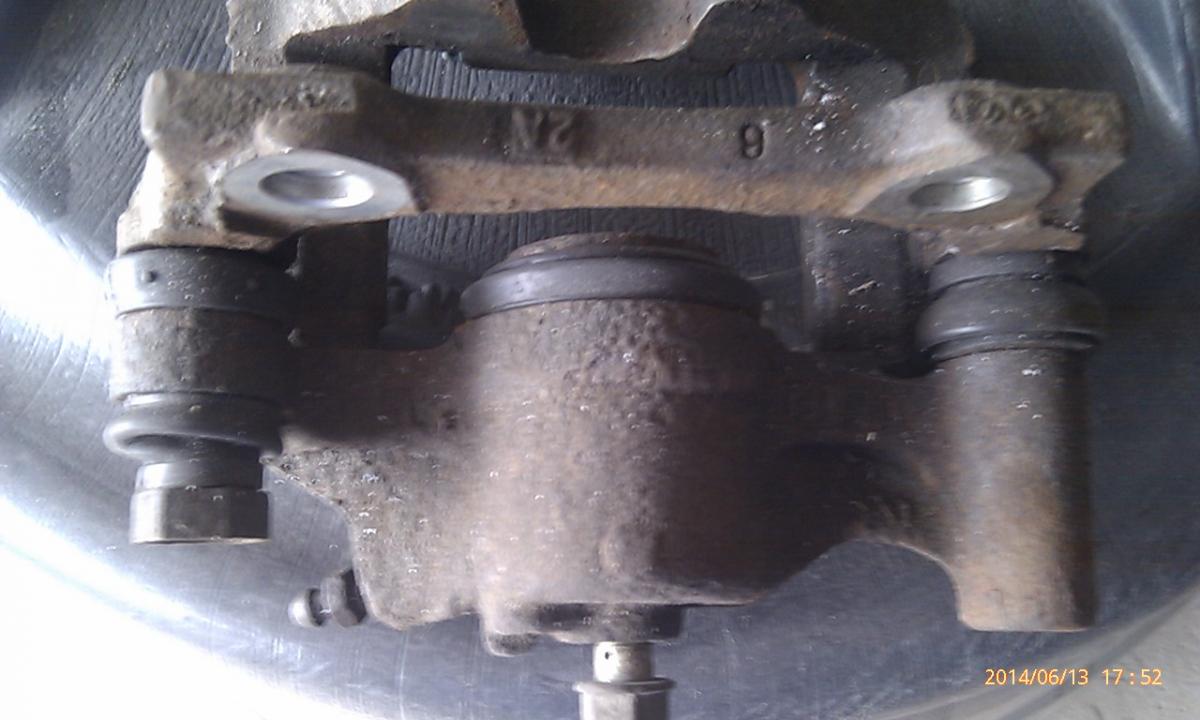
Hi Shephard Something does not sound right in what they have done - I have attached a picture showing an old calliper of mine - there is only one removable slide pin on the rear unit - the other one is attached to the calliper plate. The right hand side of the calliper on the picture shows the recess in the calliper body (looks like a tube) where the slide pin (that you cannot see) is located and slides in. The bolt on the left hand side is the removable pin. The bolt sits in a rubber sleeve that you can see in the picture and its actually the rubber sleeve that's greased on that side. The pin on the other side you can only get to when the slide plate is taken off, after you have removed the bolt. Both need greasing. The only way that this can rattle is if the rubber boot around the slide bolt is missing but even then you would need the bolt to have not been screwed into the thread at all and if that was the case it would have been lost while driving. There's something a miss in what they have done here and if you can I would get the wheel off to have a look. Could it be that the actual calliper itself was loose? If that's the case then I would definitely get out and check the others for security.
-
To save the hassle of the fix and taking a chance the fix will or wont do the job for the years you have the car why not look in a scrap dealer for the part - you already know how it goes together so would this be a good move to have a look first before getting into the guts of things?
-
Hi Ishaq - Looks good I have looked at these in the past but thought the image would not be that good but that's quite impressive. Did you buy them from the link that Normski put up from ebay? How easy were they to install - did you have to take the door cards off? thanks
-
The rear calipers were replaced under warranty when they seized but only under certain circumstances. I initially checked mine out after I felt the heat from one of my real wheels when I was standing next to the wheel and that was through trousers. I got it done virtually straight away as I think in producing that much heat it could be dangerous, fire and other parts failing due to the excessive heat.
-
Rear Break Noise
is200 Newbie replied to Shepherd's topic in Lexus IS 250 / Lexus IS 250C Club / Lexus IS 220D & IS 200D Club
Hi Shephard This is just my experience / opinion but a loose slide pin rattling ... that's not possible as there's too much pressure there in the operation of the pads and also the grease in the slide pin recess would not allow a rattle. This might be an easy fix however. I have noticed that the jack in the boot, on mine anyway, does not secure that well into its holding mount and I would imagine that if this is loose then it can rattle especially when cornering but whether this is loud enough would be questionable. Its an easy thing to check though. Might be worth a look... -
I do believe that the manufactures state that 1 litre per 1000 miles in normal conditions is acceptable. Its due to the tight tolerances that modern engines run to. I experienced this on a Vauxhall I had and that was the "excuse " they gave me but I have heard and seen this on a few different manufacturers forums. I will keep monitoring it as I would like to see how long it takes to change colour anyway.
-
Muzy One area I keep banging on about to people to check when buying one of these cars is to check the exhaust out. This caught me out when mine went last year, a bit premature I think but hey....life goes on. At the time they were not available from the likes of ATS etc as I guess its not worth these manufacturers designing and keeping them on stock as the cars are relatively new. I was stuck with a car I could not drive for a few weeks until I done a good temporary fix that probably would have lasted a good few years but I didn't want to take the chance it would go in the middle of nowhere. It was really undriveable, unable to get it over 30 mph when it went. At the time there was a two week lead time for the part and a further week to get it into the dealer to fit and back to me. I went with an aftermarket stainless steel one that was made for the car - quite noisy compared to the OEM one but no other issues really. If you consider the cost of a new exhaust which is only available (at the time) from Lexus at £2700 (back boxes and middle section) and the car off the road for a good part of a month then that's a whole lot of hassle. The exhaust may be available now from the likes of ATS etc, I haven't checked and would consider replacing the stainless one with a 3rd party one due to the drone noise experienced with stainless one. Check the exhaust
-
Thanks Normski for the recommendation - will try and get some more guides up as I get through the jobs on the car. Ishaq - The easiest way to check if your rear brakes have seized and in all honesty it will be the rear callipers that will more than likely seize on a regular basis due to the slide pins ---- water and dirt gets through the seals on the rubber boots on the pins (unavoidable) and corrodes the pins from inside the slide pin recess on the calliper making them hard to operate properly. Anyway, the easiest way is to put your hand on each alloy wheel after driving the car and feel for a difference in heat - careful as they can get very hot - if one feels hotter than the other there's a very good chance that the brake calliper on the hotter side has seized. There's no reason to think that the cooler one hasn't seized also but its a very good / quick and easy determination of finding which one (if any) has gone and its good practise to do the other side at the same time anyway - when you have done one side you will see how easy it is to do - the fronts are a different design but the principle is the same and are again easy to do. Rather than replace the calipers it is very easy to free them if they are not too far gone - they should come off the wheel assembly quite easy even if seized - Once off use a heat source directed on the slide pin recess in short bursts until you can feel it starting to get a bit on play in the movement. I have used a plumbing torch to do mine. All you will be doing is helping to melt all the "gunk" inside the recess which will be a majority of the old grease and when you have released it you will realise what I mean as the grease will have acted as a binding agent preventing the brakes from operating properly. It could be a case that someone has done the maintenance before you and put the wrong type of grease in and that's caused the damage. Castrol LM (high melting point) grease I have used with no issues. If purchasing the rear callipers you need to be aware that in 2007 there was an update to the calliper assembly whereby they changed or revised the assembly. The easiest way to check the part required for your car would be to take your wheel off and you will see a few stamped numbers / letters on the caliper itself - something along the lines of 43 L 18 or 10 R 43 - just check this part number when looking for any new ones should you need them.
-
How exactly have you done this ... below are the basic steps You need to switch to re-circulate after pressing the start button twice. Then turn car off. Take the small glove box shelf out. Remove the panel at the back of the glove box. Remove the filter by pushing the tabs up and lift out - remember to check what way it came out. Installation is the same but in reverse If your not in the re-circulation mode then I am pretty sure there is a flap that comes up which will not allow you to take the filter out.
-
Did it not have a stainless system fitted as standard ?
-
Nice colour
-
Im with Jami - sounds like your brakes need bleeding or fluid change.
-
Yes - It is a bit of a short period but I am just doing it to see when the oil starts to change or drop - doing it every week is no hassle and I will be able to see any changes starting to happen.
-
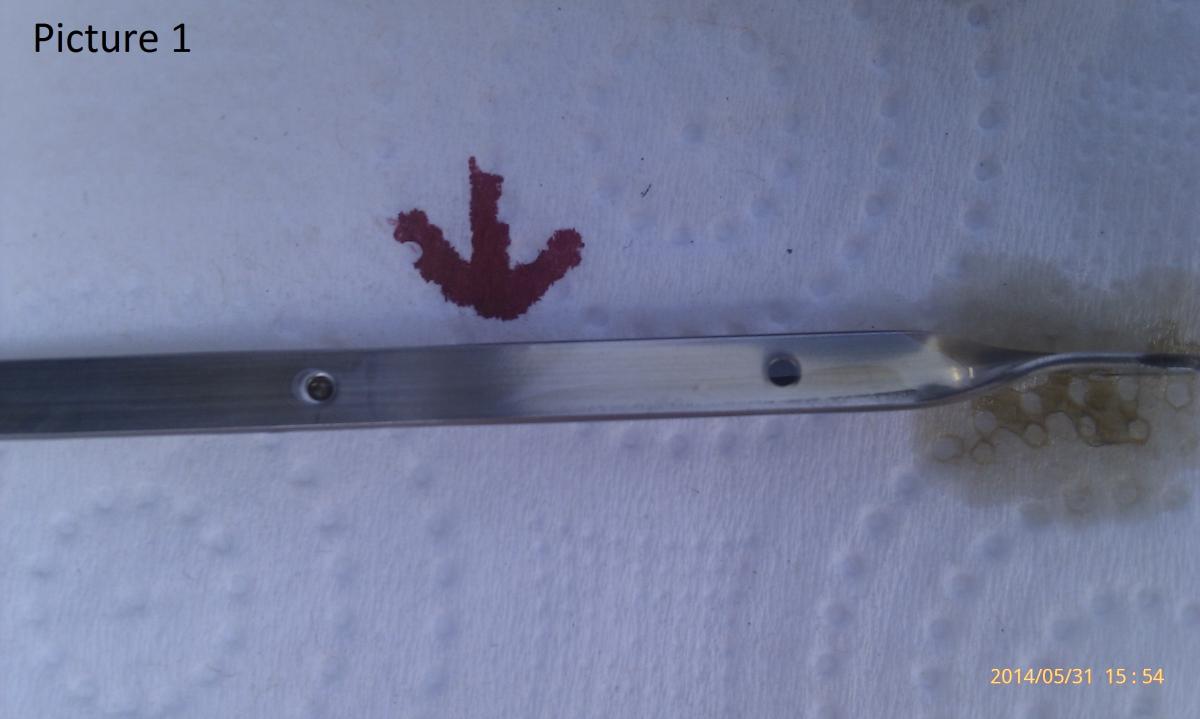
Having used Magnatec for a while now on oil changes with this car I decided to change to the Castrol Edge oil. I had found that the Magnatec goes dirty quite quick so I thought I would monitor this time just how quickly it turns a dark colour. I also thought I would monitor the oil level on a weekly basis. I took a picture of the oil after the oil change (and an engine flush) and as expected it was clean - hardly noticeable on the dip stick The oil change was done at 76,989 miles. Picture 1 is of the oil on the dip stick initially after the change (I later topped this up to the max level) Picture 2 is of the oil on the dip stick after a weeks driving and putting 311 miles on the clock. It is still as clear with no noticeable colour change or level drop. No rattles from the engine and its still as quiet as when it was when I done the change (only hear the injectors with the bonnet closed) On a run during the week I had over 41 as an average mpg. I will update again next week.
-
Has it just fallen off or has someone half inched it ...?
-
Mirrors
is200 Newbie replied to is200 Newbie's topic in Lexus IS 250 / Lexus IS 250C Club / Lexus IS 220D & IS 200D Club
Thanks Normski - yes, that's the link I found Mirrors I think are sticking after they have adjusted themselves when reversing but can be adjusted by using the manual buttons. Worth a try in cleaning them... -
You can do a quick easy replacement of the air filter to a lifetime oiled K&N one which is a direct replacement - you will notice an instant difference in acceleration and responsiveness. Not massive but its there. I bought mine for around £35 when I replaced it last year.