Leaderboard


Popular Content
Showing content with the highest reputation on 03/20/2019 in all areas
-
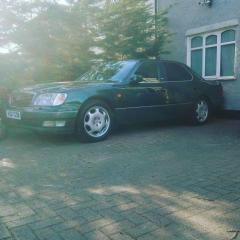
Easy one first: as far as charging the hybrid battery goes, it's all self-contained. It isn't a plug-in hybrid, so there's no equipment (special or otherwise) needed. I've recently bought one so my opinion is based on research rather than significant first-hand experience, but whilst they're complicated things they seem pretty solid from a reliability POV. That one says it's been serviced, but where? If it's a Lexus service, it should have come with a hybrid healthcheck which warranties the hybrid battery for another year / 10K - which is nice. I say should, because my understanding is that the age limit on that has recently increased from 10 to 15 years, but the dealer I spoke to wasn't sure what would happen with cars which had effectively exceeded the limit and then been brought back in by the change. Things to look for: check the boot's big enough for your needs (it ain't big!), seized rear brake calipers, leaking shocks, rusty exhausts, obviously any warning lights/messages. And I'd certainly favour a dealer history on a car like this... Overall though, if mine got written off tomorrow I'd definitely be back in another ASAP. Love it.2 points
-
The new Lexus arrived yesterday and I decided to share my first impressions. I ordered the basic Lexus IS300h with comfort pack in black metalic. The car came with the standard features including Tahara Seats, keyless entry and rearview camera. On the outside the car looks great and I definitely prefer it to the Mercedes C300h which in my opinion has started to look a bit outdated. The interior is also much nicer and the quality of the materials used in the Lexus are far more superior. I never liked the tablet style display on the Mercedes so the built in screen was a welcoming feature. The seats are rely comfortable and the synthetic Tahara leather feels really nice to the touch, time will tell if this will last. I love the clock which in the evening has really nice background glow. The drive is very different to the previous car, the Lexus feels heavier but more solid and stable on the road. The Mercedes was quicker when accelerating but also the diesel was making it very noisy when accelerating quickly. The Lexus has a complexity different style of accelerating, it seems slower but I think this is only because of the CVT gearbox and the way the engine works under heavy load. The steering is also bit heavier, it feels the same as the Merc when switch to Sport+ mode, I did like the lighter steer in Eco or Comfort when parking but I think I will get used to it. I can’t comment on the stanav and the stereo yet but it looks and sounds ok. I don’t think the satnav can beat my phone though (I use Waze on my journeys) but at least it can offer some alternitve options when needed and it is very similar to the one in the Merc. I liked the way the Mercedes had their software, it was simple and quick to navigate from one screen to another, what I saw in the Lexus was not that far off but i will need some time to work it all out. The rear space looks similar and the booth in my opinion is better, I think it might be a bit bigger but I will find out later in the week. In the Mercedes the floor was slightly raised and sloping at the back so I had to constantly rearange the luggage as it kept moving around. In the Lexus the floor is flat and it looks like it will be easier to stack suitcases there. One thing I noticed in the merc was the top of the boot area was left with bare metal and few cables were stuck and clipped to the surface, where in the Lexus everything is padded and better protected. Overal I think I made the right choice, the Lexus is slightly better car in my opinion and I think it is better built and has few more features than the merc. There are bits which I will miss from the Mercedes like the 360 camera, break hold function, automatic electric hand break, auto folding mirrors when locking the car, lighter steering, sunglasses compartment, the little horn noise when looking the car, electric booth opening and closing and the kick open function (btw I had to have the motor replaced in the merc as it stopped working and would’ve cost £1000). I suppose I need to mention that the cost of the Merc was around £40k and the Lexus IS only £33k so if you go for the higher spec model all these features probably would’ve been included. The Mercedes went back today and after two years I managed to cover around 84k miles. The car overall was very reliable and never let me down, I had the booth repaired (as I mentioned it would’ve cost around £1k if it wasn’t under warrant), few sensors failed, and the suspension started to get a bit noisy when going over bumps in the last 6 months. The stereo was also a bit temperamental and sometimes would freeze and will need a reboot. The fuel consumption also dropped over the two years from 70mpg in the first year to 55mpg in the last 8 months. It is worth mentioning that I only had to replace the rear tyres once and the front were still the original with around 3mm left. I have to make few trips in the next week and hopefully will get some more idea on how it all compares and especially what the fuel consumption is as this was also a big factor when I was choosing the car. I hope all this helps, feel free to ask if you have any questions about the merc or the new Lexus.
 2 points
 -
Brake disc change on my 2010 is250 SEL Auto on 18” rims. I checked my caliper slide pins at the beginning of the month and found my brake pads were all a bit worn down so changed the pads to my new set of Pagid pads that I had bought in advance. Whilst doing this I couldn’t help but notice the actual discs were also really quite worn. The fronts (which do most of the work) were really quite badly worn with a very noticeable deep lip at the outer edge. So I made a few notes and checked a few diameters and thicknesses while it was all exposed and pressed on with the pin check and pad change. Pretty sure that would be a MOT fail come November, when it's due! Having established the sizes I ordered up a complete set of discs. Check your specific types as there are a few variations of disc … not just diameter, some are solid discs too. My model has vented discs front and back. The fronts are 296mm dia and 28mm thick. The rears are 310mm dia and 18mm thick. The set I purchased were Mintex at a very good price of £108 for the whole set delivered. Having seen how shoddy the old discs looked I thought I’d do a bit or prep work on them before fitting. I had some spray cans of silver and a black hammerite to hand so put them to good use. Probably turn out to be pointless but heck they'll look good for a while!!! All the pad contact areas and the shoe contact point on the rear discs were masked up…. but deliberately just a little under-sized. I figured the pads would cut back the very outer margins of the 'inner' and 'outer' to re-reveal the silver of the disc, thereby keeping a tidy looking disc. They can look quite shabby when the rusty surface gets a grip on everything outside the contact area. Having masked up the contact points I marked the relevant circles with a felt pen and the trimmed with a Stanley knife. This was made easy by using a 10” turntable with a piece of cardboard over to protect it. Then the inside faces were sprayed silver and the outside faces in black, again making using use of the improvised turntable. I should have left these for about 5 weeks to fully cure but other commitments and an imminent trip to the Picos de Europa and various Rioja valley bodegas' have put paid to that! They got 2 weeks. Then it was on to fitting …. I worked off the jack .... not for some I'll grant. The other three wheels were chocked for safety. All the slide pins have rubber boots fitted so be careful with easing them off when removing slide pins. Front Discs. Loosen the wheel nuts a tad before raising the wheel. Apply the parking brake. Raise the bonnet and remove the brake fluid reservoir lid and put an old towel or similar under the resvoir … just in case you get absent minded later!! I then removed a small amount of brake fluid, about two table spoons, with a syringe to another clean pot. Then remove the wheel and put to one side. I chose to gently squeeze the caliper just enough to slacken the pad grip. There are two caliper pin bolts to remove (14mm socket or spanner) and if you need to prevent the pin moving you’ll need a 17mm spanner. Then remove the caliper and rest it on an old towel on the suspension… just be wary of the hydraulic pipe. You don’t want to stretch or kink it. Some folk opt to hang it up with a bent wire or similar….up to you. I then use a G clamp and a piece of wood to squeeze, gently, the caliper piston back into its housing. The new disc and pads will be thicker than your original set so you need that piston pushed back or it will not fit over the pads at re-assembly. Pushing the piston back will raise the fluid level in the reservoir … that’s why you need to remove some. Keep an eye on the level each time you push a piston back. Remove the pads and put to one side. Then you’ll need a 17mm socket to remove the bolts that hold the caliper carrier in place. It’s likely the front disc will now be loose and easy to remove …. mine were. If it is stuck fast you’ll need a couple of 8mm bolts to wind into the 2 threaded holes to push the disc off the hub. Here's an internet pic, credit to original uploader, to give an idea of using the 8mm bolts to crack off the disc from the hub. The arrows point to the threaded holes. Give the hub a bit of a clean up with a wire brush and apply a little anti-seize copper grease to the contact face of the hub…it will help with disc removal next time. Then fit the new disc onto the hub. I used the wheel nuts to pull the disc securely onto the hub and visually checked it was spinning without any wobble. Front disc, carrier and pads fitted Then refit the carrier and refit the pads being mindful of the shims. I use a little copper grease on the shims and have not had any squeal in 6 years. Some prefer to use Ceratec grease. The choice is yours. I checked the slide pins and then refitted the caliper and bolted down securely. Then refit the wheel, start the car and prime the brakes with a couple of presses on the brake pedal. On to the next! old front discs Rear Discs. Slightly different process here. Loosen the wheel nuts before raising the wheel. Do not apply the parking brake and put the shifter into Neutral (not P). If you don’t do this you won’t be able to turn the hub and the brake will hold the disc to the hub preventing removal. Remove the wheel and put to one side. Next remove the guide pin retainer spring…fitted vertically between the two pins and slide out the pins. A pair of long-nose pliers do this nicely. There is an anti-squeal spring associated with the lower pin… so note how it locates for reassembly. Gentle squeeze on the caliper may be necessary to free up the pads. Then remove the pads. Then undo the upper caliper pin, I think it was 17mm socket, and remove it completely. The caliper should now rotate towards the rear of the car…its pivot point is the lower slide pin. This lower pin is fixed. Wiggle the caliper backwards and put aside in a secure place on that old piece of towel. Again, careful with that hydraulic pipe! There is a rubber grommet fixed in the disc … this covers a hole for adjusting the parking brake. Remove it and keep it for placement into your new disc. Now remove the old disc. Mine were ‘frozen’ solid (both sides) and would not budge. So it’s time to use those 8mm bolts again! A snick and a snack and it’s loose enough to remove. Now clean the parking brake shoes and parts with brake cleaner. You will be able now to see the adjuster for the footbrake and how it works. These shoes are only used for parking so are highly unlikely to be worn. But you may need to adjust the shoe to the new hub. If you turn the cog wheel you’ll see the pads move in and out. When the disc is fitted that circular access hole allows for a screwdriver to enter and engage with that cogged adjuster. Once again, give the hub a bit of a clean up with a wire brush and apply a little anti-seize copper grease to the contact face of the hub…it will help with disc removal next time. Then fit the new disc onto the hub. Again I used the wheel nuts to pull the disc securely onto the hub and visually checked it was spinning without any wobble. So, back to that access hole again and screw up the adjuster until the disc is locked, then undo it about 6 teeth and check the parking brake operation - it should go down 7 clicks or so to engage securely. Again, you will need to push that caliper piston right back to get it to fit the width of disc and pads. Keep an eye on that fluid reservoir each time you push a piston back. You don’t want that brake oil oozing all over the place!! Grease (red rubber grease) the slide pins and refit the caliper securing the upper slide pin Refit the pads with a liitle copper grease on the shims and fit the upper guide pin to hold the pads in place. Position the anti-squeal spring and slide the guide pin through both pads and the coils of the anti-squeal spring and push the tags back into the centre holes of the pads. Then refit the retaining spring. Wipe off any mucky bits resulting from the refit and ensure the brake contact area is clean. Then refit the wheel, start the car and prime the brakes with a couple of presses on the brake pedal. I then took the car for a gentle low speed drive 20-40mph and gently bedded the brakes onto the discs for about 15 mins. I’m not sure if this is critical but it felt the right thing to do …. I recall my Dad used to do that! After a cuppa had a longer 30 minute drive at gently increasing speed with braking (when nowt was around...pretty easy in Dorset!!) and all feels good. Front and Back all refitted and bedding in nicely! It’s not a particularly challenging task, if you’re up to a bit of spannering. Just take your time and be methodical. Take pics of any unfamiliar parts and how they assemble to refer back to. In total, with a few cups of tea and the odd slice of cake and one ear on the football scores, it was nearly 4 hours start to finish. Total parts cost was around £150 ....better than the £700+ quoted by u know who!! Credit to Newbie and Johnatg for doing this in the past. Your guides gave me the encouragement to have a bash at something I knew couldn't be that difficult.
1 point
-
Hi everyone, I thought I should share this with you: Recently, whilst driving I was checking my emails using the Lexus phone system (when the car was stationary) and I noticed that there is a reply button, if you open your message for both emails and texts. So I pressed this reply button to see what it actually does and I was delighted to see that it offers 15 ready made messages that I can chose from and reply with. I was pleasantly surprised to be honest as I was not expecting this to be an available option and you can even customise any of the ready messages and retype what you would want to respond instead. I really think it is a great option if you want to reply on the move quickly and legally. I do not recall this as an available option with any of the previous cars I had driven before. Well done Lexus!1 point
-
Just had car pass MOT (Brilliant). Car done 195K, but when I took it in I said to look at UCAs as I get a slight knock on speed humps and some road dips (not all the time) and what feels like a vibration, but is not a vibration, more a sense of road rumble. Mechanic says the control arms looking okay (which surprises me at this mileage). Mechanic thinks road rumble at around 40mph, is mainly tyres (could be right as this effect seems to have been there since new tyres 5 months back). However he did say anti-roll bars are looking a bit sad, and will need doing. Questions: Is it best to go for OEM anti-roll, or worth a punt on other makes and what sort of cost should I be looking at. My mechanic will use genuine when I insist, and usually he knows his stuff, as he sorted out my brakes, which no else seemed to manage. Tyres by the way are Nexen Maxxis, so if they are a problem, might move them to rear when I have to get new rears in next month or so, and see what happens. I know a few people have Nexen makes on their LS, anyone else ever had more road rumble than expected with Nexens, they are pretty hard wearing though, my current rear Nexen Blues have done around 35000 miles which is pretty amazing and still have about 3000 left in them. Any advice appreciated. Also to say - Had the sparks changed, and amazed at difference it makes, engine seems a little quiter and pulls even better, and 'odd' gear changes I have been getting seemed to have gone (mainly when negotiating steep downhill section on final run home).1 point
-
Anyone struggling with the front strut air suspension bearing problem...creaking noise...and the apparently only solution..ie whole new strut...not so..check out Orchard Engineering in Cheltenham..this guy can fix it 😁1 point
-
I believe you can check a reference number of your satnav on the Lexus website, if it's over a certain value then you can download a map update and indeed apply it via a USB stick. It's been on my list of things to do for a looong time. One of these days 🙂1 point
-
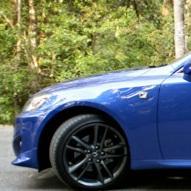
I'd forgotten how refined these cars are when not pushing on. It would definitely appear that Lexus has tweaked the powertrain too - I don't find I have to mash the throttle into the carpet to make decent progress in Normal mode. Very happy so far, 1700 miles on the clock.1 point
-
You may want to read this thread... There are other threads on the same topic that are worth reading1 point
-
Given that you are a new owner and you may want to do a few bits yourself. Please take a few minutes to read this before you attempt changing the cabin filter behind the golvebox. This may be useful as well Incidentally, I have 6 CD's full of Mp3's loaded in my player and they work fine. As you found ... DVD's full of Mp3's do not. Enjoy getting to know your car. I think they are quite excellent cars.1 point
-
Sounds good Scott1 point
-
If you want to post a link, click the chain icon on the toolbar and paste the link in the top box then add text in the bottom box and it becomes the clickable link like this.
1 point
-
DZUS fasteners! Now that brings back memories........thanks for posting Herbie.1 point
-
I know someone who just sold one. He had it on his ls430 and it worked a treat1 point
-
Welcome back Paul1 point
-
Having previously owned a 2014 IS300h f sport (ex Sir Geoff Hurst) I am currently in a2018 loan IS300h executive which I agree feels a lot quicker and is certainly more economical than the earlier version.1 point
-
When you take delivery of the Lexus it would be great if you could write a comparison of the two cars. I imagine they are aimed at the same market segment so it would be nice to hear what their good points and bad points are.1 point
-
+1 on loosening the bleed nipple method for various reasons, 1 it periodically ensures the nipple is not siezed! 2 if the flexi brake hose is suitable clamped then fluid cannot be 'pushed back into master cylinder' 3 it allows a small amount of brake fluid to be removed ( master cylinder will therefore need topping up afterwards) and it will be the fluid that has been living and working in the most hostile environment and exposed to extremes of temperatures so this will be a good thing. paul m.1 point
-
Surely it is far easier to slacken off the caliper bleed nipple, fit a suitable piece of plastic tube over the nipple into a container then gently push back the pistons rather than risk seal damage further up the system?1 point
-
I do track days on my bike the tyre pressures have to be reduced by around 8psi frt and 10psi rear after checking after a few laps the increase is around 4-6 lbs psi it increases quite a way above possibly same with the cars in hot weather.1 point
-
Yes - seems that way. Have driven it last night and for some time this morning and it seems fine. I'm just imagining the Lexus dealership story - we've tested it Sir (£79) and its reporting a faulty ABS sensor so we've changed it (£150, I checked) and reset the warning messages - so it's just the parts and a couple of hours labour... Here's an invoice for £600 - and look how clean it is! Errr... Thanks! Sent from my iPhone using Tapatalk1 point
-
...and if anyone would like a laugh - then I'd also completely forgotten that my car has a dashcam fitted. I've now reviewed the journey that my wife took on Sunday afternoon... She was in a hurry... Sets off from home, and within 50 yards passes over a speed-table at normal speed, without any braking or consideration for it at all. 50 yards later there's a slightly raised mini roundabout - and she also goes directly over the top of it (you can hear the suspension "thunks" as she takes it). Almost simultaneously with taking the mini roundabout at speed you can hear the "ping ping" noise, that the dash makes when it displays a warning message. She doesn't seem to notice this, or just ignores it. Around 20s later the dash again pings twice, and obviously continues to flash up messages. At this point she is heard to mutter "What's going on here?" and stops the car for about 10s - only to then just continue driving. At this point she's less than 300 yards from home. A short while later, when around a mile away from home she calls me for a "Is your car OK to drive with these messages popping up?" conversation. We've now had a discussion about the true course of events and the subject of "mechanical sympathy" where road surfaces are concerned.1 point
-
why would you want to put it under stress - i know i wouldnt be towing anything in a £48K car!0 points


.png.714ea85e2770c76481faa8399ea9dfb1.png)