

sir john
-
Posts
470 -
Joined
-
Last visited
Content Type
Profiles
Forums
Events
Store
Gallery
Tutorials
Lexus Owners Club
Gold Membership Discounts
Lexus Owners Club Video
News & Articles
Everything posted by sir john
-
 I had this problem with my LS. I replaced the upper wishbones and some other bushes. Not a simple job but it fixed the problem.
 -
The PAS fluid is costing me a small fortune so its time to send the car down the road (scrap) or repair it. There are a couple of second hand racks on ebay (new one from the dealers is £1,264 + vat, and thats after a discount). I am handy at "spinning the spanners" but im wondering how to go about replacing the rack. It looks like a pig of a job. Any tips????? My main worry is getting the steering shaft out of the rack; the part with the universal joint??

-
I have always used Castrol Magetic and always changed it myself. I simply would not let anyone else do it. I have seen too many garage mechanics (and Im not saying they are all the same) drop the oil, change the filter and replace the drain plug before all the oil has stopped dribbling out of the engine. Not for me.
-
Massive thanks to Steve, Ive put that link into my favourites. reading it it doent sound too bad. Looks like the old girl will make 20 after all. Its her birthday in December.
-
Impressive. That's why you're a sir and I'm just a carpenter! Im just plain old Jonathan. I registered on the forum on 2008 (never been on one before) as Sir Johns Lexus because my LS was first owned by Sir John Harvey Jones. I didnt think Sir John was going to come up on my posts. I just put Sir Johns Lexus because I couldnt think of anything else to put and It used to be his Lexus. Its just coincidence that my name of jonathan.And your not "just a carpenter" your a carpenter and a bloody good one too ill bet.
-
Thanks for all the help guys. I always do my own mantainance and repairs no matter what it is. Dont have a manual though. I seem to remember there is one on cd or dvd?? The-Acre, I am an Independent Financial Adviser (IFA). You had to be qualified to practice and register with the FSA anyway but the FSA decided that all IFAs had to requalify before Jan 1st 2013. So thats what it was for, Diploma for Financial Advisers (DipFA). It cost me 2 to 3 months of study time last year. Just to qualify for a job I was already qualified for.
-
How nice of you The-Acre,Havent been active on teh forum since june 2012 when I changed the rear wishbones and discs because ive been busy doing a Diploma and keeping the Rover 75 on the road. The LS has been faultless since then too. Re the issue I have now; Ive found a second hand rack on ebay for £60 delivered. I think thats the way to go. Anyone got a How-To or advice for changing the whole rack??? Big hugs all round.
-
Ls400 / 95 Rear Springs & Rear Upper Arm/ball Joint
sir john replied to Neil99's topic in Brakes & Suspension
Correction; the rear wishbones were £250 from Lexus Coventry. If you havent done the job yet, heres how; Here is a quick “how to” for replacing the rear upper wishbone that carries the upper ball joints, without having to removing the drive/half shafts. I’m not an author or a trained mechanic so, don’t shoot me down if this isn’t text book and doesn’t read well. It’s also 2 weeks since I did the job so it’s also from memory. Usual rider; you are responsible for ensuring your own safety and your own workmanship. This is just what I did and is meant to be a guide only, its not advice. (If you think you are going to squash yourself under your car, drop me a PM beforehand and I’ll sort you out with some life insurance; I’m an Independent Financial Adviser. It’s what I do). Here we go then. The upper rear ball joints had too much play in them for about 12 months now so needed replacing. My car is a 93 LS so everything will have been good and rusty so here what I did. August 2011; cleaned (wire brush) all the nuts and bolt that I thought I would have to remove and treated them to a good bath of WD40. This included everything around the rear suspension. Between then and now (June 2012) I have repeated this about 6 times and it’s paid off because there were no dramas in getting anything apart. Parts from Lexus Coventry were £253 delivered (i live in Cumbria); I haggled a 15% discount and Coventry gave me excellent service and even photocopied a few pages from the workshop manual for me. The removal procedure is as follows; Remove the seats and rear parcel shelf. This will give you access to the top of the rear shockers (more on this later). Jack up both sides of the rear of the car and support on axle stands. I always lower the car onto these and then wind the jack back up so it is “just” taking some of the weight (I like the belt and braces approach) and i have 2 jacks. Remove the road wheels and slide them under the car just below the rear foot well (more safety). Remove the rear callipers from the hub and wire up out of the way. I removed the pads as well, because I replaced the rear discs and pads while I was doing this job. Using spring compressors, compress the rear suspension spring down to about 8” so that you can remove the shocker and spring as one assembly. You cannot change the wish bone without removing the shocker and spring assembly. And you wont get the shocker and spring out without compressing the spring. Undo the nut at the bottom of the shock absorber but do not remove the bolt yet. Now that the rear suspension spring is compressed you can undo the top nut from inside the car. This is why you removed the rear seats and parcel shelf. Under the parcel shelf at the bottom corner of the rear screen, on each side there is an inverted steel cup held down with 3 nuts. Remove this and put to one side. Under this cup is a 14mm nut that you need to remove. This is what holds the top of the shocker in place. You are now ready to remove the bolt that holds the bottom of the shock. I used a ¼” socket extension bar to push it out. You should now be able to push the shocker upwards so that you can remove it from the car. It’s a bit tricky and you might have to compress the spring a little more to get it out. Warning; be careful because if the compressor clamps come of the spring while you are doing this it will take your fingers off; really. Put this shocker and spring unit to one side. I took the pressure of the spring so as not to stress it for too long. Undo the 2x 10mm nuts that hold a U shaped clamp to the wishbone and tie out of the way. You are now ready to remove the rear upper wishbone and ball joint. You will need a 12 point and a 6 point 19mm socket, a straight 19mm open and ring spanner and a double cranked 19mm ring spanner. If you haven’t got a double cranked 19mm ring spanner you will not be able to get the wishbone off. Having the shocker removed will give you just enough access to get your (probably newly acquired) double cranked 19mm ring spanner onto the nut that holds the ball joint. You will be on your back under the car and it will be very tight but your months of cleaning and oiling with WD40 will have paid off. Mine had been on for 19 years but I got them off with just the ring spanner without drama. Here is the big tip; access to this nut is really restricted. As the nut winds down the thread of the ball joint, there comes a point when you cannot drop the ring spanner off the nut to move the spanner round another 1/8 turn without tightening the nut back up. So you have to wind the nut back up until you can slide the ring spanner out. Carry on with the open end 19mm and the nut falls off into your hand. Well actually, it will probably fall onto the floor and roll off onto the dust and dirt but you shouldnt be reusing it anyway. Next, using a trolley jack, take the weight of the rear hug. Remove the 2 nuts and bolts that hold the other 2, inner ends of the wishbone and slide out the bolts, taking care to make sure that the wishbone and hub don’t fall outwards towards you and pull at the drive/half shafts. (Months of cleaning and WD40 pays off again because I had no problem getting these out. All that should be holding the old wishbone in place now is the ball joint. I have forked ball joint splitter but for me these are a last resort because they damage whatever you hammer them into. Take a decent hammer and give the old wishbone a few clean horizontal knocks at the side of the ball joint and it will just drop out (don’t hit the hub. You don’t have to). And that’s it. The old wishbone is removed without removing the drive/half shafts. Fitting the new wishbone is simply the reverse procedure. Here are a couple of tips that might save you the time that I lost. Tip 1; if the new ball joint turns while you are trying to tighten a NEW nut onto it, you can use a G clamp to hold the new wishbone and hub together. It holds the ball joint just tight enough to get the nut on. Tip 2; the new wishbones from Lexus don’t come with the ball joint nut. You have to order them separately; £1.06 each. DO NOT REUSE A BALL JOINT NUT. Tip 3; And this drove me mad until I spotted what was wrong (and to think that 2 years ago I replaced both rear springs and should have known this). The thread on the top of the shocker has 2 flats on it where it passes through the underside of the rear parcel shelf. 1 at each side. It won’t go through the hole in the rear parcel shelf unless you line these up properly. Jiggle it about until you get the top thread through the hole and get someone inside the rear of the car to get a couple of turn on the top nut when it comes through. I managed this on my own but I’m a hero (No really!; I wear my undies on the outside of my pants and fly through the air at night looking for villans and righting wrongs). You can now push the bottom of the shocker into place and slide the bottom bolt into it. Then remove the spring compressors. Footnote; I was dreading this job but it wasn’t that bad. Mainly because I have spent nearly 10 months spraying WD40 at it. It took me a couple of days but that included cleaning all the dried dirt off the underside of the rear end and wax oiling everything that I could get to (I got 12kg of dry dirt, just off the back end). The 2 days also included changing the discs and pads and cleaning the inside of the car. I have taken the time to type this up because I would have liked to have had something similar before starting the job myself. I hope that someone finds it useful. And if you need an IFA drop me a PM and I'll have a chat with you. -
Ls400 / 95 Rear Springs & Rear Upper Arm/ball Joint
sir john replied to Neil99's topic in Brakes & Suspension
I replaced my rear springs about 3 yrs ago; from memory about £60 for the pair from a factor. Upper wishbone/ball joint is a dealer only thing unless you can find a pair of second hand units that arent knackered. I went to Lexus from mine last year; £350 delivered. I phoned a few dealers to haggle for the best price. My advice would be to wire brush all the nuts and bolts you need to remove and spray with WD40. I did this about 6 times over a 12 month period prior to doing the wishbones. Everything came apart without drama. I posted a How-To on here detailing every step of the proceedure. Might be worth a search. -
Royt, you are a star. Where did you get the information from? and are there any diagrams with parts labeled? Im going to PM Benfur and get in touch with the Lexus dealers to find out if a replacement unit is cost effective or if there is a repair kit for it.
-
really!!!! 35 urban and 50 on a run?
-
Mark, what do you get to the gallon on gas in your old 400? I might be in teh market.
-
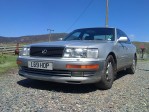
Thanks for that Steve, Looking at my photo and the exploded diagram on your link it looks like it will be a pig to fix. I dont even know if i will be able to unfasten that knuckle joint so that I stand a chance of replacing the whole unit; the cast part i mean, not the whole rack. At a cursory glance, the rack looks like a big job to remove. Has anyone got any details about removing this case part for repair or replacement? I dont want to see the old girl fade away. It isnt many cars you buy as a 1 month stop gap and get so attached to that you still have her 5 years later. Listern to me referring to the car as "her"; I must be mad!
-
At the top right corner of the picture is a universal knuckle joint; top half dry bottom half wet; directly under the wet half of the knuckle joint you can see a rubber cap (sitting on top of the cast body that the 2 snaking pipes attach to). Its from under that rubber cap that the fluid is leaking. What looks like corrosion is a build up of dust and fluid. I topped up the fluid when SWMBO was going shopping last week because i could hear the PAS pump whining. Ive just checked and its not showing on the dip stick. Or course ive topped it up again but I dont think it will be in there long.
-
Thanks for the replies guys. It doesn't sound like its a common failure. I have never seen it on the forum before. If its expensive or very difficult to repair it might just spell the end for the old girl.
-
Hi All, not been on here for ages because the old girl rarely goes wrong and im always busy fixing the Rover 75. Anyway, I was under the LS (1993and 190k miles ) repairing the Y pipe again when i noticed I have a major leak of fluid, as in dribbling from under a rubber seal at the top just under the knuckle joint, on the off side of the steering rack. Please tell me there is an easy repair for this and its not going to need the rack removing.
-
Thanks for the responses and ideas guys. Its not worth buying new cats and y pipes. The cars is 19 yrs old, on 191k miles and is not mint. I have tried the super steel type stuff a coulpe of times and it does do the job, but it nly lasts a few months. My other thought, and im sure i have seen these somewhere, is bolt on flanges. A flange in 2 halves that bolt together to form 1 flange. 1 of these for each cat and 1 for each end of the Y pipe. Hope that makes sense. Problem is, i cannot remember where i saw them.
-
Good point. Thanks for that Mark. It is obvious but I would have forgotten to do it.
-
I have botched this up with various types of "metal in a tube" things for the past 3 years now. Im think about permanent salutions now. Option 1; pay someone to weld the pipes; c£60. Option 2; buy a MIG welder and have a go myself; c£150 and I will have a welder at the end on the job. If I do it myself I will be doing it with the pipes still on the car.
-
Hmmmmmm. Thanks for that Malc.Could be worth looking at. The drips so fluid on the sump are the worrying thing though.
-
Its leaking more now. Got back from a drive to suffolk and back (650 miles +) and I had to put water in it. Bugger! That was tuesday. Now, Friday, its dropped back to its old level. Time to keep an eye on it. Glad I took the AA Breakdown Repair Cover last month.
-
My dad has classic car insurance on his 1993 merc 190e. I will ask him at the weekend which company he uses, but im sure that if you get a copy of any classic car mag there will be loads of insurance companies in there willing to insure an old Lexus. Why havent i done it for my 93 LS400? Because i need cover for business miles.
-
Ac Not Working
sir john replied to sir john's topic in LS 400 / Lexus LS 430 / Lexus LS 460 / Lexus 600h / Lexus 500h Club
This might help http://www.lexls.com/tutorials/air/ Mike Thanks for that Mike. I didnt know it had a diagnostice mode. Unforunately though, the LCD on my car is kaput and i cannot read the codes. Thanks anyway. -
Ac Not Working
sir john replied to sir john's topic in LS 400 / Lexus LS 430 / Lexus LS 460 / Lexus 600h / Lexus 500h Club
Up date. Been out for a root about. No fuses with AC for AC. Coolant was non-existant in the expansion bottle so ive topped it up. Didnt take much. Temp guage was a touch lower than normal on the way down to Suffolk and back. Put this down to the rubbich weather. EDIT; there is a tittering/ticking noise coming from the engine too. Seems to be coming from the rear of the engine rather than the front. -
Just driven 330 miles back home without AC. Not nice. Always ice cold before. Now it might as well not be there. I dont think the pump is working because when I idle the engine and switch the AC on, the revs do not increase as they used to. I havent had chance to check the fuse yet. Any other ideas? And where is the AC pump?


