Monocle
-
Posts
167 -
Joined
-
Last visited
Content Type
Profiles
Forums
Events
Store
Gallery
Tutorials
Lexus Owners Club
Gold Membership Discounts
Lexus Owners Club Video
News & Articles
Everything posted by Monocle
-
100k Club
Monocle replied to is200 Newbie's topic in Lexus IS 250 / Lexus IS 250C Club / Lexus IS 220D & IS 200D Club
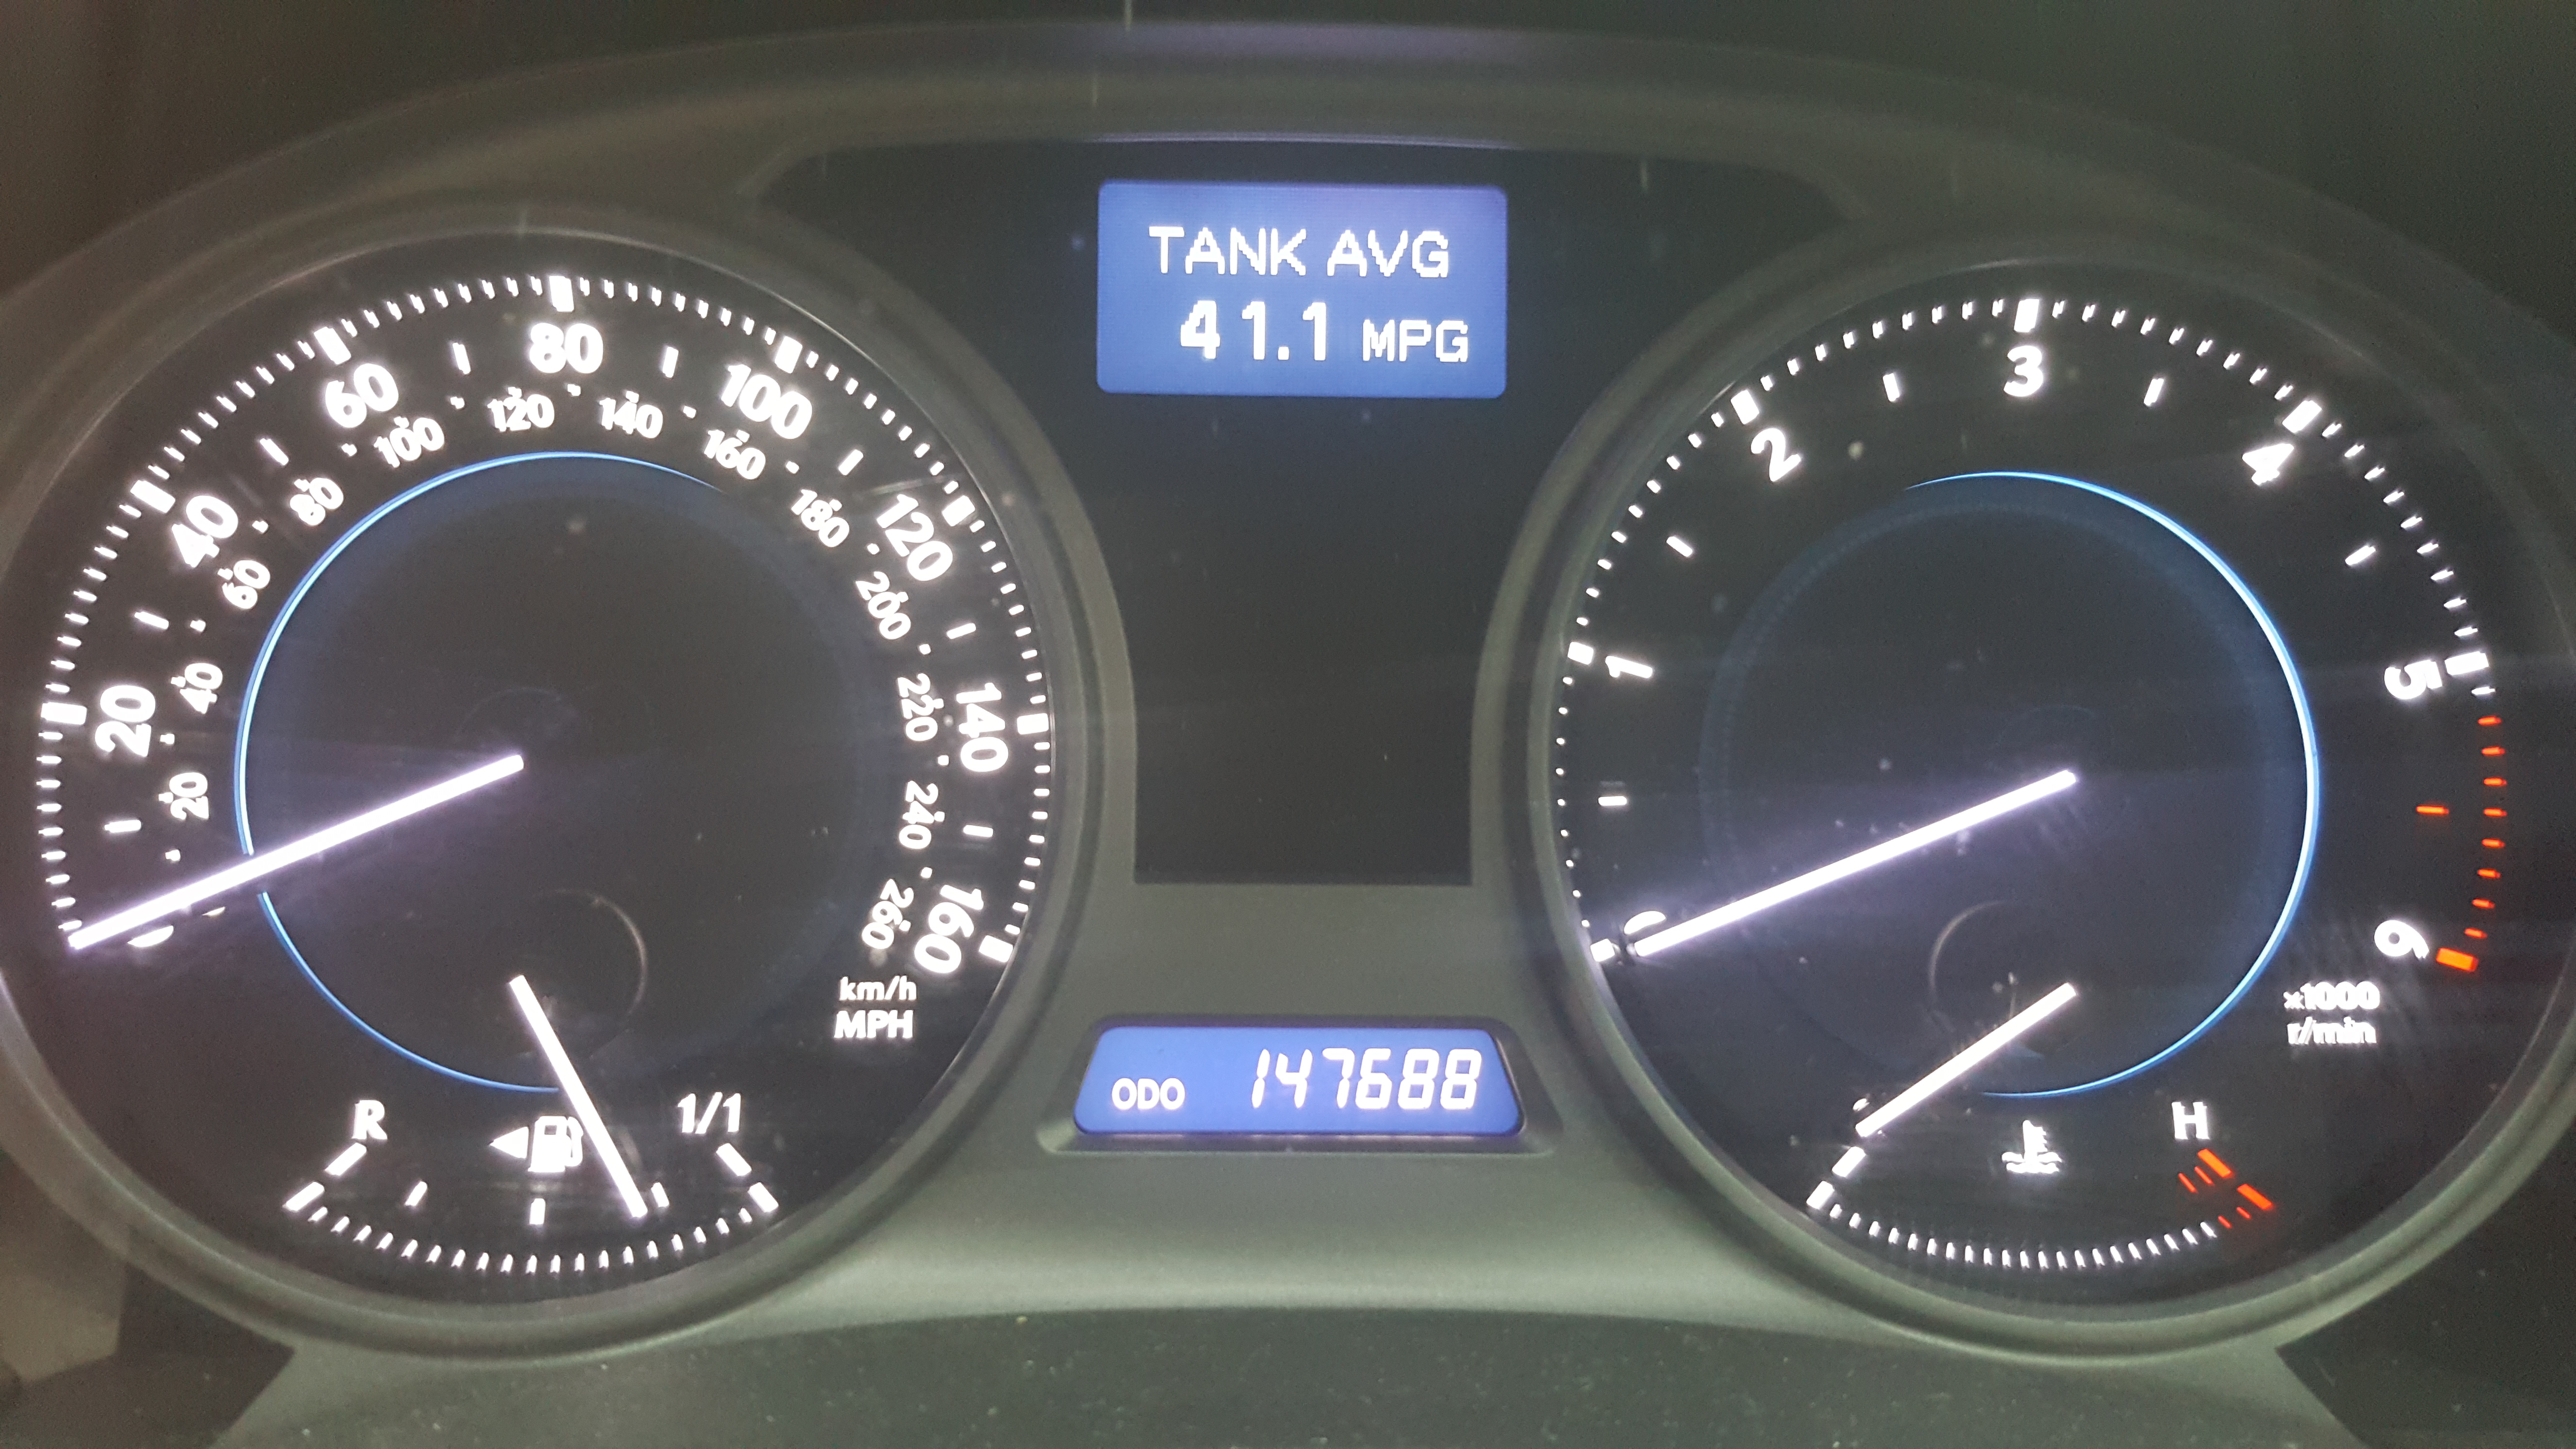
Is220d Sep 2007. Had since Mar 2010 at 30k miles. Come a long way since! The tank average below is not normal - usually around 35mpg max of late.
-
Looks fantastic Normski, well done! Great colour too. I did mine last Summer using VHT spray paint. The cleaning was the most important and difficult part I found. It's now nearly a year and I inspected them yesterday. Three of them are still in perfect condition but for some reason one is really corroded. No idea why. Will be redoing it again in a couple of weeks. I think the Hammerite option might be a better bet. You can really slap it on thick unlike the spray which tends to run.
-
Thanks Lee and Chris. Well I think it is safe to say that I got very lucky! My god that is horrendous and scary!
-
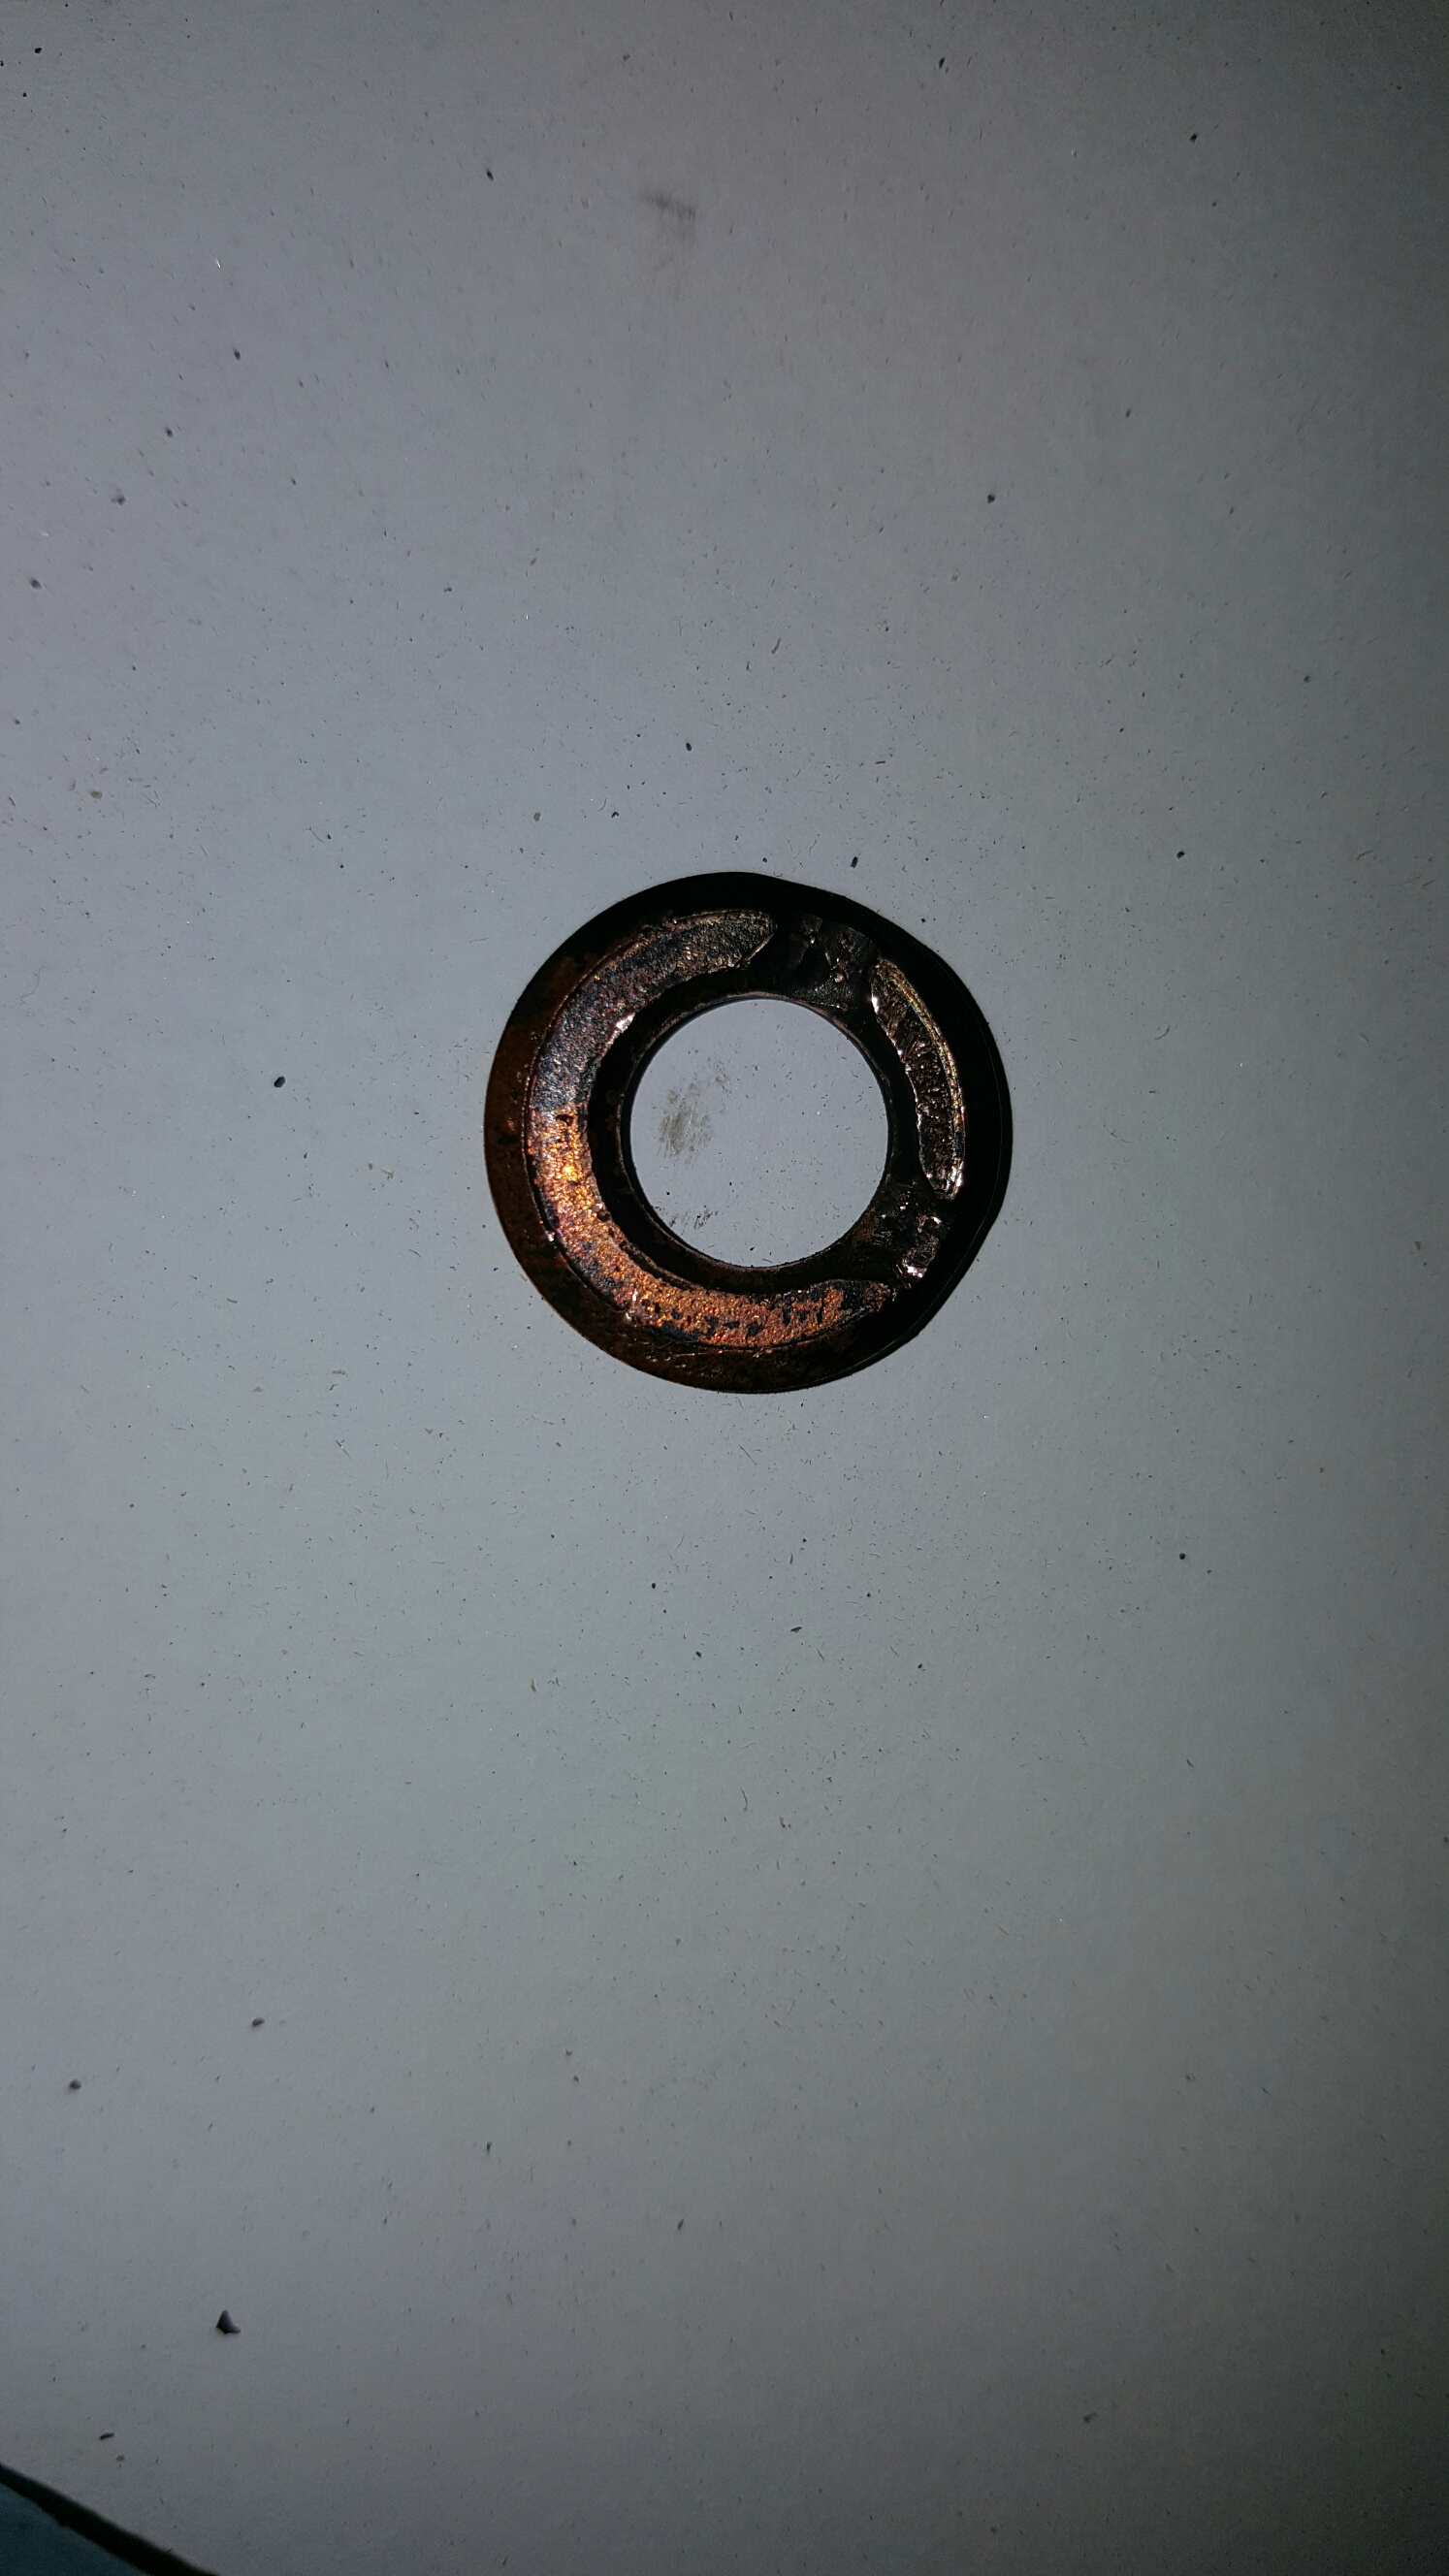
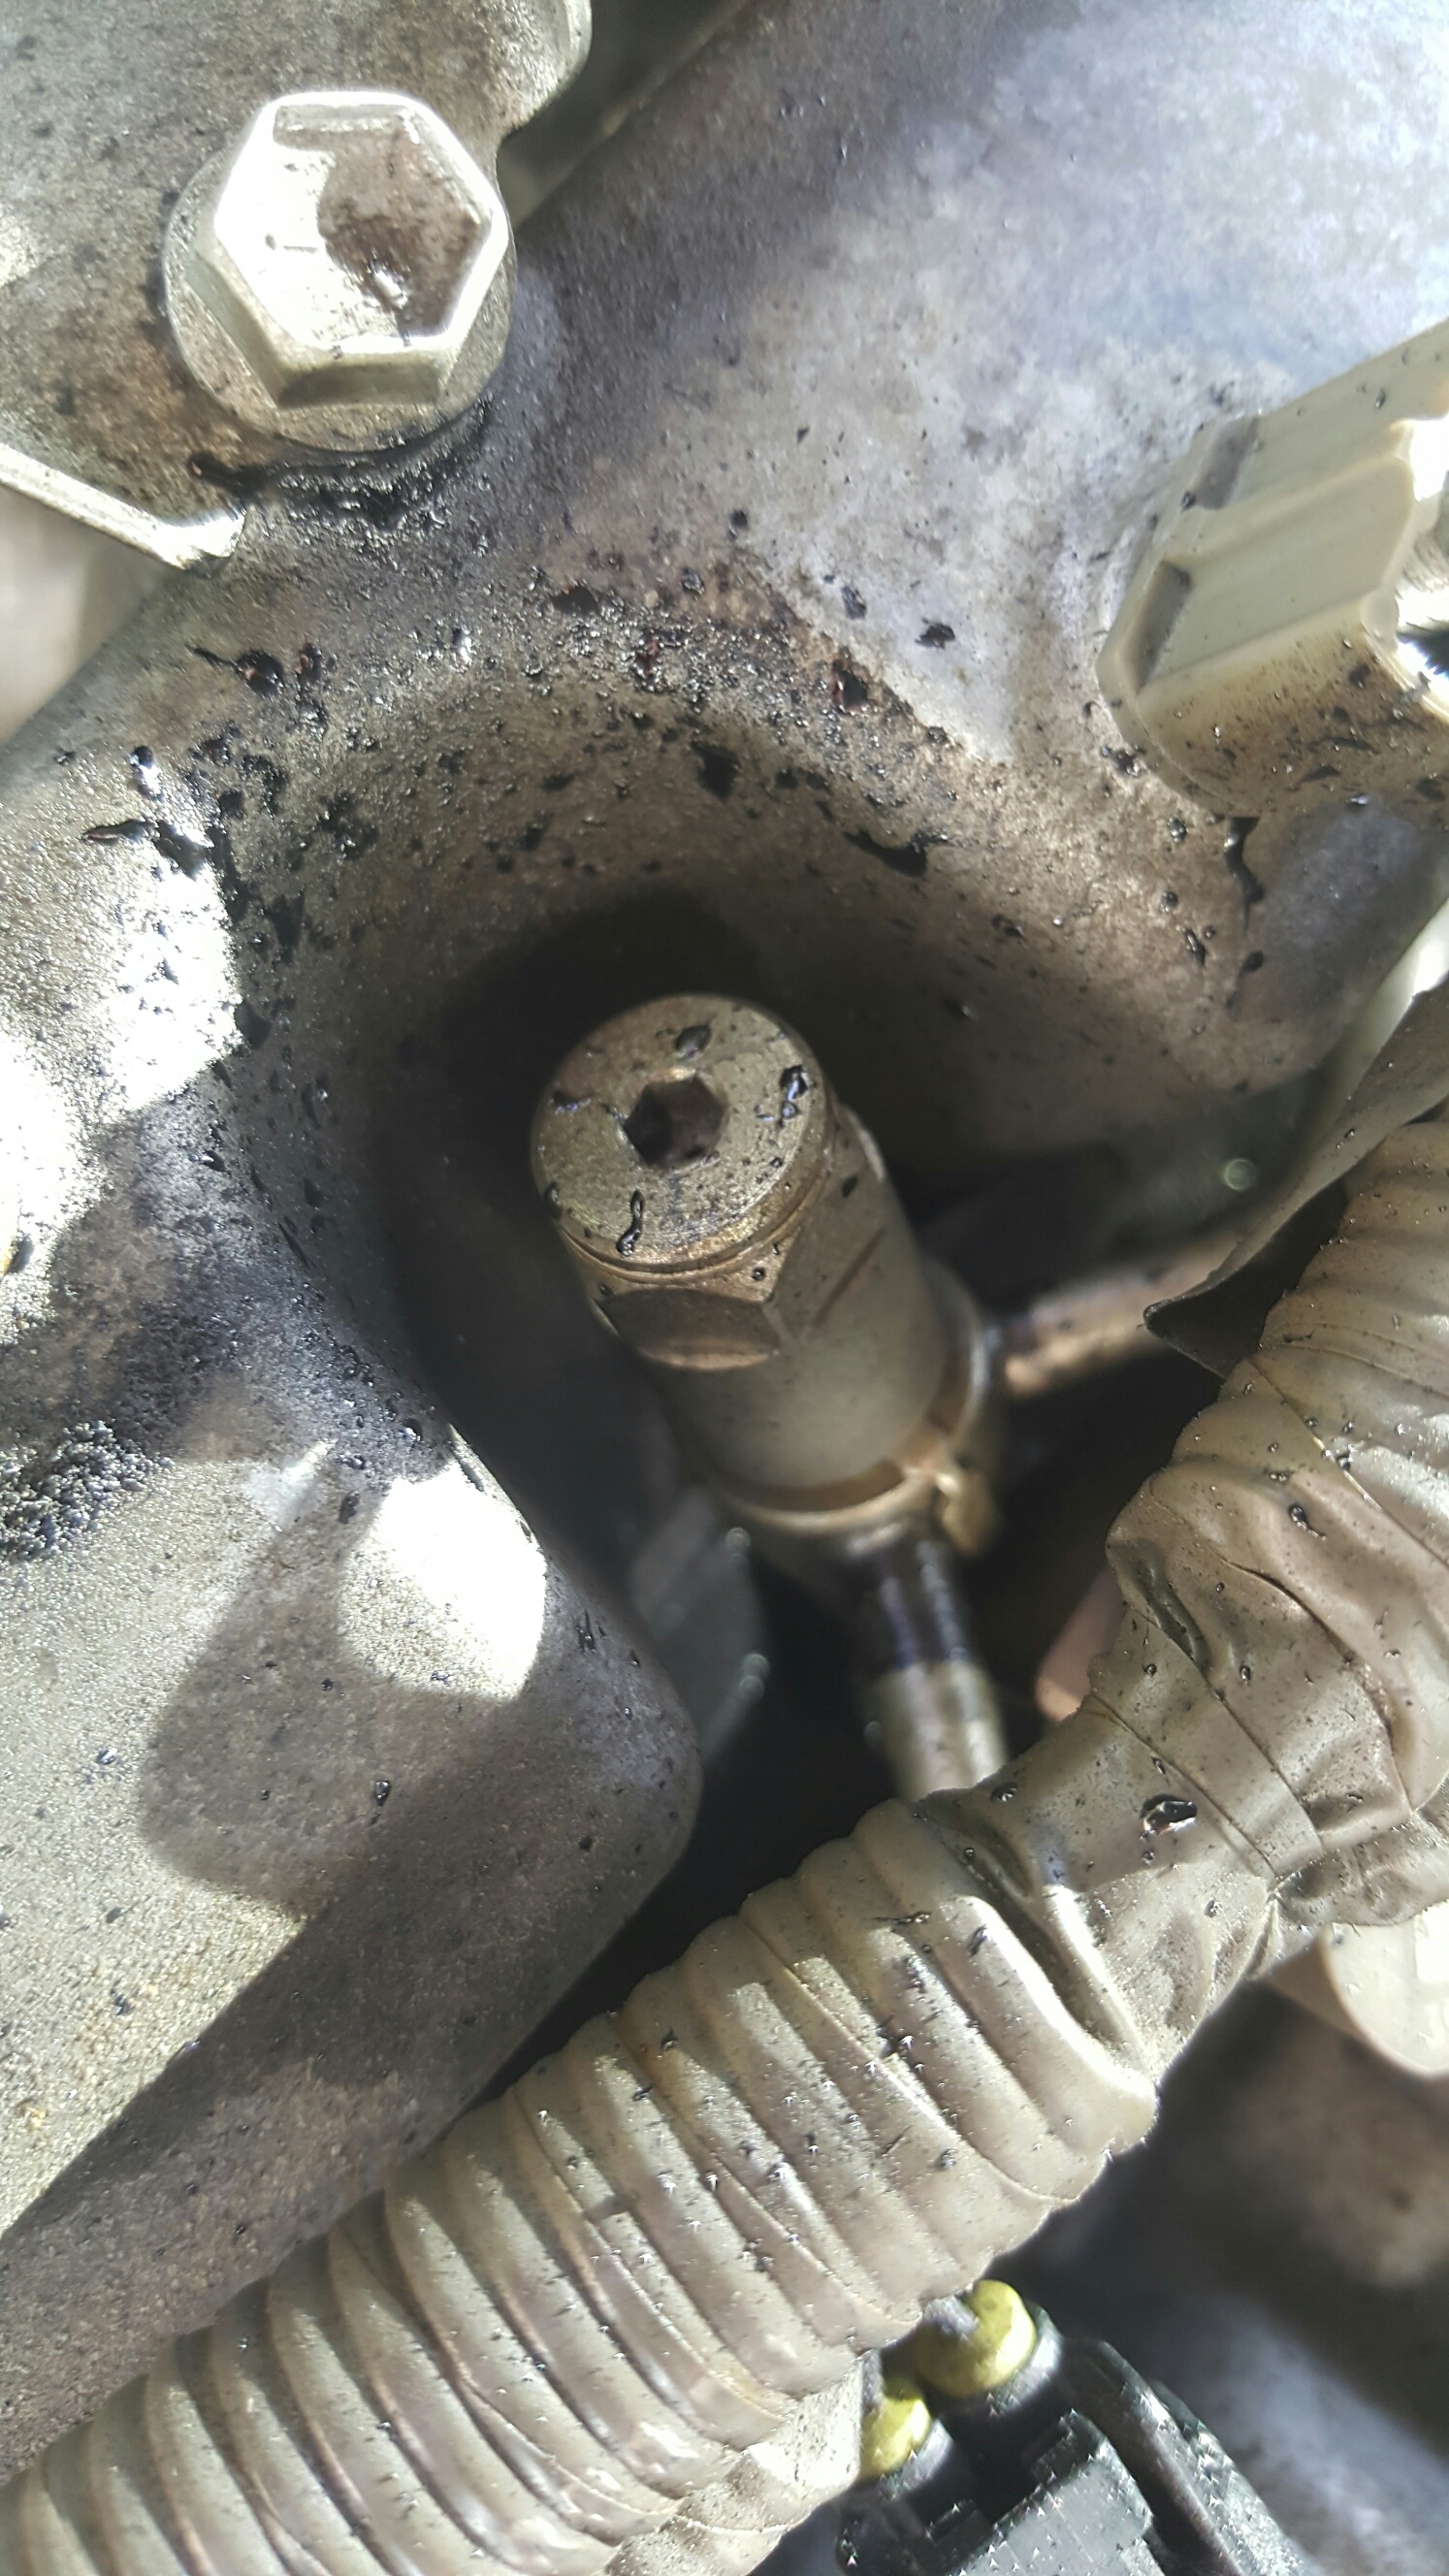
Job done - will do How To Guide soon. Honestly, a very easy job. However, I think the fact that I caught it early meant the washer was reasonably free and the injector itself didn't need too much effort to pull out - so I got lucky. If left for longer, that black gunk would probably build up more and more and make it difficult to get both out. The parts were €7 for the copper washer (not copper anymore!) and the o-ring (which isn't a perfect fit unfortunately - it is the right diameter but the thickness isn't the same as previous). Total job time is about 1 hour (minus trip to collect parts!). Also, on doing some reading on this forum about getting the washer out, there are concerns about the washer falling into the cylinder chamber below. I'm not sure how this is possible unless the washer had split. But if it is in one piece, it cannot physically fit down into the cylinder. So, I think the risk is very low. Highly recommend doing this job from a satisfaction and financial perspective. I was tempted to do all four at once but I have read that they should be left well alone until a problem occurs. Not sure I understand why fully - I know the injectors are sensitive pieces of kit but as long as you are careful, it shouldn't be a problem. I'd welcome some opinions on this. How to Guide:
-
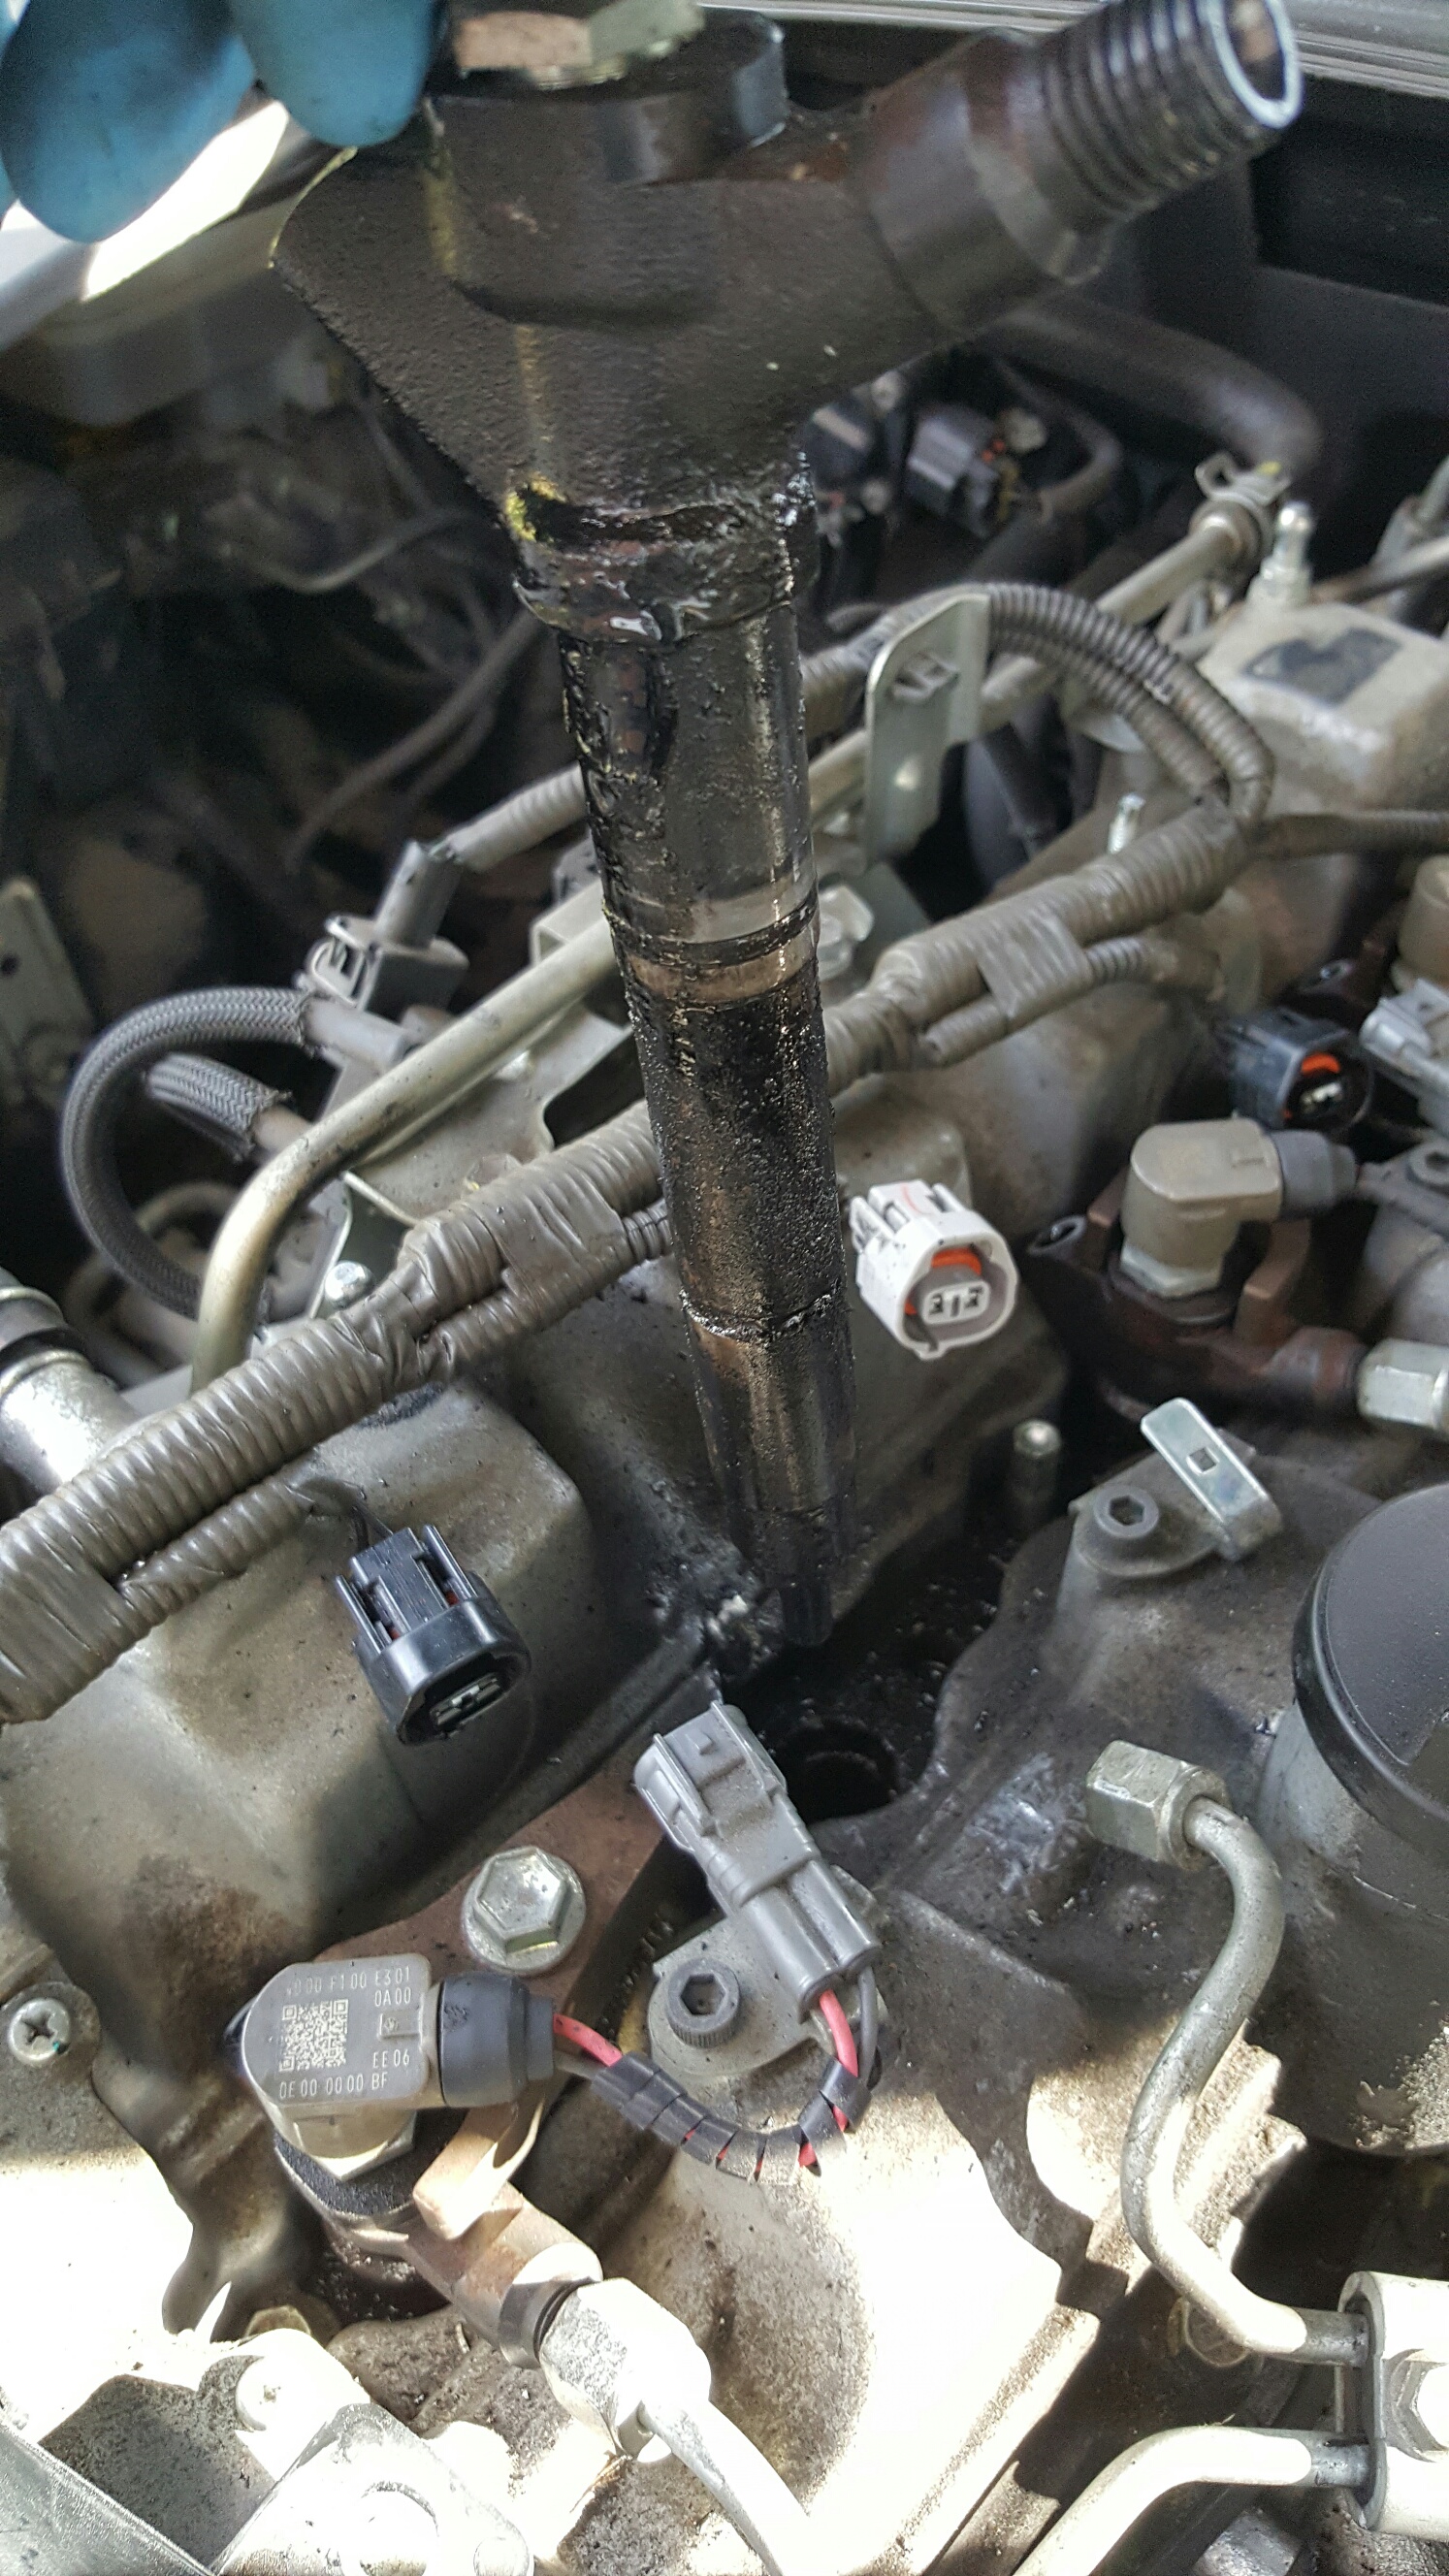
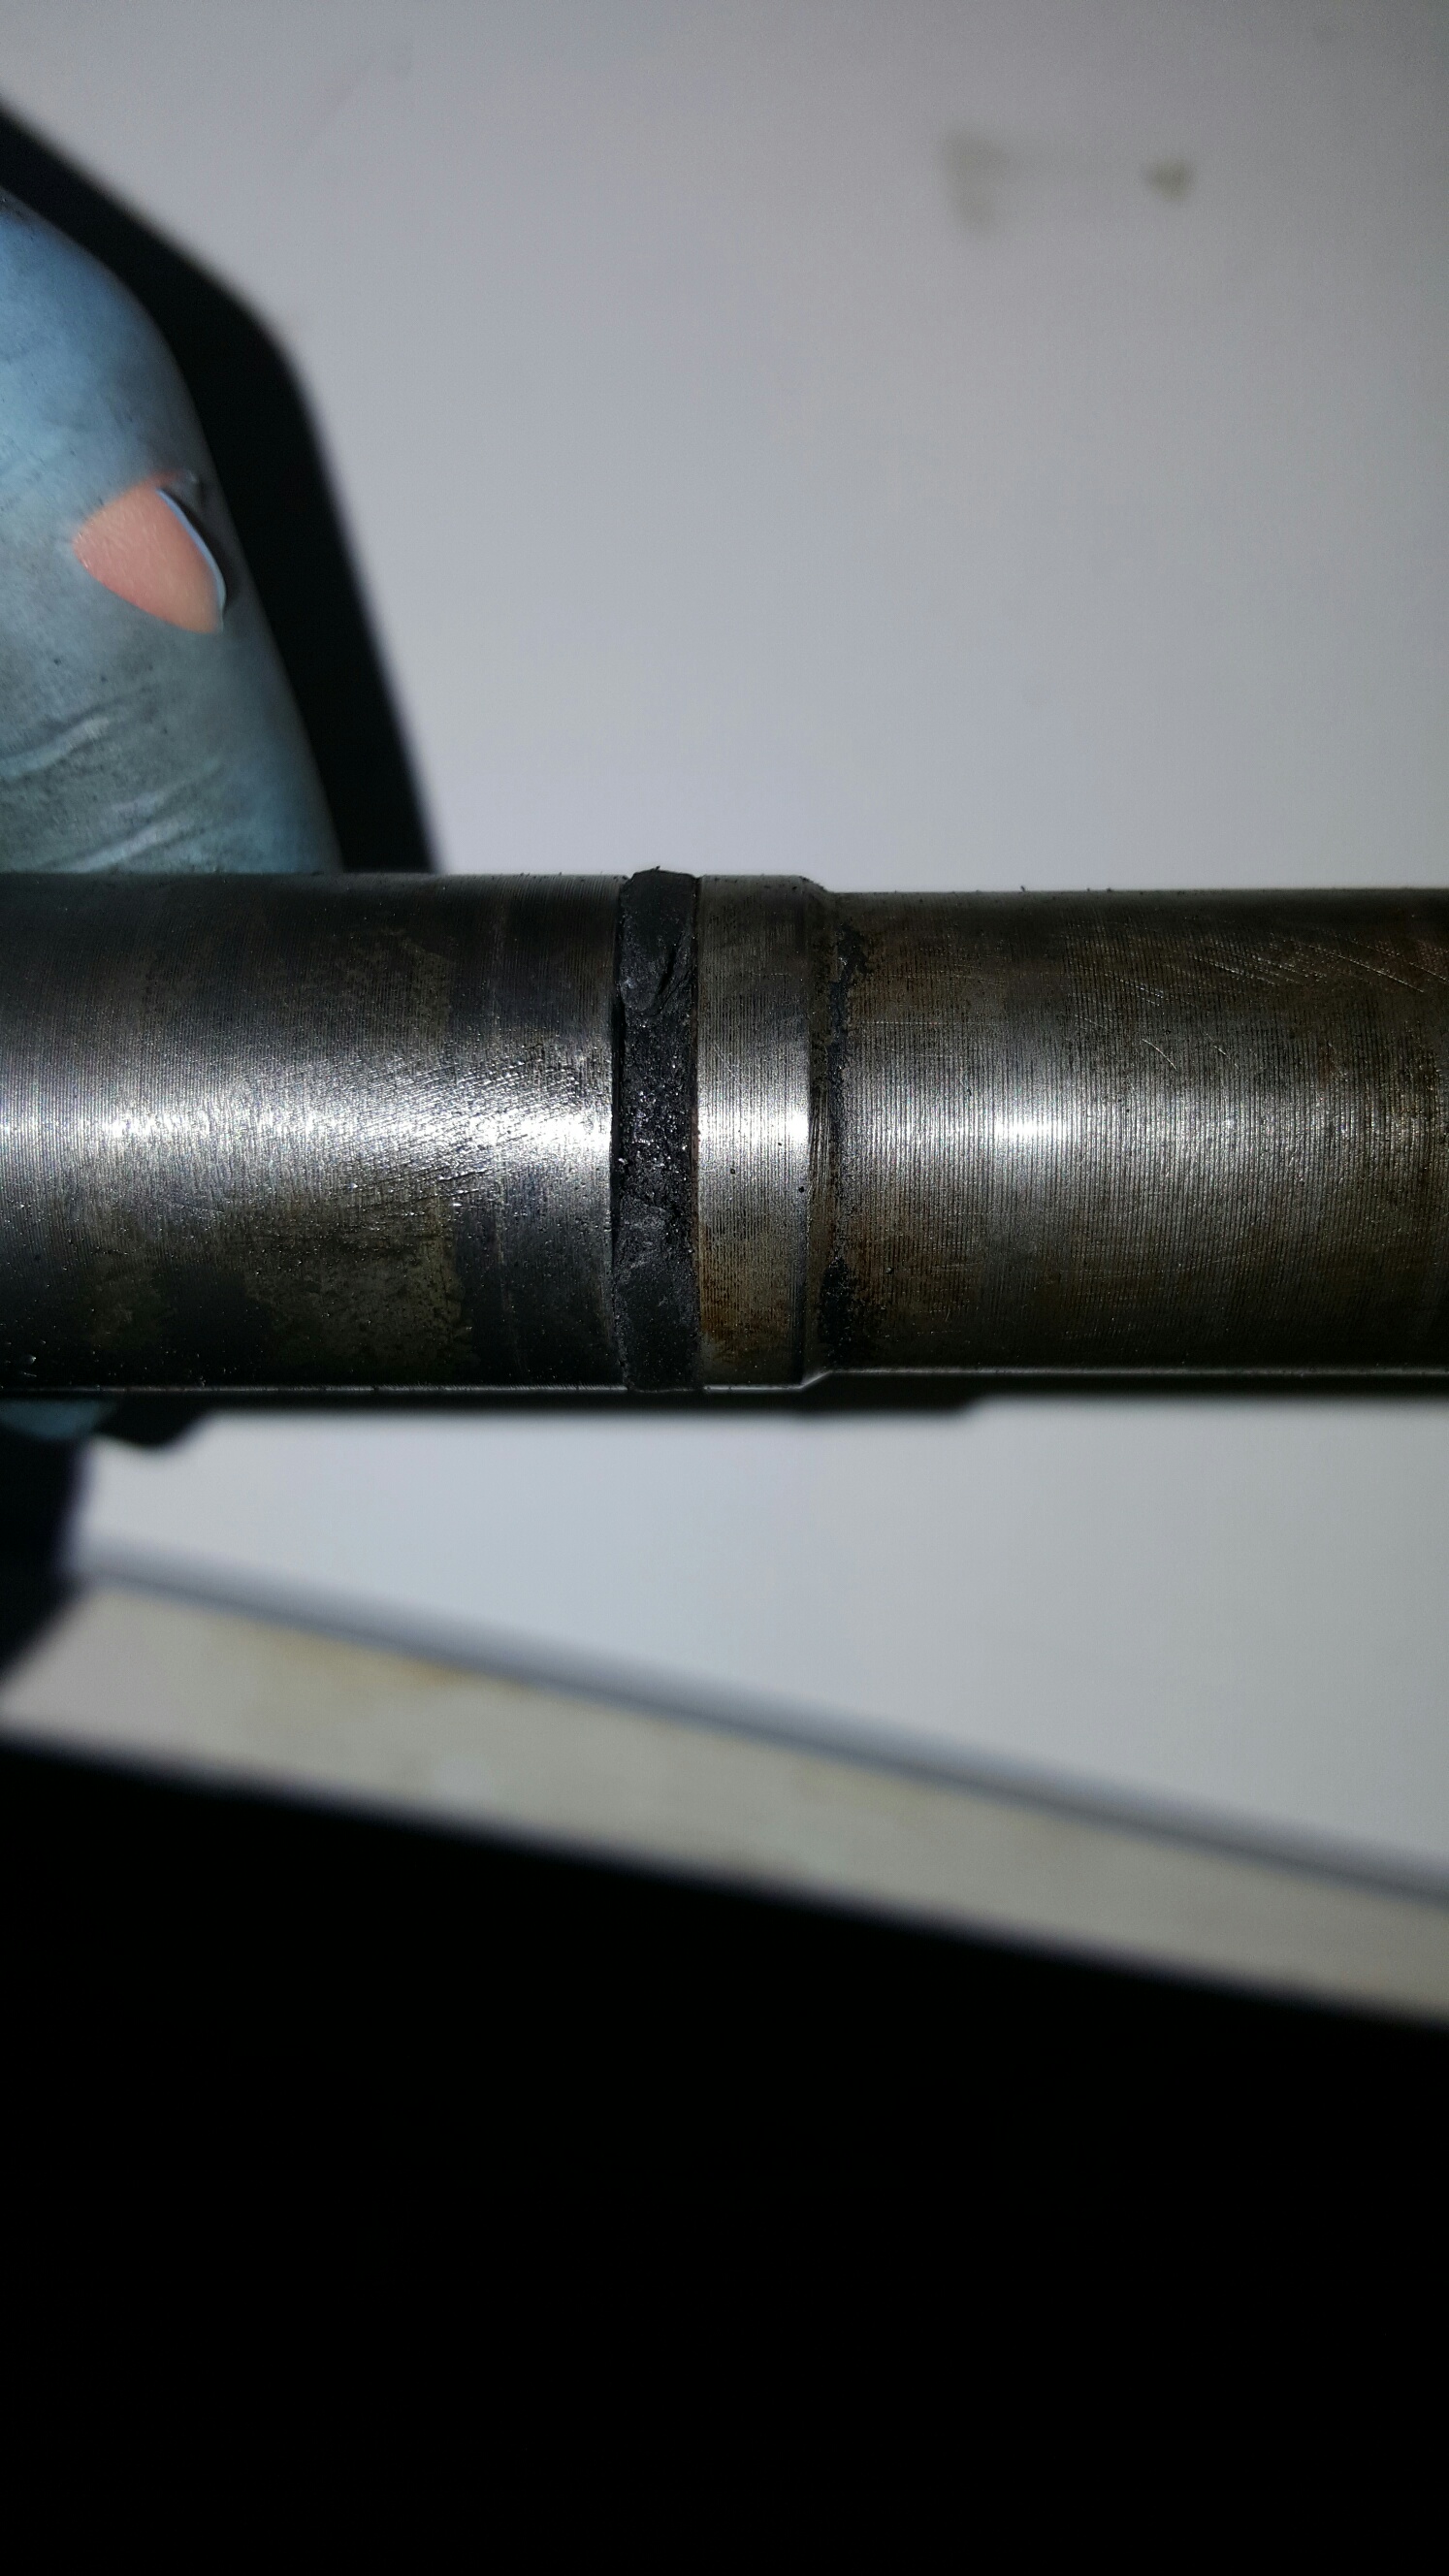
I just took out the injector there. It was a straight forward job. Took about 45 minutes total - 15 of which were spent trying to get the copper washer (seal) out. You can see the damage to the copper washer below (two notches) and the o-ring half way up the injector. Also included is a pic of the injector itself. It was a bit stuck due to the build up. Parts are arriving on Monday so will fit and do full DIY Guide then.
-
Thanks madasahater. I can't see the how to guide but I have ordered the seals (arrive Monday) and I'm going to give it a go myself. I think I have caught it very early so I am hoping the copper seal isn't too stuck! I have seen some failures and the build up is significant - I only see a small amount on mine. If you can find that how to guide, please let me know. Otherwise I will do one up if I'm successful!
-
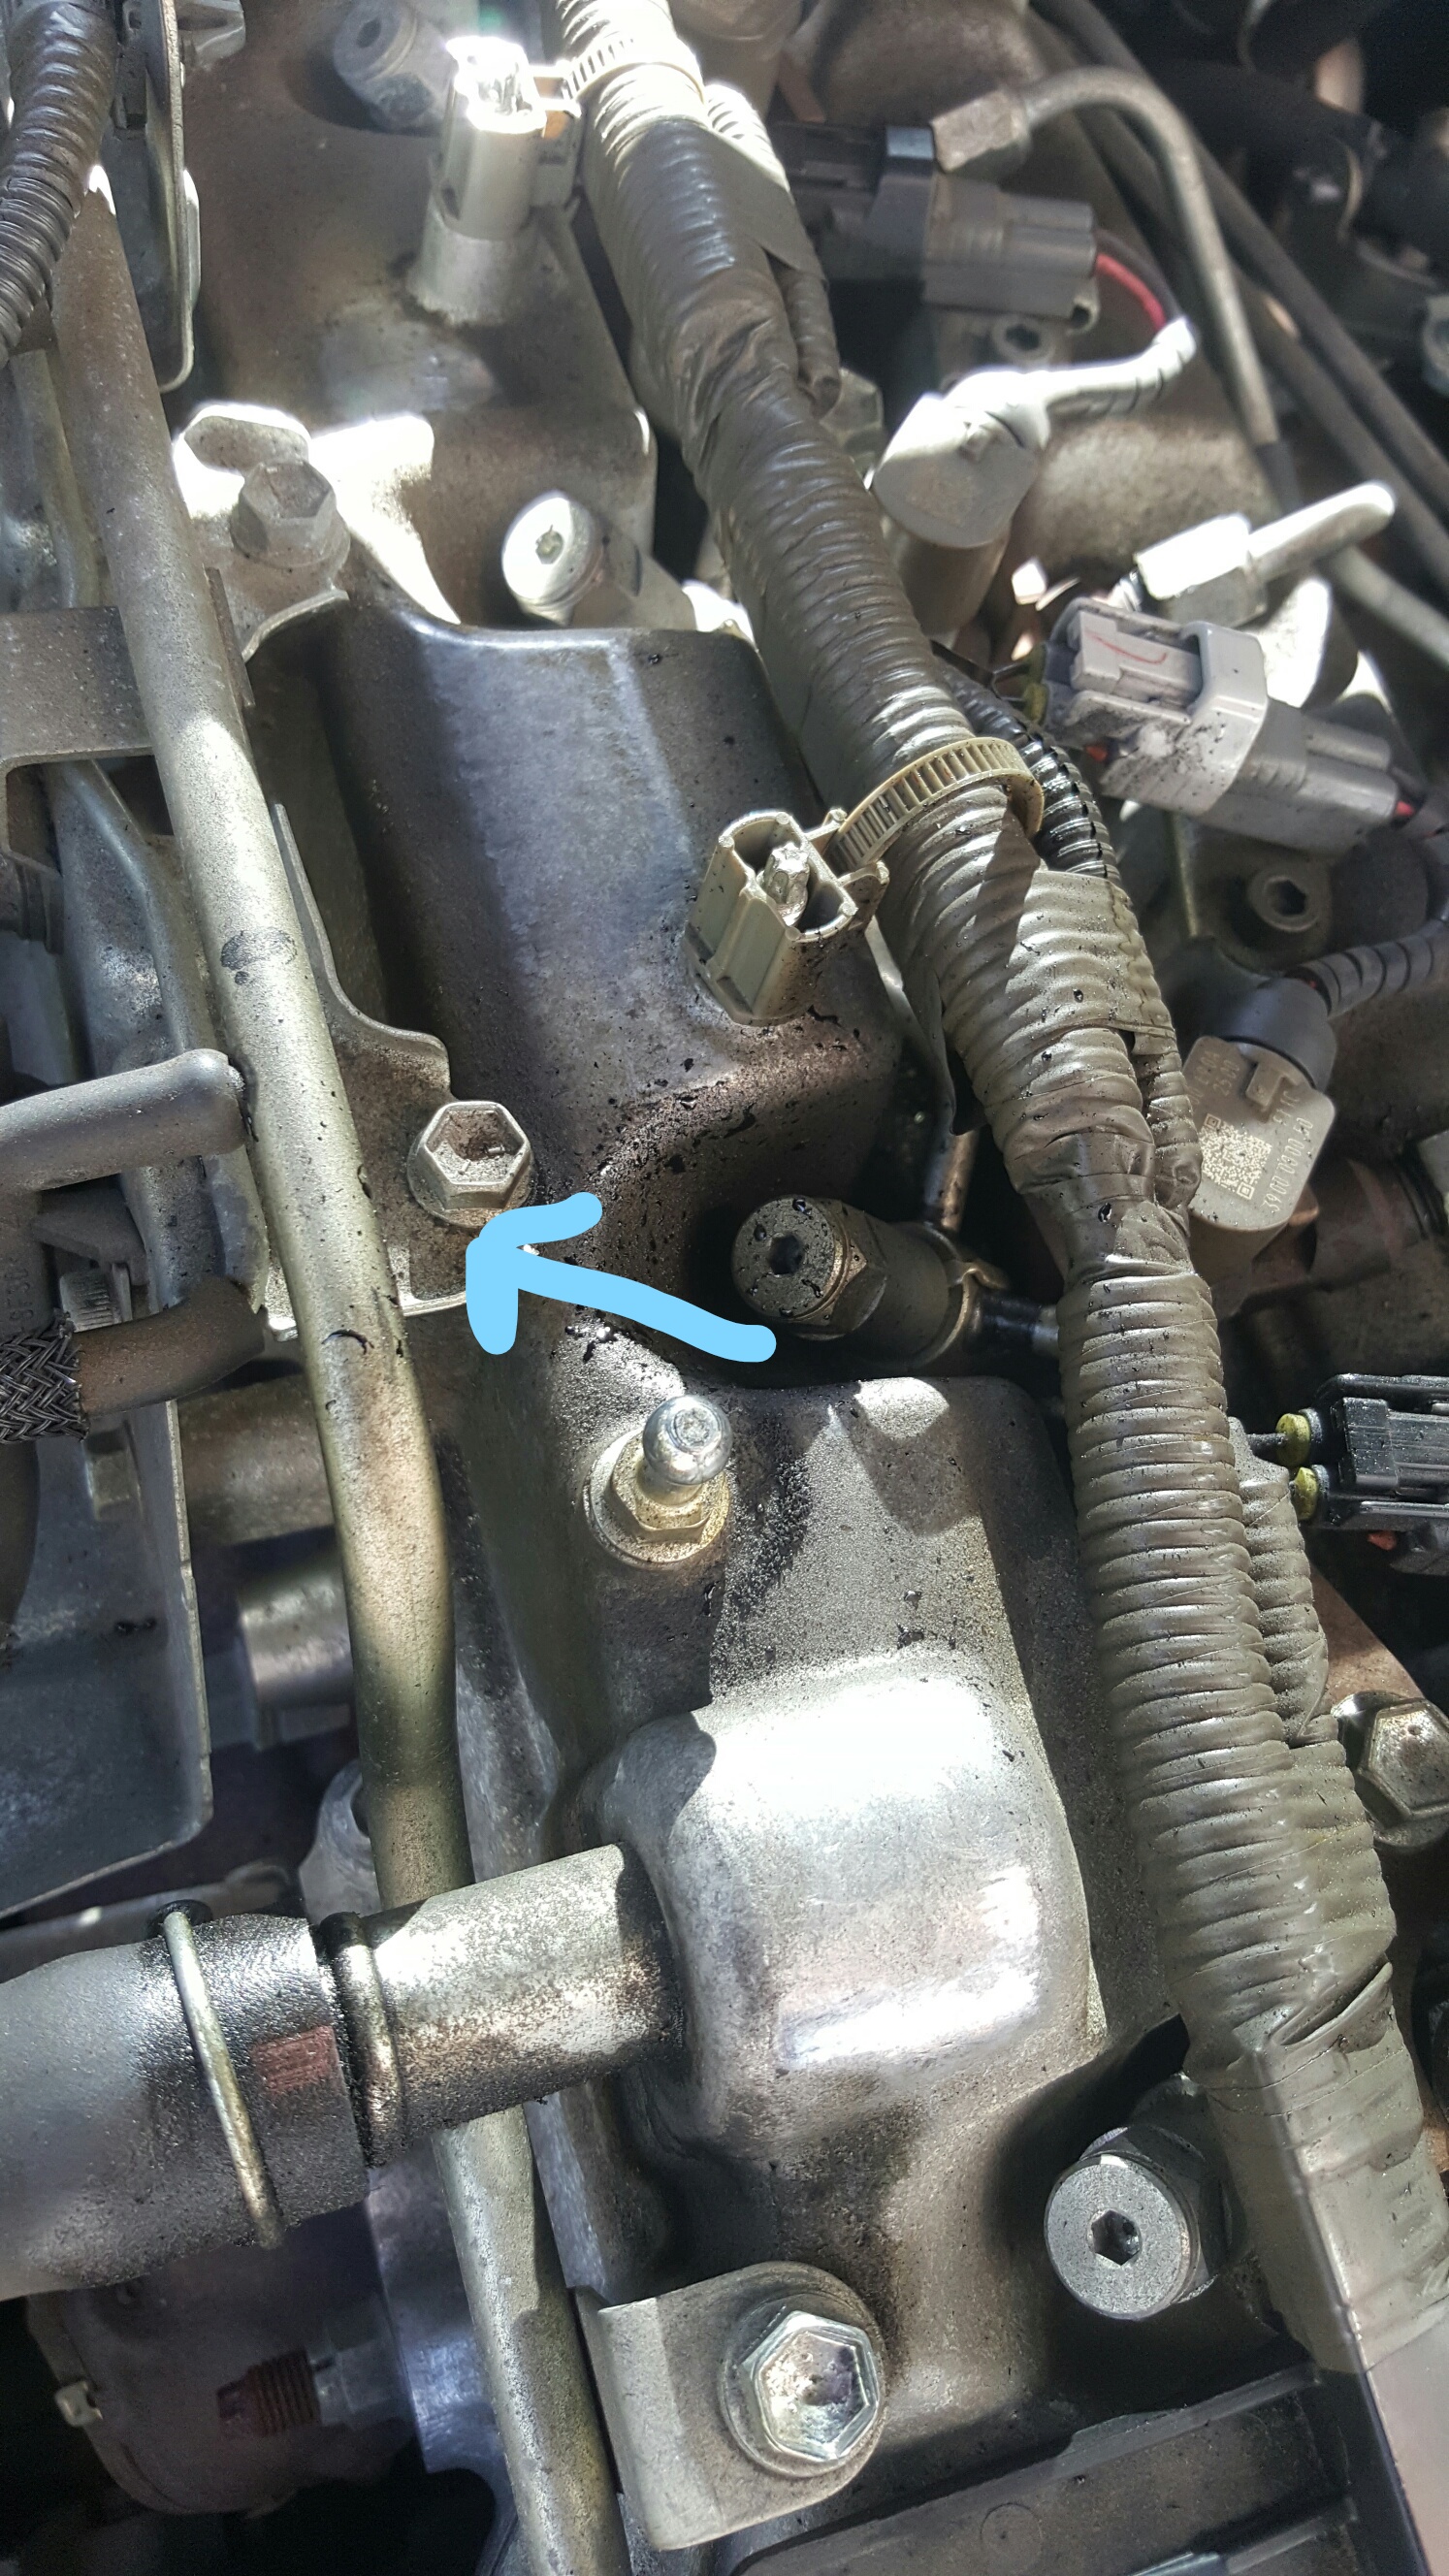
I was nearly home after a three hour driver this morning and noticed a strong smell (like burning rubber) in the car (IS220D). When I pulled into the driveway I took a look at the engine with it running. There was a blowing sound which I quickly saw was coming from one the injectors. It also looks like some sort of rubber or plastic been spit out with the blow. It looks like oil spray but it is hard. See pics below. There was no smoke and the smell was not diesel or oil. The blue arrow just indicates the direction of the blow out. It is coming from the back (not visible side of the port). The schematic of the engine block refers to this part of the injector as the nozzle leakage assembly. I have no idea what this is. I have a feeling that a rubber gasket has failed and is being melted away by the heat and pressure. The red circle is where the problem is and the blue is my best guess of what has failed. My question is, has anyone encountered this problem? Also, I want to pull it apart to see exactly what went wrong, but I don't like pulling out injectors. Thanks
-
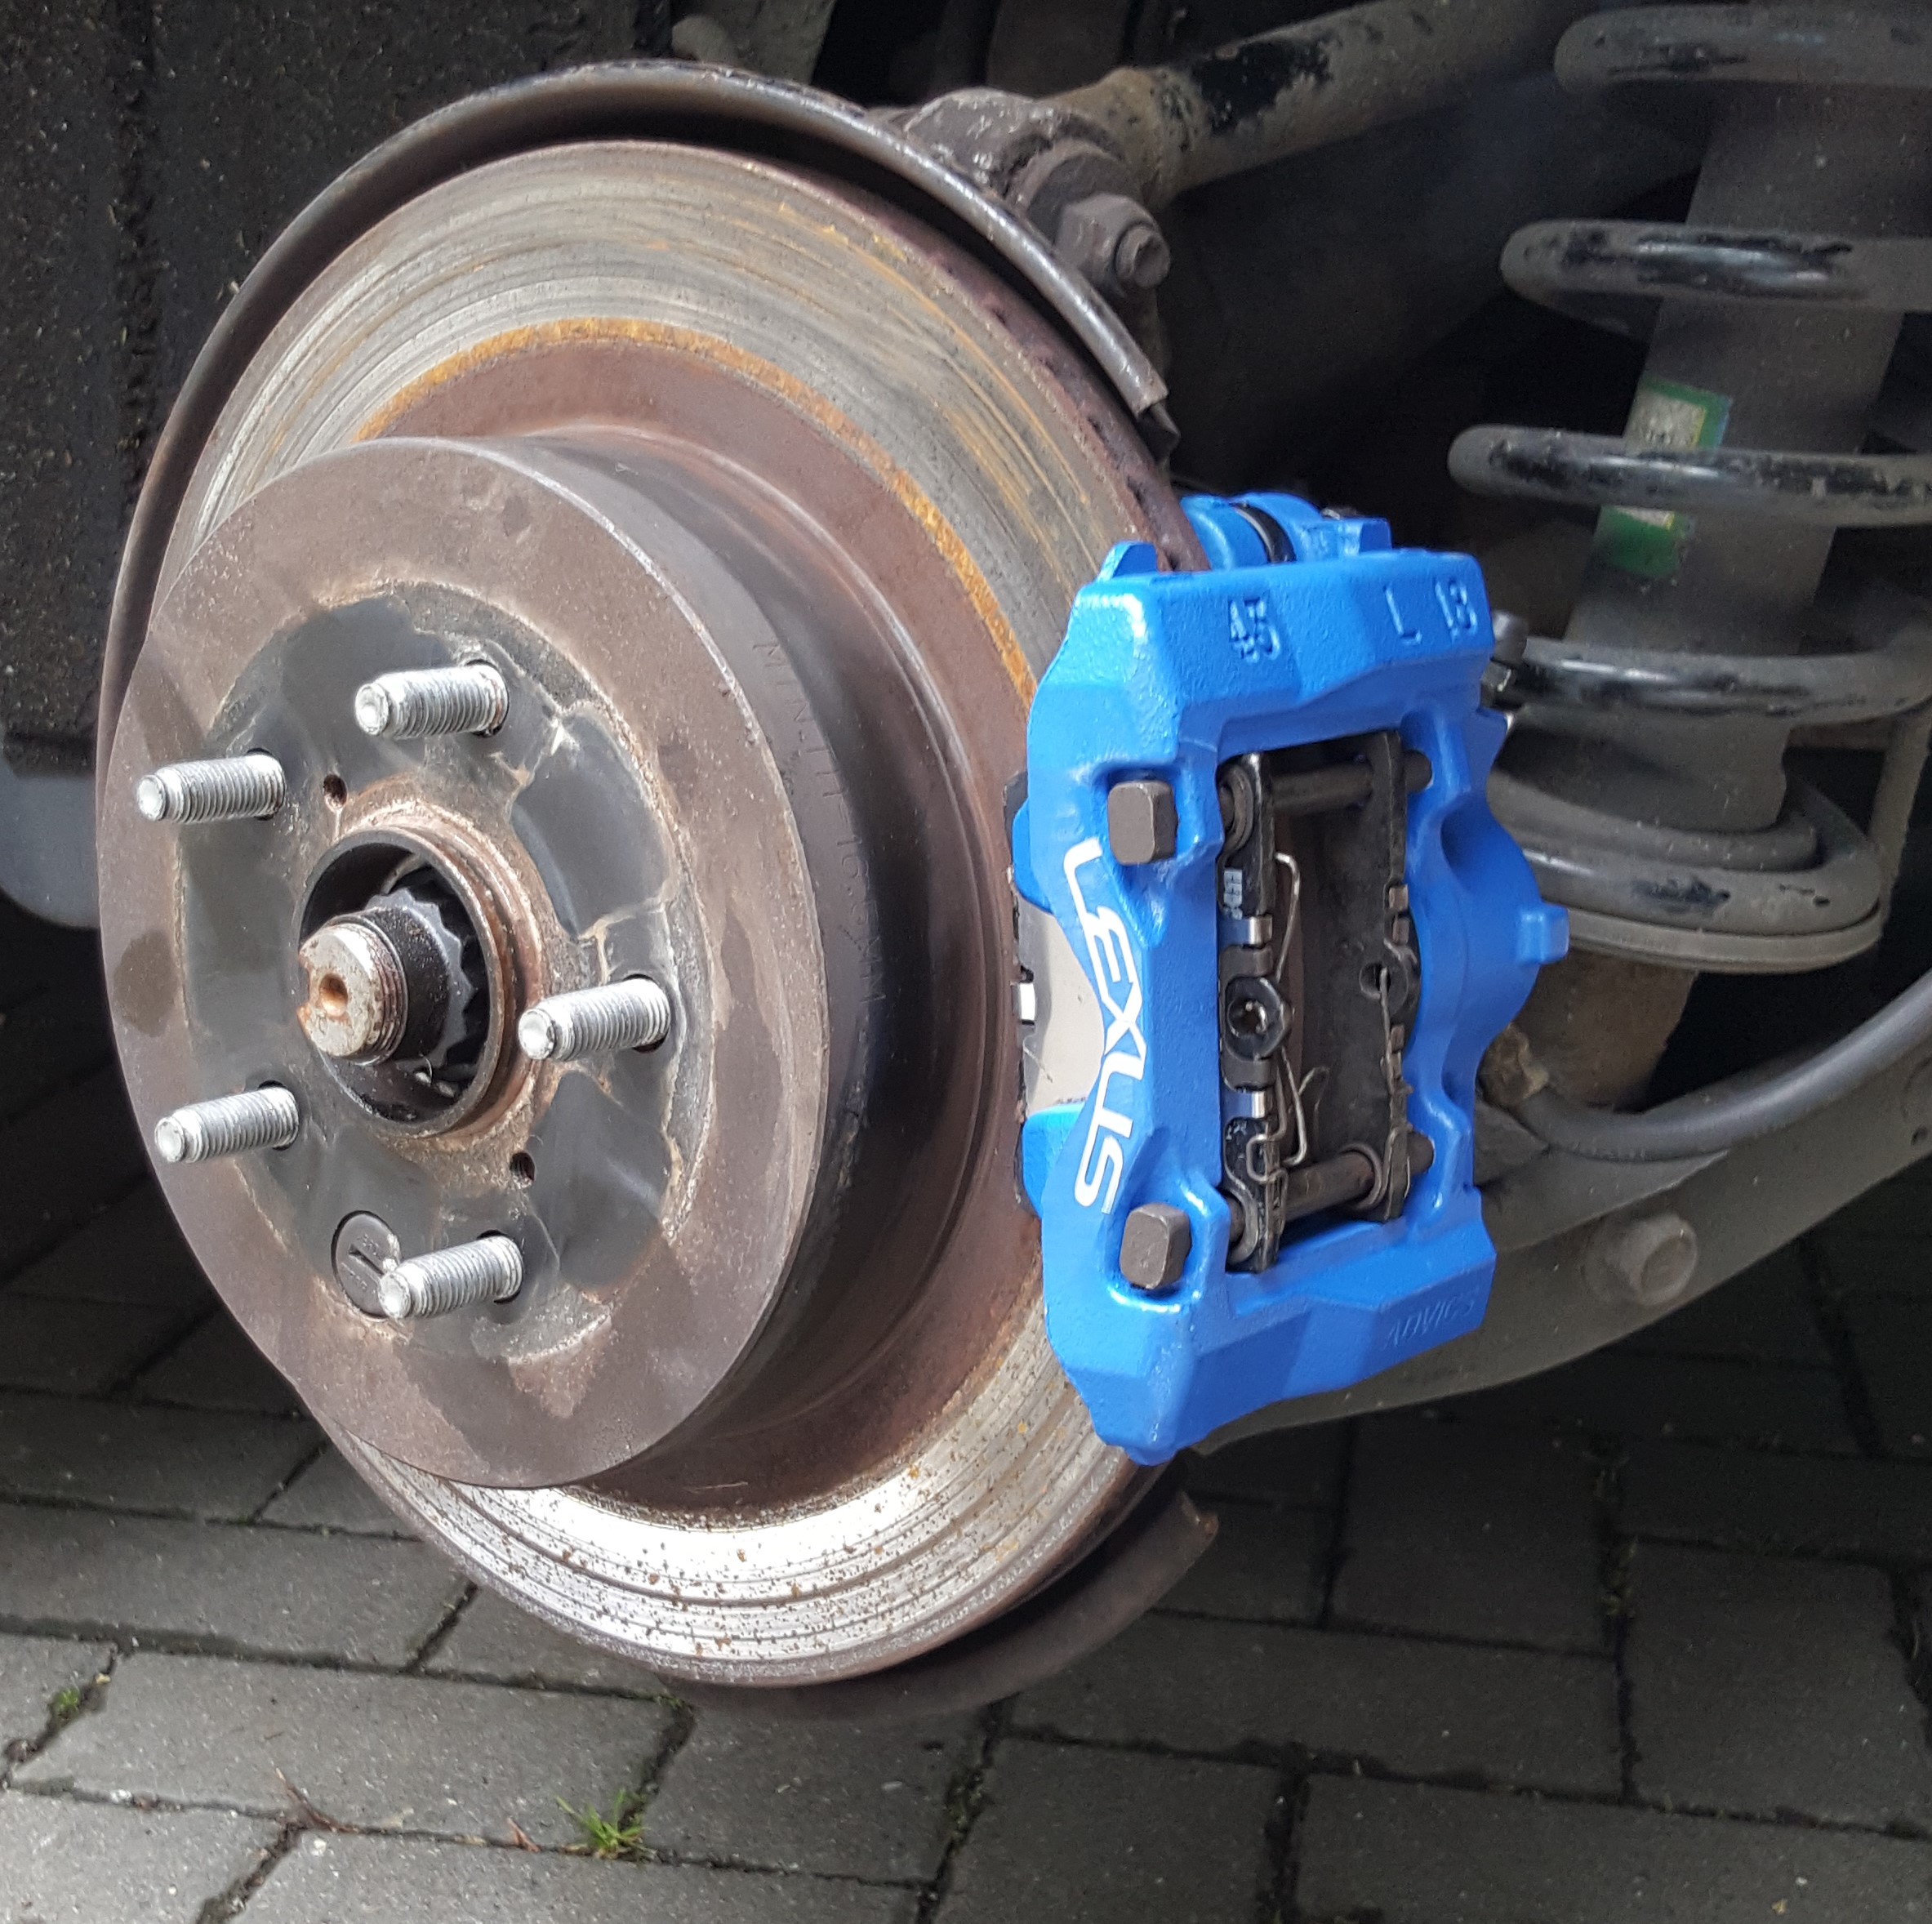
Love the car. Wheels look great. Wish mine looked that shiny! Especially love the calipers. I did a similar (DIY) job last year and wasn't sure about the colour - glad someone else has the same taste
-
I've used two different Dealerships over the years. As you can imagine, the sales over here when compared to the UK are much lower so Dealerships tend to carry two or more makes. The two Dealership's I used were both a Toyota/Lexus hybrid (no pun!). So it carried Lexus and Toyotas in the same showroom and the same out the back in service. That is no joke about the Civic - I was convinced I wouldn't even make it back to collect my car!
-
Just a quick vent - this is the difference between Irish and UK service. I'd say I have had about 10 services with Lexus over the last seven years. I have needed a replacement car on most occasions. I was charged at least twice for a POS (Yaris mainly). Other times it was free but the car was a >10 year old Yaris/Civic/similar. I never once had a brand new car. I was never once offered a new car. And I did ask on several occasions and was told that it was not their policy. Maybe it's the way I look I'm seriously jealous of the service you UK guys receive!!!
-
I think it might be worth your while searching for posts on cleaning the EGR valve yourself. Clean it every 5,000 miles. Also, read up on the regen of the DPF issue. Lots of conflicting comments but for the sake of a few motorway miles at high revs every couple of weeks, it won't do you any harm. Finally, and there is a current thread on this, grease the caliper pins. Apart from that, from my experience, the rest is minor. Enjoy the car - I've had mine seven years and still love getting into it!
-
Brake callipers
Monocle replied to jackcramerr's topic in Lexus IS 250 / Lexus IS 250C Club / Lexus IS 220D & IS 200D Club
47775-50010 Part Number for Rear Caliper Pin Boots For what it's worth I use standard silicon grease and has served me well but I grease every year at a minimum. -
It's more that it is an easy and satisfying job. Only a socket set and a bucket needed! Not really about saving money (the quote above is great value) - I just enjoy doing these jobs! Also check that new pump came with a new rubber gasket.
-
I thought I'd give an update on this saga. So, as mentioned above I had the Terraclean DPF service carried out and it worked like a dream - however, it was only temporary. It hasn't gone back to the way it was previously (completely blocked) but there is definitely some resistance when I accelerate any more than gently, particularly in 4th gear and above. I have had no limp mode which is good. But the average fuel consumption on a mixed long drive that I do weekly went from about 38mpg to 32mpg in the space of 2-3 weeks. There was an offer on in Lexus for an intermediate service (I stopped going to Lexus around 100k miles and did the servicing myself). But it's cold out so thought I would just leave it in with them for the day and get it done The main reason was to get them to look at the DPF situation and also confirm my air con condenser has failed. So here is what Lexus had to say about the DPF... "The older the IS220D, the more the DPF blocks. One customer has to do a "driving regen" every 175km! This entails driving for 8-10 km at constant revs between 2750 & 3000. You cannot use cruise control (maybe someone can explain why this is - I've no idea!). This cannot be interrupted even for a second or you have to start again. This should be done more frequently if you drive urban miles mainly" I'm not agreeing or disagreeing with these comments but from what I have read about initiating regens, this isn't exactly how it works. Not sure though. Lexus carried out two forced regens to get the inlet pressure down sufficiently. I have driven about 200 miles since and it feels great again. Just not sure how long it will last. I was thinking about replacing the DPF myself. Part roughly €700 (spurious). But this could be a complete waste if it will just get blocked again and again. I asked about the fifth injector (something I know little about) but he said it was not the problem. Will keep you posted again in a few weeks. I'd welcome some opinions on the fuel consumption drop though! Seems like a dramatic drop.
-
I replaced mine with a genuine part around 50k miles. Now at 150k and no problems. Maybe they modified? You should fit it yourself. It is such an easy job!
-
EGR cleaned
Monocle replied to Psychotic Madman's topic in Lexus IS 250 / Lexus IS 250C Club / Lexus IS 220D & IS 200D Club
Not sure if I'm right on this, but here's my two cents. I clean my EGR every 5,000 miles. When you remove the EGR valve, there is carbon build up where it meets the inlet manifold. Some of these carbon deposits break off and fall into the manifold below. I also clean the inlet manifold port under the EGR valve but I try to use a hoover at the same time to minimize carbon deposits falling into the manifold. Anyway, once you start the engine, the carbon deposits are pulled through the engine and find their way to the DPF. As the DPF is a fine mesh filter, it can get clogged momentarily - hence the restricted ("misfire") feeling. Giving it a good blast for a few miles to increase the airflow and temp sorts it out for me. -
@Shahpor Do let us know how the test goes. Would be interesting to compare, especially if a few others did the same. And all the above I have listed, I think I have had value for money. I do feel lucky when I compare to some of the horror stories I have read on here. @Farqui I think you are right. It's a great car when maintained and looks great when in good condition. But it's pretty heavy so the pulling power does lack a bit especially when I compare to Audis/BMs that I've driven. We'll see how long the healthy period lasts!
-
@Ahmedali44 Thanks for that, I'll check out that product. @Shahpor Yes, I have had other issues, most of which have been mentioned in a few posts here by other members. When I bought the car, the clutch had just been replaced at 30,000 miles. Not sure who was driving it! But the clutch has been perfect since. 1. At around 60,000 miles the water pump failed. Picked up one new from Lexus for about €150 and fitted myself. Easy enough job. 2. Rear brake caliper guides seized a few times but I managed to free them. One fully stuck at about 120,000 miles and had to be replaced. Again, paid about €140 from Lexus and fitted myself. 3. At about 115,000 miles, I went to start the car one morning. It tried to start then all electrics shut down. Checked all the fuses I could but could see nothing. Brought it to Lexus. They said that the heads of the air con, audio and seated/cooled seats had been fried and that it would be several thousand euro to replace. I got a bit ****** off as I couldn't understand how a fuse wouldn't blow first and why had this happened on so many separate electronic parts. Lexus wouldn't budge. At this stage they hadn't pulled the centre console out to investigate the heads as that would cost €300 alone. So I again questioned the fuse issue and they said they would have a proper look once the console was out. Low and behold, a few hours later they "found" a fuse blown on the power to these units. €5 replacement plus the €300 to get the console in and out. 4. Not a major issue but caused me pain at the time. During the problem at #3 I had tyres that were not in great condition. Lexus needed to test drive the car to investigate the issue further but wouldn't send anyone out until the tyres were replaced for safety reasons. I actually didn't have a problem with this in fairness. So they replaced three of them. Anyway, a few months down the line, I was doing a refurb on the brakes (and spraying them a bright blue with decals ) but I couldn't get the hub nuts off. I put so much force on the locking nut that the protrusion on the locking key sheared off. Went to Lexus and they said they didn't over tighten the nuts and they couldn't source a new key. Very helpful as always . Eventually hammered on an 18mm socket with great difficulty to get them off. Needed a 1.5m bar to get enough torque to get the other nuts off as well. Luckily I didn't need to do this on the side of the road! 5. The air con compressor failed on me 5,000 miles ago (140,000). I don't fully understand the system as I haven't looked into it in detail but there is a bad rattle from the compressor and there is no cool air. A replacement fitted is over €1200 I believe so I can do without for the moment. I am keeping my eye out for a second hand/refurbished part on the net. Other than that, just carried out my own servicing since leaving Lexus servicing at around 90,000 miles. Knew I was going to be holding on to the car for a long time so the cost didn't justify the returns long term. Can't remember any other major issues. Small ones include the rear passenger roof handle securing clip breaking off. One of the backing lights on the centre console display is blinking. There are a few others but I can't think of them right now. So back to the results from yesterday's DPF/Engine clean out. I drove a journey of about 3 hours today (a good mix of motorway, secondary roads and traffic). I had been getting somewhere between 33-35mpg. I got 38.4 today. Very pleased. I don't think I was light on the accelerator as I was in a bit of a hurry so I think it is fairly representative. But the big change for me was the acceleration in low revs. I tested the car a number of months ago on a flat stretch of road. I put it in third gear and let the revs drop just below 1,000 rpm. Then I put the foot down and measure the time it takes to get from 1,000 to 2,000 rpm. I think I got this idea from this forum in the past. Anyway, it had been about 8-9 secs with the pull only coming in at about 1,750 rpm. Today it took about 4.5 secs with the pull around 1,400 rpm. Acceleration has dramatically improved. All in all the car just feels like it is breathing so much better. It's like the accelerator has no resistance if you know what I mean. The mechanic said that the DPF was in an awful state so obviously I would see a big improvement but I still believe this should be carried out on any high mileage IS220D. I'll report back in the weeks to come to see how things are. I really want to see a full tank consumption rate before I know for sure about the fuel.
-
@Ahmedali44 Thanks for the advice! I had a few bits done to the car but it worked out about €375 (I'm in Dublin). It was extra then for the standard Terraclean job which the mechanic said probably wasn't needed (in fairness he said this before he carried it out!). I wanted to be sure though. What DPF cleaner did you use? Might do this every 5,000 miles or so. @Shahpor I have had the car nearly seven years. I brought it in the from the UK at 30,000 miles in great nick. It was my first (and only so far!) decent car. So, I have looked after it very well. Particularly giving attention to the engine. EGR cleaning, manifold cleaning, etc. It's now at 144,000 miles and I still love the car. I know it's not everyone's cup of tea but it has really served me well. I have noticed some drop in throttle response as the years have gone by. Particularly the last two years or 30,000 miles. BUT! I picked up the car this evening and it drove like the day I bought it! I only got 30mins driving but it was fantastic. I'm convinced there is a huge increase in fuel consumption too. I have a three hour drive tomorrow that usually gets about 35mpg so I'll report back tomorrow. I don't want to jinx it but so far so good!!! For those of you in Ireland, the DPF centre in south west Dublin were fantastic. I'll post full details tomorrow also. l will probably give it a few weeks before I call it a success but I am very pleased so far.
-
That's exactly what I was looking for Shahpor! Thanks for taking the time to look that up. I'll check this weekend and check out the TechStream option if I'm not successful. Fingers well and truly crossed on the Terraclean
-
I posted this a while back but I forgot to post in this section. I've added a few photos at the bottom as well. First off, I am not a mechanic so my terminology may annoy some of you! I did this as i was getting a lack of power at about 2500revs mainly in higher gears. It has improved dramatically. Fuel efficiency seems to have improved but only slightly so I can't say for sure. For this guide, I refer to right and left as you stand at the front of the vehicle looking into the engine. I know this is not the norm so apologies if confusing. Front refers to the front of the car as standard. Also, the elec. connectors are the biggest pain in the &%$£. Trying to squeeze the clip and pull at the same time is so difficult as they are usually well stuck in place being nine years old! Don’t give up! Job time – 10 hours over two days (I didn’t have a guide so hopefully you will do it faster – it would take me about 6 hours if I did it again) Set up tools, bench, laptop, etc. (1 hour) Disassembly (5 hours) Cleaning (2 hours) Reassembly (2 hours) Basic tools are required but just having a good socket set is very important. Not necessary to jack up vehicle but would help. I drove the front wheels up on 3inch blocks. This is the order I did it in, you may want to do it a little differently. I include headings for the most part but in general this order worked well. Here we go!... Covers: Remove primary engine cover Remove RH engine cover Remove LH engine cover Remove front engine cover Remove under engine covers (x2) Battery: Disconnect battery terminals Remove battery horizontal support brace Disconnect the electrical connection on the LH side of the battery cover Remove battery cover Remove battery Remove base cover of battery Remove battery vertical support brace Remove control module under battery (x3 bolts – long one goes on RH side) Disconnect 3 elec. connectors on control module Remove bottom battery case (x3 bolts) EGR: Remove EGR pipe and gaskets Disconnect EGR elec. connector Remove EGR valve Radiator: Open radiator cap and drain ***** (have bucket ready to take ~5 litres) Drain fluid Remove air intake duct above radiator Disconnect inlet and outlet pipes of radiator fluid reservoir tank Remove reservoir tank Various: Disconnect fuse box wire harness clips (x2) Disconnect common rail front end elec. connector Disconnect common rail fuel supply hose Disconnect common rail rear end elec. connector Remove wire harness support bolts (x2) Various: Disconnect EGR valve rear end elec. connector Remove five wire harness clips (red arrows) Remove harness support (green arrow) Remove sponge adjacent to EGR valve Various: Remove bolts (x3) on water pipe (blue arrow) below EGR assembly Remove clip at front end of pipe and slide hose off Remove vacuum hose (small) from water pipe (underneath) Remove elec. connector under vacuum hose & remove clip also (hard to see but you’ll know it has to be disconnected) Push hose assembly out of the way – towards battery area (no need to fully disconnect) Air Flow (Throttle) Assembly:- Disconnect three elec. connectors on air flow unit Remove bolt on air flow unit Common Rail:- Remove common rail bolt (x2) Remove common rail fuel lines Protect (tissue) the common rail connectors & ports Remove common rail and keep clean Inlet Manifold: Disconnect vacuum hose from inlet manifold Remove inlet manifold upper stay bolt (it’s a vertical support that can be hard to see) Remove air flow pipe to inlet manifold (1 clip also) (difficult to remove for me but keep twisting and pulling – there is a lip to overcome) Loosen inlet manifold lower stay nut (very difficult to access – hard to even see. This was the most awkward part of the whole job. You should really disconnect for easier access but it would be impossible to get it back on – loosening and pushing it aside was fine for me) See diagram below. Remove bolts (~x9) on intake manifold Remove intake manifold Cleaning: Clean inlet manifold – I used a power hose, carburettor cleaner, screwdriver for scraping & kitchen paper. Clean inlet ports – as above but I used a hoover continuously to prevent as much carbon as possible entering the valves/cylinders Reinstall in reverse – much easier than disassembly! Prime the fuel system. Photos: Photo 1 - Inlet ports exposed after inlet manifold clean. Of the four ports showing, the first has been cleaned mostly, the second is as found, and the third and fourth have some cleaning done. Highly recommend using a hoover if scraping any carbon from here. Otherwise just coat with carburetor cleaner and wipe away with a cloth. Photo 2 - Inlet manifold removed. Condition hard to see but constriction increases further into the ports. Photo 3 - Inlet ports - two untouched and two partially cleared.
-
Last week my car went through the usual process of chugging, no power, check VSC, limp mode. It had been about 3 years (40,000 miles ago) since it had last happened. A good EGR clean and DPF regeneration seemed to do the job back then. So, now i'm at 145,000 miles (2007) and the same happened. I gave the EGR a clean (I usually do this every 5,000 miles anyway) but this time I pulled it apart and tried to ensure the two plates on the valve stem were seating properly. I'd highly recommend this extra attention as there was still a small gap after my usual clean. However, the DPF seems to be fully blocked this time. The P2002 fault appeared and I had the pressure checked. It should be about 3mBar at idle but was 50mBar (measured between turbo and DPF). The car is now in today for a full DPF clean. It's done using a Terraclean product. Fingers crossed. I'm having a full engine clean done as well (standard Terraclean service). Picking the car up later this evening so will report back. One thing I wanted to try was to check the operation of the EGR valve. I'm not a mechanic/electrician but have some level of competency . Can anyone tell me how to check that it is working? Was thinking of just running 12V through it direct from the battery but I don't have a wiring diagram.
-
Thanks Newbie, that's all really helpful. I'm now not looking forward to the state of the silicon grease when I check it next! I think, as you have used the Toyota grease for many years and it has been very successful, I'm going to switch to it. The boots were in a good state the last time I checked so not sure what is happening. I'll investigate further. It's a simple job as you said - it's just that repetitive jobs frustrate me Thanks again - great advice throughout the thread.
-
I've done a bit of research on this as I was fed up doing this job every 3-4k miles. Apparently Silicon grease (water resistant) is ideal for the job. Cheap and easily got. Small tube. I checked mine after 4k miles following application of this new grease and they did look a lot better than usual. Usual bit of dirt but pins were less rusted and seemed freer. I don't know the exact technical reasons for this but I'm sure someone here can shed some light!