GS450hPurr
-
Posts
10 -
Joined
-
Last visited
GS450hPurr's Achievements
")


-
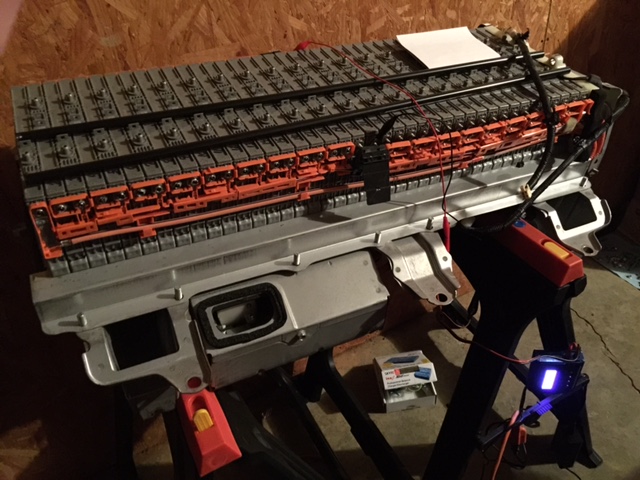
Got all the modules cycled. TAKES FOREVER - even running around the clock. I was doing 1 at a time, but after the first ten modules I had to break down and get a Venom dual charger for the task. Now I am keying in on making sure I balance the charges evenly across all 40, then planning to put them all back together and let them "even out" in series. I did remove all of the copper bus bars to do a light sanding job with an electric sander so they're all nice and clean again. Planning on putting them all back together with a coating of di-electric grease. The one bad module I flagged and replaced, I did run through a few CHG/DCHG cycles for the fun of it to see what would happen and it still wants to hang out around 6.8v (a .3v improvement from the original reading of 6.5v when I first assessed all 40 voltages a month ago). Tomorrow I should finally be reinstalling and firing the 450h back up again. I'll post more and followup with results!
- 128 replies
-
- 2
-

-
- Check Hybrid
- VSC
- (and 3 more)
-
Hey John- I currently have the IMAX cycle set to charge first then discharge 5 times so I may go amend the process to your above post. I went ahead and set the DISCH/CHARGE to maximum Amp to save time since it doesn't harm them or affect quality. I have the IMAX Discharge set to the lowest Discharge option of 0.1v and the Charge set to 7.9v. I guess I figured it would auto charge on cycle setting but maybe not. I'll look again. I think on the auto-charge setting it will auto max charge, but again, I'm kinda getting to know the IMAX and its settings some. There is also a separate setting for "Re-Peak" which is what it sounded like you were referring to in the above post where finding more room for peak capacity on recharge. Since I am cycling them all what then should be my final target charge for all modules upon completion? I was going with 7.9v and then hooking them all up in their series to let them "even out" prior to reinstall. Of course that'll be a week out from now since I'm just now getting off the runway with the reconditioning phase.
-
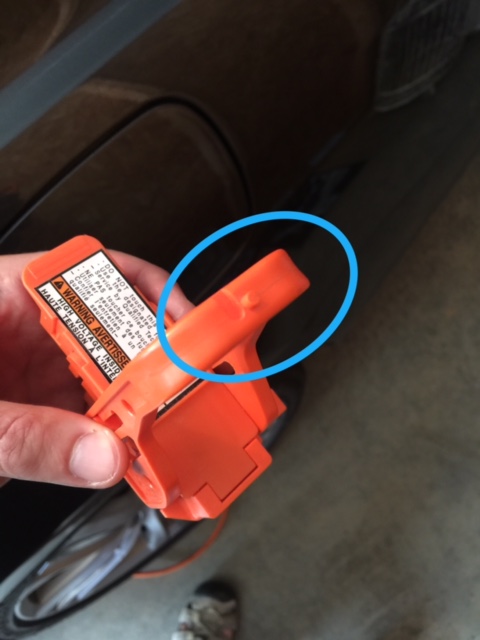
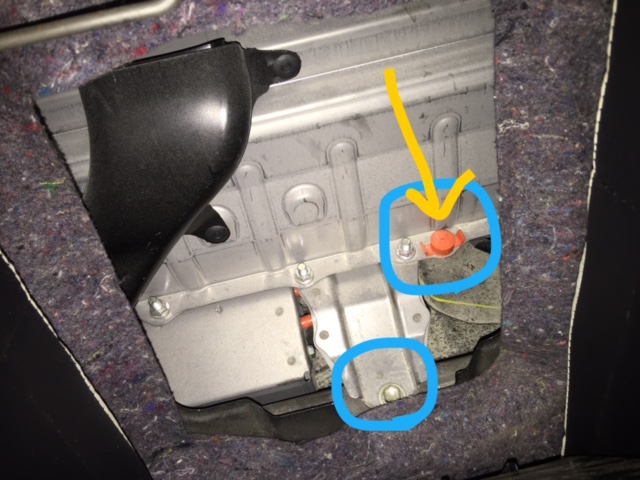
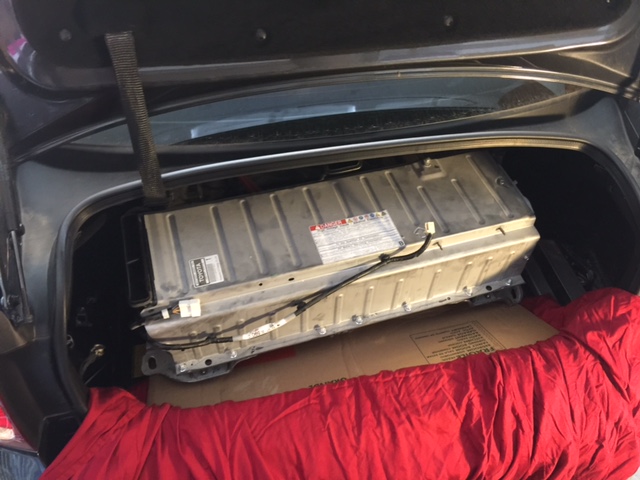
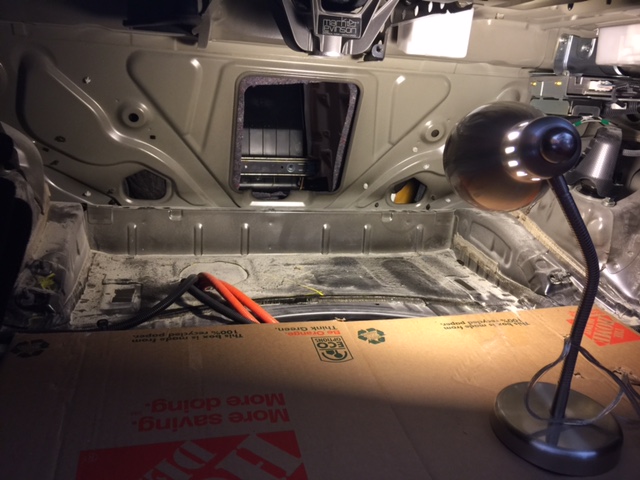
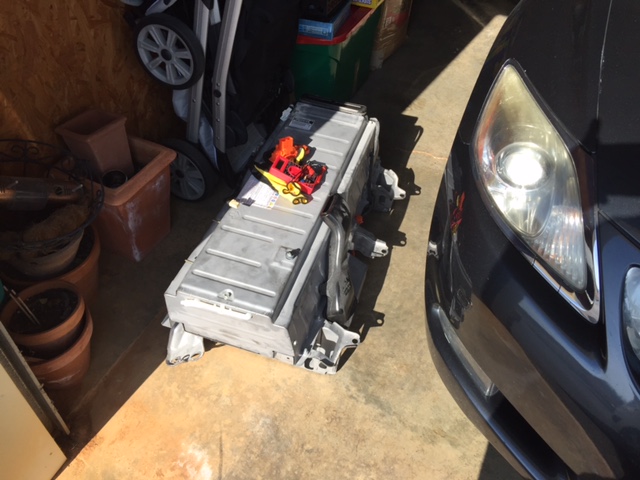
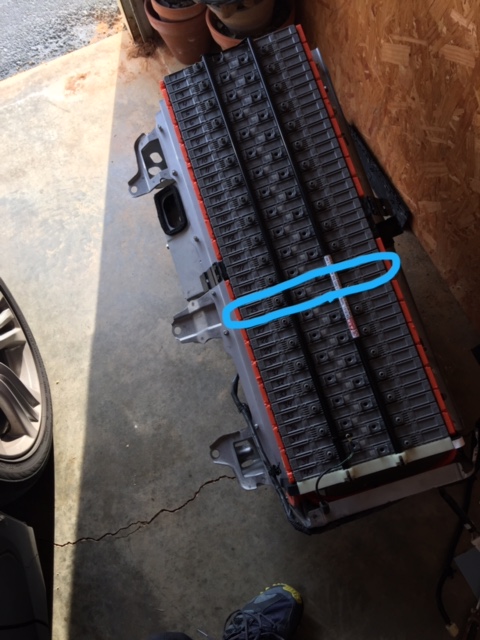
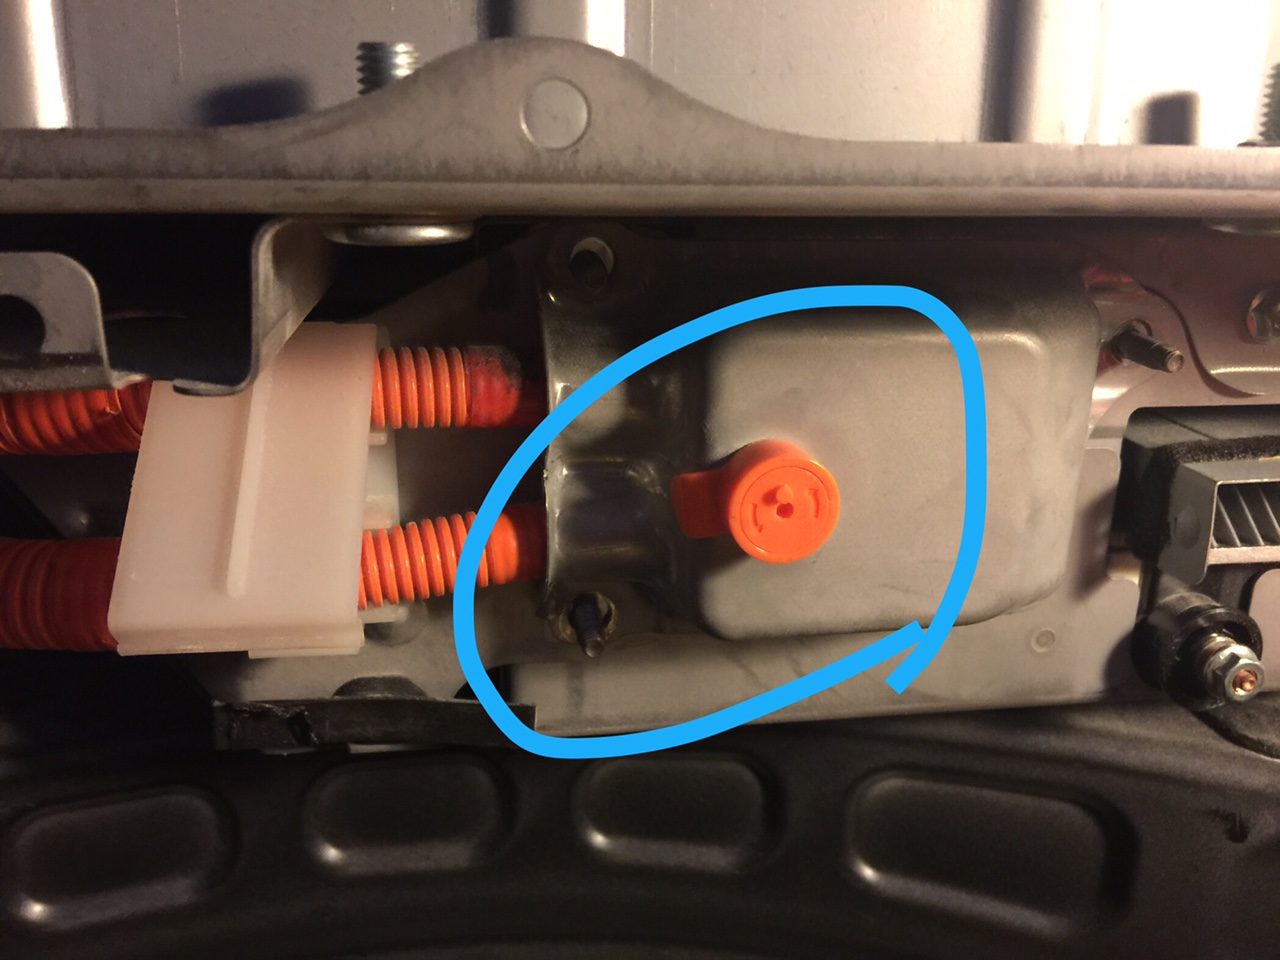
Here are some helpful update pictures and feedback below for anyone out there... The key used to remove the two (2) orange voltage safety pins (see picture of below). I got miffed at this step and another member chimed in above to help. I thought I'd show a picture to help others. The key on the fuse panel is used to fit the male/female notches and turn the pins. This ensures you are now entering the main voltage hot zone with the fuse in fact removed. Nice thought out safety feature in my opinion by Lexus. The blue circles above show one of the orange voltage safety pins you must use the fuse with the built in key to remove shown in the first picture above that I circled. Wait and unlock this orange pin when you get the battery removed from the trunk. The secon blue circle above just shows one of the 3 rear mounting bolts you'll need to access in order to uninstall/install the hybrid battery pack. ***Another tip would be to completely unsecure and lean the seats forward to have better access through the fireproof material into the trunk space. Slide the hybrid battery pack carefully forward onto a cardboard box to avoid unnecessary scratches inside the trunk area. I recommend a lamp with a bendable neck or shop light you can angle for good lighting to see while you work inside the trunk space. These are heavier than they look. Wear gloves, get a friend to help you and stay clear of the paint job or you'll be spending more money going to the body shop next on your list or repairs. I was strong enough to lift it and move it but it was awkwardly large to handle given the strain. The sharp edges of the machined metal makes it a must to wear gloves while moving. I cut my hands a couple of times. Number your modules 1-40 and test each module. I circled the obvious bad one I had in blue above. It was #25 on my series. It tested in at 6.5v without load. It will be replaced.

- 128 replies
-
- 2
-
-
- Check Hybrid
- VSC
- (and 3 more)
-
Hey John- So I got the IMAX B6 Mini charger in over the weekend and started playing with some of the features. I did some reading up on NiMh batteries and from what I seemed to read up on these batteries don't tend to have memory like some other kinds. I was also making sure there wasn't a minimum discharge rate. I have a few questions: The IMAX charger has some options for the discharge/recharge settings and so I wasn't sure... is it better to conduct the discharge/recharge cycles to the lowest Amp setting or does it really matter? I figured the slowest discharge and recharge setting was better but I'd rather speed things up and increase the Amp rate and get the reconditioning along quicker. Not sure here so the first module is set low with Cut off at 7.9v. I also set it to cycle 5 times - is it necessary to cycle, and I know the complete cycling is good but is it necessary to set it to 5 times for each module? If the ideal here is the higher the number of cycles the better then I am fine with doing the cycle 5 times. I just wanted to know your thoughts on making this endeavor the most efficient for the time invested in reconditioning the modules with the right settings in mind. I know the modules are standard at 7.2v comprising of 6 cells at 1.2v each. So if the IMAX automatically knows when these NiMh modules are fully charged what should be the target voltage be for the cutoff upon recharging when I leave them to cycle?
-
UPDATE: I managed to get all 40 modules tested. Here's what I got: All cells tested 7.8v except #21 was a little low at 7.7v and the culprit appears to be #25 which tested at 6.5v! So I'm only going to replace the 6.5v culprit. I'm starting to wonder why only 1 cell would have caused the entire battery to fail. I of course got the check engine light, the codes, the gas engine coming on more, and then it got to the point where the cooling fan stayed on and then the car completely lost power while driving a couple times. I was under the impression these cars would continue to drive on the Gas Engine just fine.
-
John- I looked into and ordered myself one of the Imax B6 mini chargers you recommended. You're right. This is the one to use for the modules in our vehicles. I am planning on checking each module for not only Voltage but AH capacity on all of the modules and replace accordingly. Once I have all the replacements above 4 AH I am then going to condition every single module by setting them to fully discharge and recharge cycle on the Imax B6. Then I am going to enure they are all fully recharged at the same voltage reading prior to reinstalling and reassembling. Pictures coming soon...
-
Hey John- First, thank you solving this mystery. I am trying to demystify this time consuming repair for those of us who are qualified and not afraid to take on this repair, however it is imperatively important that we all follow proven methods of safety for ourselves and the proper mechanics of the batteries and the respective modules within. I for one am not and expert at understanding the battery chemistries so that was a weak area for me and I didn't want to proceed without the right knowledge. For anyone else out there following and resorting to this post NOTE that I have found a few areas in my progress to make this original repair post a little easier to follow. I have managed to overcome a few methods I will later add into this process which will make the repair less burdensome I think. For one, the thing I found to be a much better method was actually removing the rear bottom portion of the leather bench seats, setting them aside outside the vehicle in a safe place to avoid rips, tears, or punctures, and then for the upper portion of the rear seats just loosening the bolts securing them below where the seat-belt anchors are and then simply leaning them forward with the seat-belts still running through the plastic guides on the upper corners of the upper seat cushions near the windows (2 of those) and then you don't have to actually take the upper seats out but ultimately allow yourself more room to get a good firm grip on your ratchet in order to remove the (3) hybrid anchor bolts behind the seats, at the rear of the boot/trunk, and beyond the fireproof fabric without tearing it. I also didn't want to break the center arm rest plastic divider that only pops forward about 6 inches and is connected....pry to far and then you'll end up breaking that. $$$ Trust me, save yourself some heart ache and remove the lower portion of the rear seats and lean the upper seats forward after taking out the two bolts for each side. Keep in mind the rear seats are a total of (2) pieces: The Upper Portion and the Lower Portion. One bonus to this is you'll also take a moment to find any loose pocket change which can rattle in time and recover any of your kids missing Legos, I also reaffirmed that my seat-belt anchors were all nice and snug for a safety check. One seat-belt anchor was in fact loose.
- 128 replies
-
- 1
-
-
- Check Hybrid
- VSC
- (and 3 more)
-
This helps. I am going to invest in the charger you mentioned. I have purposely NOT started the module assessment or replacement yet until confirming this bit of informations because I did not want to make a situation worse or more expensive. I will do the diagnosis and then decide the most efficient means to replacing them, with the "AH" (Amp Hours) in mind. I currently have my Hybrid Battery Pack removed and sitting in the garage awaiting my next move. And let me warn ANYONE who attempts this repair just how heavy these battery packs are. I am strong but this battery was very heavy to move with sharp machined metal edges to grab hold of. You better man up, cover the body of your car, and lift up and away and be mindful of your posture as not to strain your back or otherwise. It is heavy!!!!
- 128 replies
-
- 1
-
-
- Check Hybrid
- VSC
- (and 3 more)
-
Will a regular 12v trickle charger pickup on the lower Volt capacity modules without overcharging them?
-
Hello English friends... This is an awesome post with info to help alot of Hybrid 3rd Gen drivers now suffering the Hybrid battery failure. I being one of them. I'm writing in all the way from the U.S. in hopes of adding some to this post but also have highlighted my two main confusions in RED below. PLEASE HELP!!! My GS450h wont run now.... I too started getting the failing hybrid check engine light about a year ago. One thing I am somewhat confused about is when the hybrid battery finally completely fails, are our GS 450h models still drive-able. I backed mine into the garage two weeks ago where it has not moved since. I was following this post a while back and decided I was comfortable giving this DIY a go. Ok, well when I moved my car into the garage to start this Hybrid Battery pack diagnosis and repair it was running, but as soon as I pulled the orange disconnect fuse to the battery pack upon disassembling the trunk/boot in order to remove the battery pack, I plugged the fuse back in shortly thereafter to start my car and move it some and it would not start up at all. It's as if the Hybrid battery completely discharged and now my car will function on 12v (new battery) but won't kick into the gas engine to actually drive. I knew the hybrid was on it's last leg but shouldn't it at least start up and run on the gas engine? I literally disconnected the orange hybrid pull fuse and about 45 minutes later reconnected and suddenly it wont drive at all now. So now that I've gone this far, I am now 90% disassembled in the trunk and about to remove the hybrid battery for further evaluation and testing of all 40 modules to see which ones I need to replace. One place I am stuck at is the small orange circle thing with arrow over the metal cover plate covering the orange power leads. Not sure how to get this booger off and don't want to break it. Any suggestions on that too would be helpful in reference to future followers of this thread as well as me! I will come back in and post my pictures and results too. Thanks everyone!
- 128 replies
-
- 1
-
-
- Check Hybrid
- VSC
- (and 3 more)