

Description
Click on photos to enlarge...
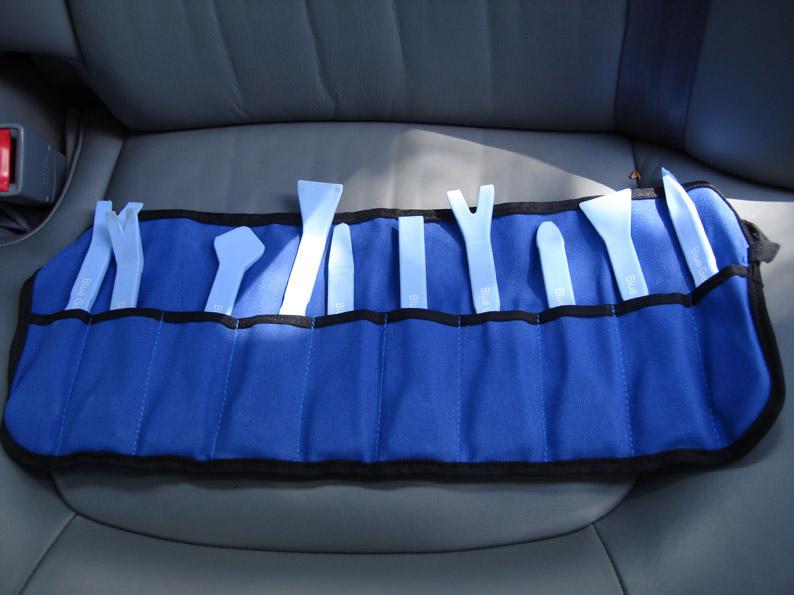
Buy some of these plastic trim removal tools as above (they are called Blue Tools and made in USA) much better than using a screwdriver covered in rag - I cannot stress how much these will save you in terms of no damage or gouge marks to your interior. Current price on ebay is around £22 or so, search under 'trim removal'
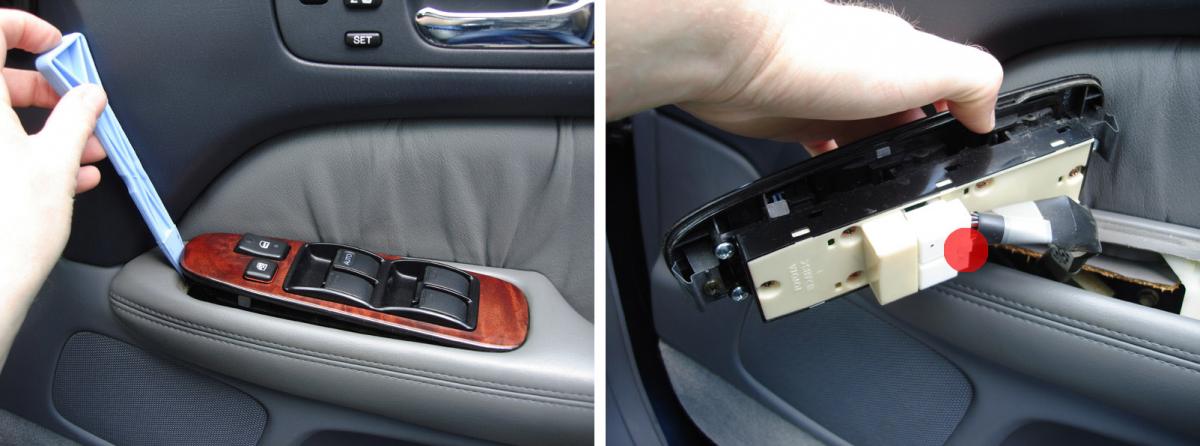
Use one of the blue tools and simply pry from the narrow end as I am doing in the first photo, the window switch bank will pop up quite easily. You then need to disconnect it, the plug has a plastic clip that you simply press in with a small flat blade screwdriver and then slide out (indicated by the red dot)
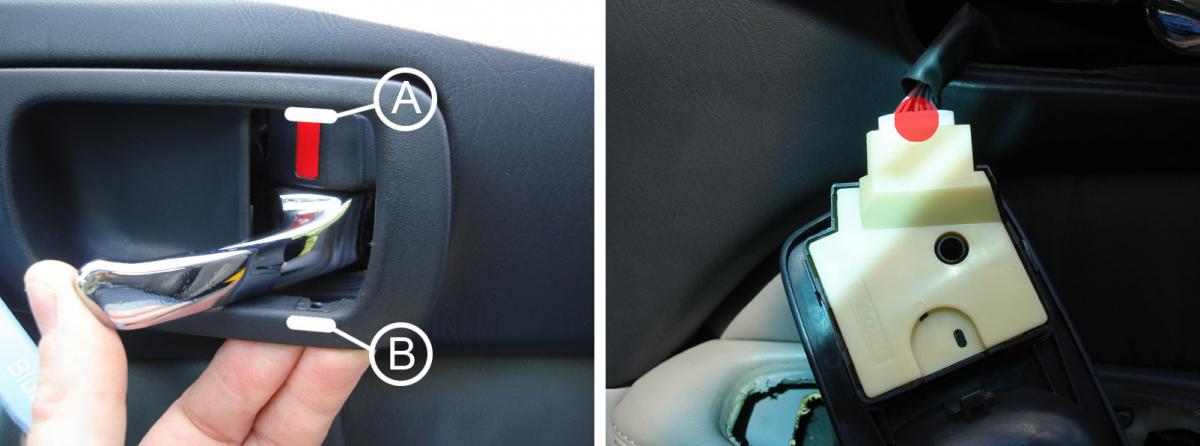
Now for the seat height adjuster - I have pulled this out, so you can see the notch where the pin fits at point 'B' in the photo. Another pin locates the trim at point 'A' above the door pull. Place one of the blue tools at point 'B' just beneath the chrome door pull and lever the trim out - this bit is a little tricky, then do the same for point 'A'. You will need to pull on the chrome door handle and hold it in the open position so that you can then remove the trim. As with the window switch, there is another plug that you need to disconnect - highlighted with the red dot.
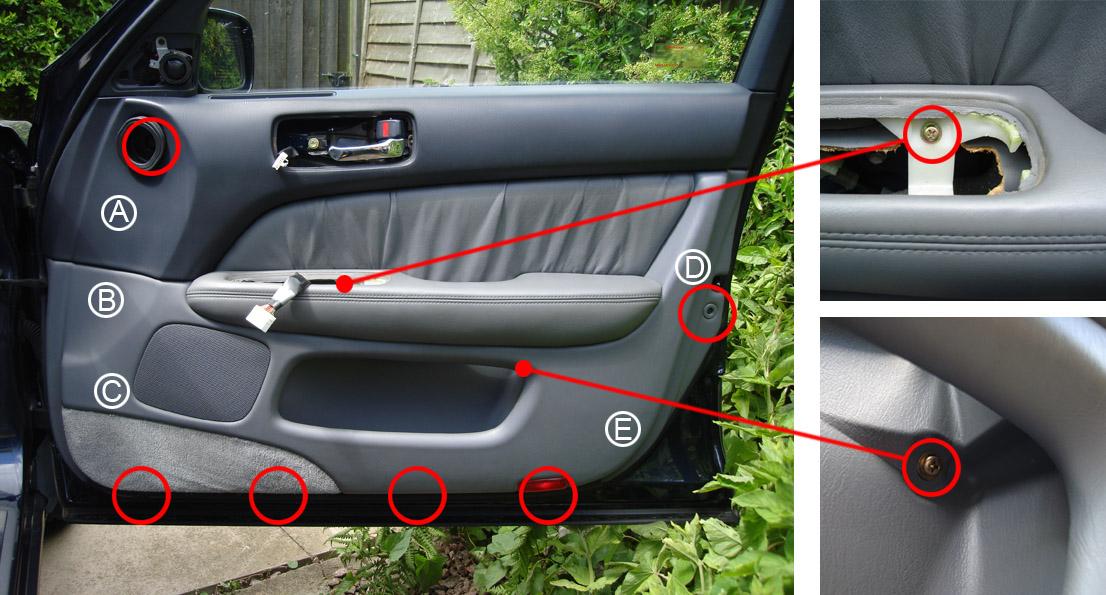
Time for the door panel - nice and easy. The red circles show the locations of the screws of which there are 8 in total, two are hidden - one in the armrest and the other just inside the door pocket, take all of these screws out using a phillips screwdriver. Locations A,B,C,D,E are the positions of the door trim fasteners behind the panel, use a blue tool and insert it between the door card and the door at these points and then pry towards you, they should give easily and the panel will then be loose.
OK once this has been done, the door card can now be taken off completely. There is a bit of a technique to doing this - grab hold of the leather armrest with your right hand, get your fingers on your left hand behind the door card above 'A' close to where the mirror is. Lift the door card up with your right hand whilst simultaneously using your fingers on your left hand to gently pull on the plastic trim toward you. The panel will start to come away easily, at this stage don't feel tempted to drop the door panel or yank it as you still need to remove the door courtesy light plug!
With the panel free, sit on your drivers seat and pull the door inwards slightly then rest the door card on your legs - you can now use a flat blade screwdriver and disconnect the door panel courtesy light plug (same procedure as the window switches and seat height adjuster).
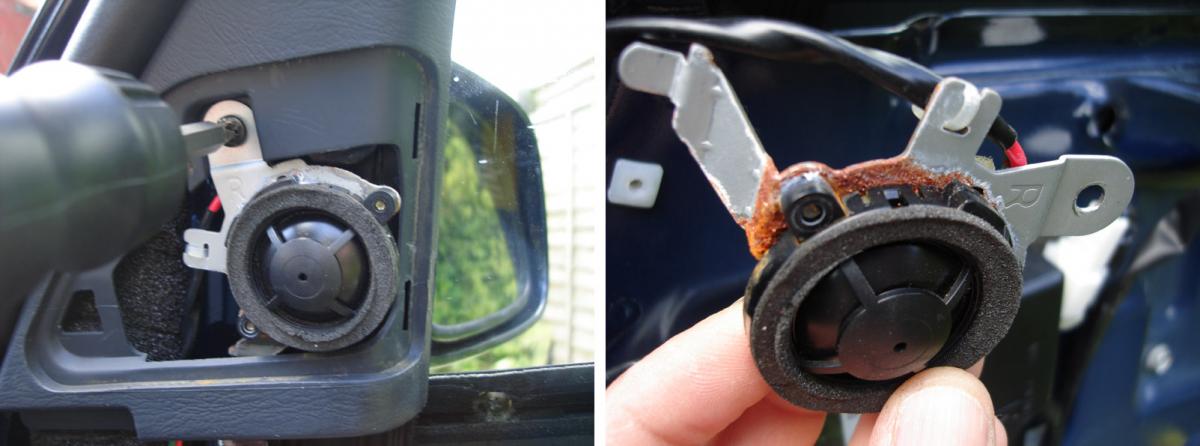
Next bit is easy, pop off the grill that covers the tweeter and unscrew the speaker - wiggle it about upwards to free it from the door, use your hands to gently pull the plastic trim away so you can drop the speaker out from underneath. A small metal tab helps to locate the tweeter and you will see this clearly once it is free. Look at the corrosion on my tweeter!
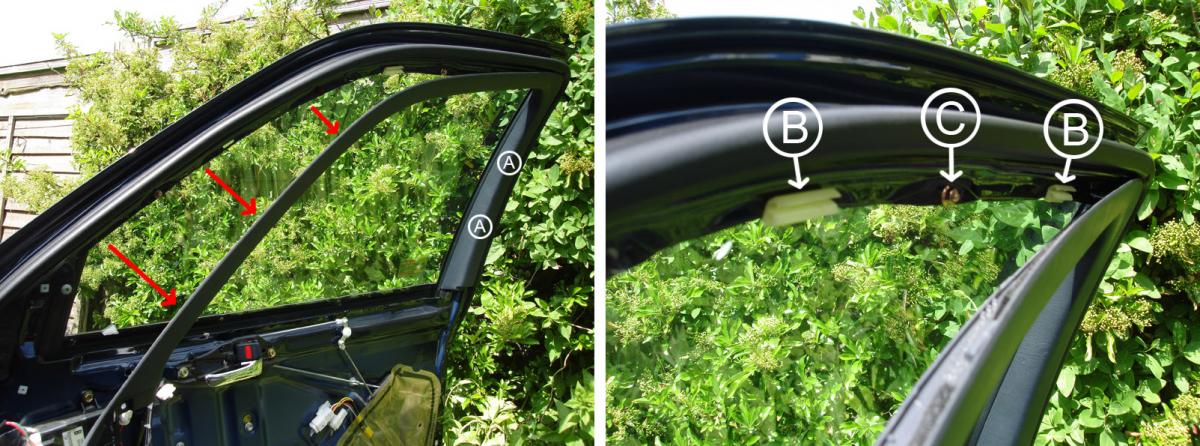
This next bit is a little tricky and requires you to be gentle as I managed to break a few trim clips. Use both your hands and get your fingers behind the plastic window trim surround just above where the mirror is and pull towards you, work your way up towards the back corner of the door. Locations 'A' are where two metal spring clips secure the trim to the door, tackle these last - they do grip the trim quite tightly, so again use your fingers and be gentle but firm. Locations 'B' show you the trim clips - there are only 3 on the door frame. Location 'C' shows one of the four nuts you have to remove.
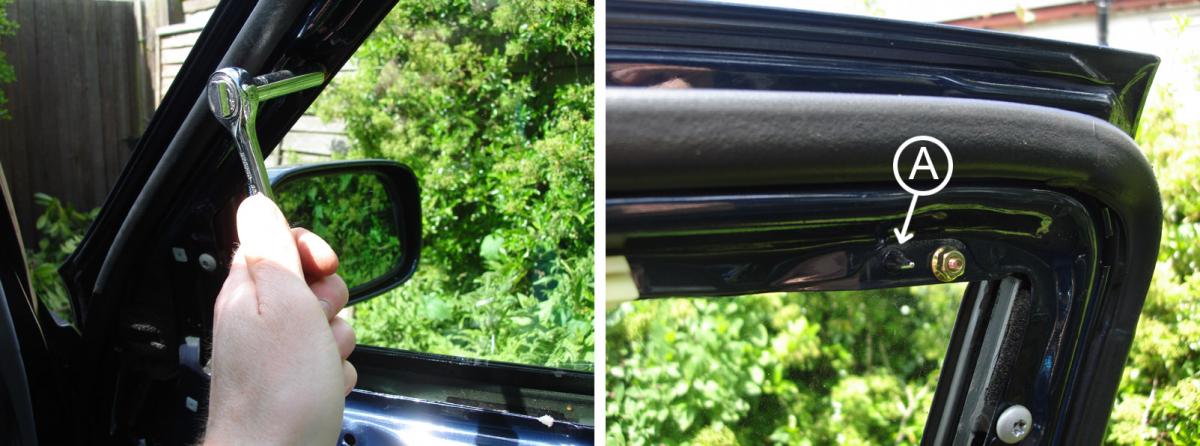
Use an 8mm socket and undo/remove all four of the nuts (they compress the trim against the door) they all run along the same line in the door frame and you can easily see them. The two at the front of the door frame were badly corroded on mine and one of the bolts sheared, both were replaced with stainless steel items from an engineering factor. Location 'A' shows a metal spike located next to the nut and these run along the door frame. Next is the wing mirror, remove the foam insert and then slide the power plug off of the metal tab - disconnect the power supply (same as all the others we have done). There are 3 bolts to remove before you can take the wing mirror off. Loosen all the bolts off and stand with the door ajar so you can hold the wing mirror as you remove the bolts. Wunderbar!
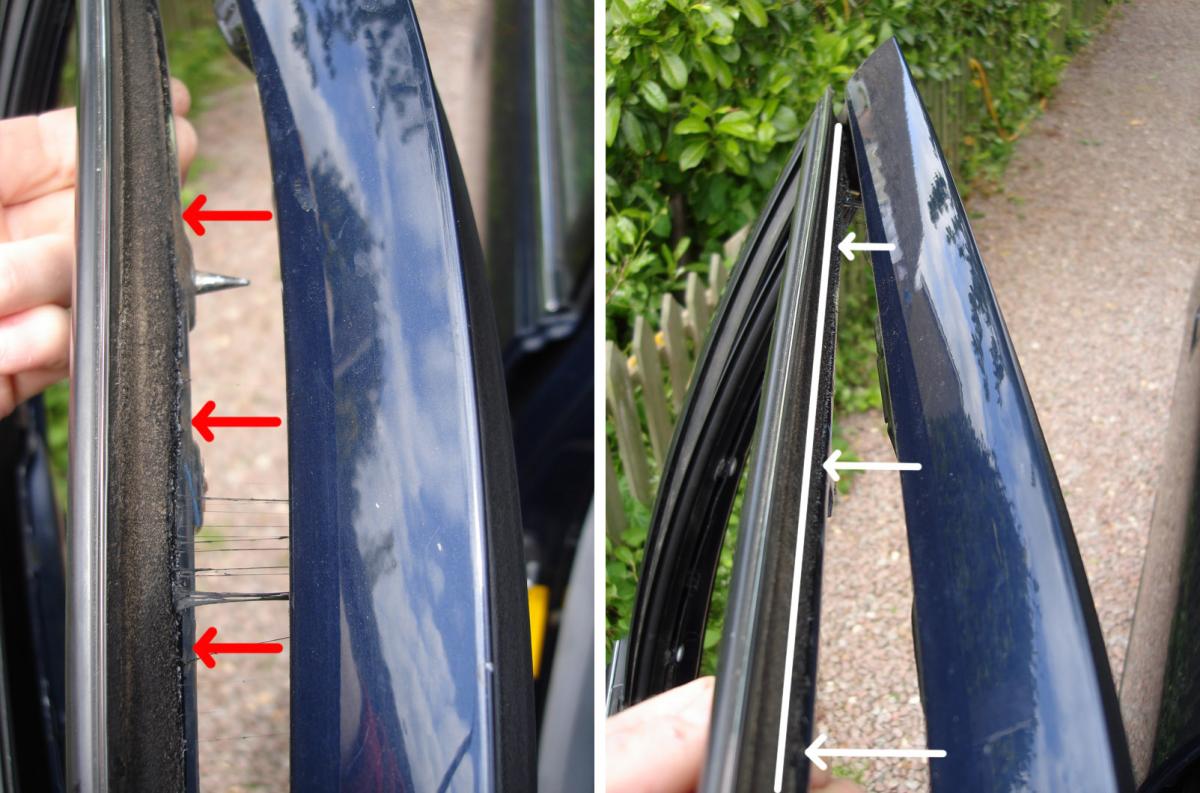
Now you have complete access to the chrome trim which is the cause of the problem - the adhesive/ foam backing as you can see on the left photo has completely dried out all along the length of the trim, believe it or not the water gets behind this and tracks all the way down and drips out where your tweeter is!. Temporarily connect the window switches and lower your window, remember location 'A' in the previous stage showing a spike? OK, using a flat broad bladed screwdriver press these spikes gently outward to reveal the adhesive/foam strip - if yours is anything like mine, this will not require a great deal of effort.
The final stage - now everything is in pieces, I used WD40 to clean the metal surfaces that the chrome trim will be bonded to, cleaned the door with an engineering brush and hoover plus just generally made sure that everything was spick and span. The photo on the right (white line/arrows) shows where I injected the mastic - to make life easy, I used two blue tools to keep the chrome trim away from the door whilst I did this. I ran a line of mastic all the way along the trim strip, from the top edge of the 'B' pillar down to the corner of the door where the wing mirror fits and I also put some around the wing mirror plate just for good measure.
Once you have done all of this, push the chrome trim back into position and replace the nuts and tighten them but do not over do it - as you do this, you can see the trim being pressed against the door and some mastic will ooze out which can be easily cleaned off with some white spirit. When you power the window up, a little more mastic will be squeezed out which again can simply be cleaned off.
Finally, refit your wing mirror, power supply and foam insert. Then fit everything back in the reverse order that it was removed in. FINIS. 
Extra Fields
General
-
Tools Used?
Socket set<br />Phillips screwdriver<br />Blue Tools
-
List Parts Used?
Mastic - non-setting as used in the marine industry<br />New plastic trim clips<br />8mm stainless steel nuts and bolts<br />WD40
-
Costs?
Minimal
-
Difficulty Level? 1-5
2

Recommended Comments
Join the conversation
You can post now and register later. If you have an account, sign in now to post with your account.