Forbesy
-
Posts
14 -
Joined
-
Last visited
Content Type
Profiles
Forums
Events
Store
Gallery
Tutorials
Lexus Owners Club
Gold Membership Discounts
Lexus Owners Club Video
News & Articles
Everything posted by Forbesy
-
Graeme.. There's a pic of a rear height sensor in this post http://www.lexusownersclub.co.uk/forum/index.php?/topic/97659-Rx300-Se-L-Height-Sensor-Fix The balljoint is on the end of the swingarm bit.. although for someone to pick this up on an MOT is surprisingly thorough, I'd say.. You could certainly pop the bolt out and give the balljoint a wiggle in-situ to free it up. It's tiny and wouldn't put up much of a struggle but I'd be inclined to ignore it.. Your compressor run on startup does seem long to me, unless you have the easy access mode enabled, perhaps?
-
Newbie Advice Please
Forbesy replied to Matty RX's topic in RX 300 / RX 350 / RX 400h / RX 200t / RX 450h Club
Beautiful - thanks Chris... Great to see that shed science isn't dead -
Newbie Advice Please
Forbesy replied to Matty RX's topic in RX 300 / RX 350 / RX 400h / RX 200t / RX 450h Club
Hi Chris... Incredible result on that caliper casting.. I spent a long time with a wire brush earlier this week getting my rears nowhere near as good as that... googling DIY electrolysis tanks now but any quick tips appreciated! ! Cheers -
Yeah, mine's about the same as yours.. Gentle raising with a couple of audible clicks as it switches air supply from front to rear... I've got the expected timings in the workshop manual and recall that mine was about right, if not a little faster.. Cheers
-
Rx300 Se-L Height Sensor Fix
Forbesy replied to Forbesy's topic in RX 300 / RX 350 / RX 400h / RX 200t / RX 450h Club
correction now I've checked. . seller 'mattstheone' -
Rx300 Se-L Height Sensor Fix
Forbesy replied to Forbesy's topic in RX 300 / RX 350 / RX 400h / RX 200t / RX 450h Club
hi folks... Alan.. you can see the rear sensors if you look from the back of the car. Look along from that driveshaft gaitor towards the centre of the car and you'll see the cream coloured lid of the sensor before too long.. Eric, I just searched Ebay for RX300 workshop manual and got a CD version for £4 from a seller called 'mattistheone'.. He doesn't have any up there at the mo, but I'll bet they come up regularly... -
Rx300 Se-L Height Sensor Fix
Forbesy replied to Forbesy's topic in RX 300 / RX 350 / RX 400h / RX 200t / RX 450h Club
Ah, carbon tracks! Indeed 'conductive paint' was something of a best guess ;) I'm no electronics whizz as you can tell.. -
Howdy all, 2005 RX300 SE-L 80k Thought I'd post this in case it helps anyone out - Considering a new height sensor is about 300 quid, I thought I'd open up my faulty one and see what laid within before shelling out. Although I had no warning lights etc., the car was riding really harshly and kangarooing at the back from the tiniest bump, so something was clearly amiss.. Consulting my ebayed workshop manual: Straightened out paper clip connecting pins 4 and 13 on the OBDII port starts diagnostic mode (quite fun as it opens up a diag screen on the satnav which is interesting to play with).. The 'OFF' light for the air suspension flashes out code 14 telling me that the LH rear sensor is faulty. Took about 10 mins to take it off and test its resistance according to the chart - Mins was in the 100's of Kohms, so manual recommends replacement. Nothing to lose at this point, so opened it up and found that it's a pretty rudimentary bit of kit, with some steel springs that carry the signal (apparently via some black conductive paint on the lid) As you can see, it was all pretty rusty in there (and wet with WD40 in these pics!) So, I cleaned everything up, gave the springs a rubdown with some emery paper (If you do this, be careful when you take the lid off - Don't, as I did, let them ping out and have to spend half an hour trying to find one of them!) Do, however, pull them out and clean up the area where they sit into the base - I think this is where mine was losing connection. Anyhoo, cleanup, reassemble, check resistance (all good now) and put it back on the car - All back to wafty floatiness !! If I ignore the spring-finding time, it probably took and hour in total and cost me... errrm.. nothing. Well worth a bash if you have height sensor trouble..

-
Rx 300 Rear Diff - Oil Change
Forbesy replied to Forbesy's topic in RX 300 / RX 350 / RX 400h / RX 200t / RX 450h Club
Yeah, must admit to being a bit concerned about the chassis rust although it doesn't seem structurally troublesome as yet, another job on the list is to spend some time with a wire brush and some POR15 paint... can't hurt ! For the diff I put it on some ramps, but reckon there's enough room to shimmy under there without anyway.. -
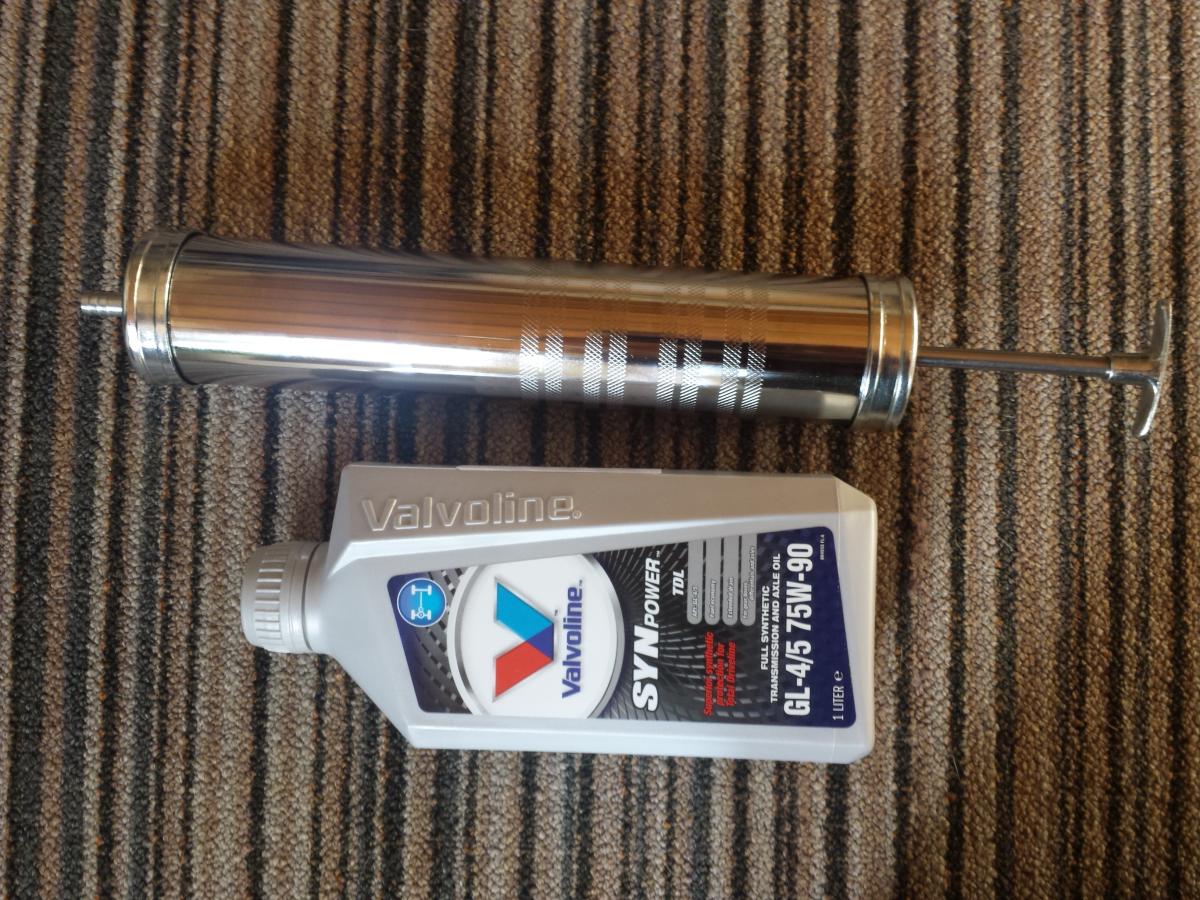
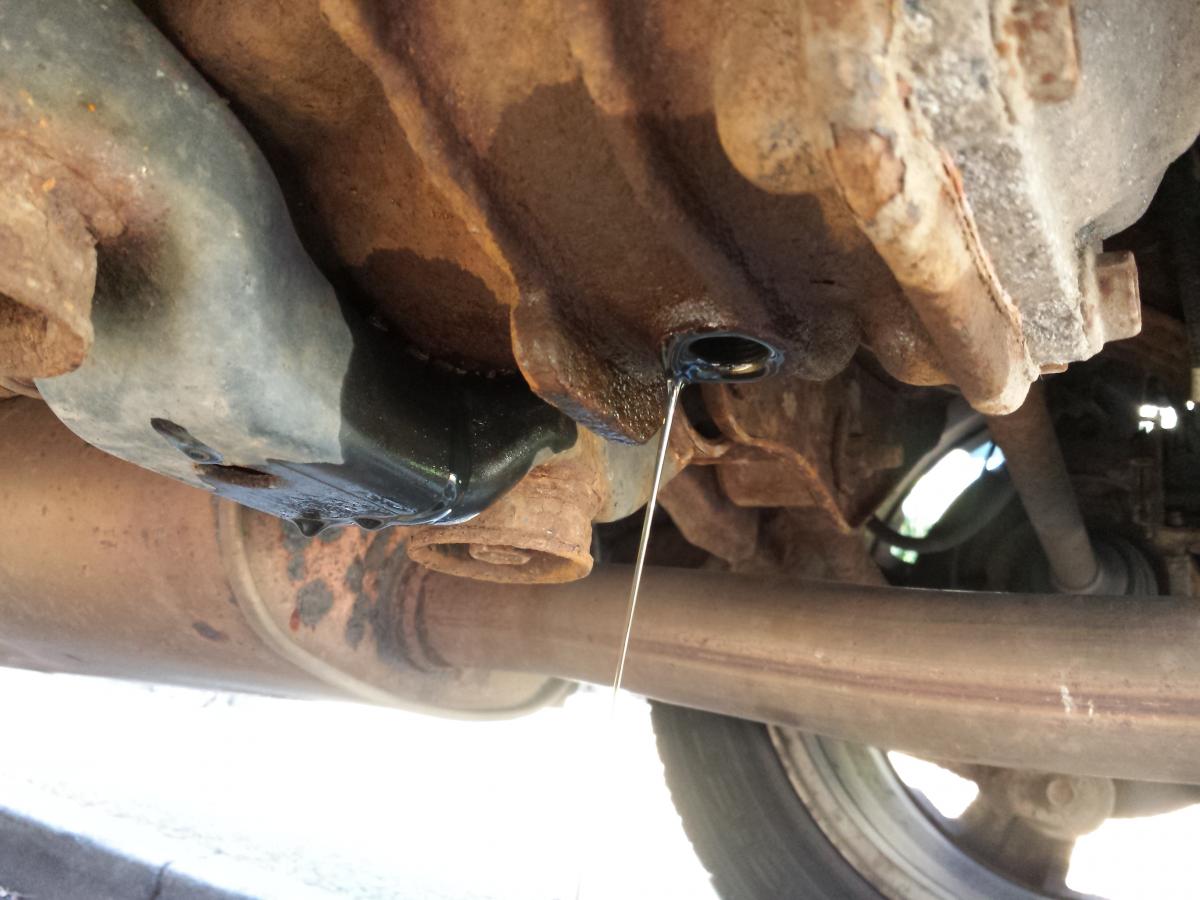
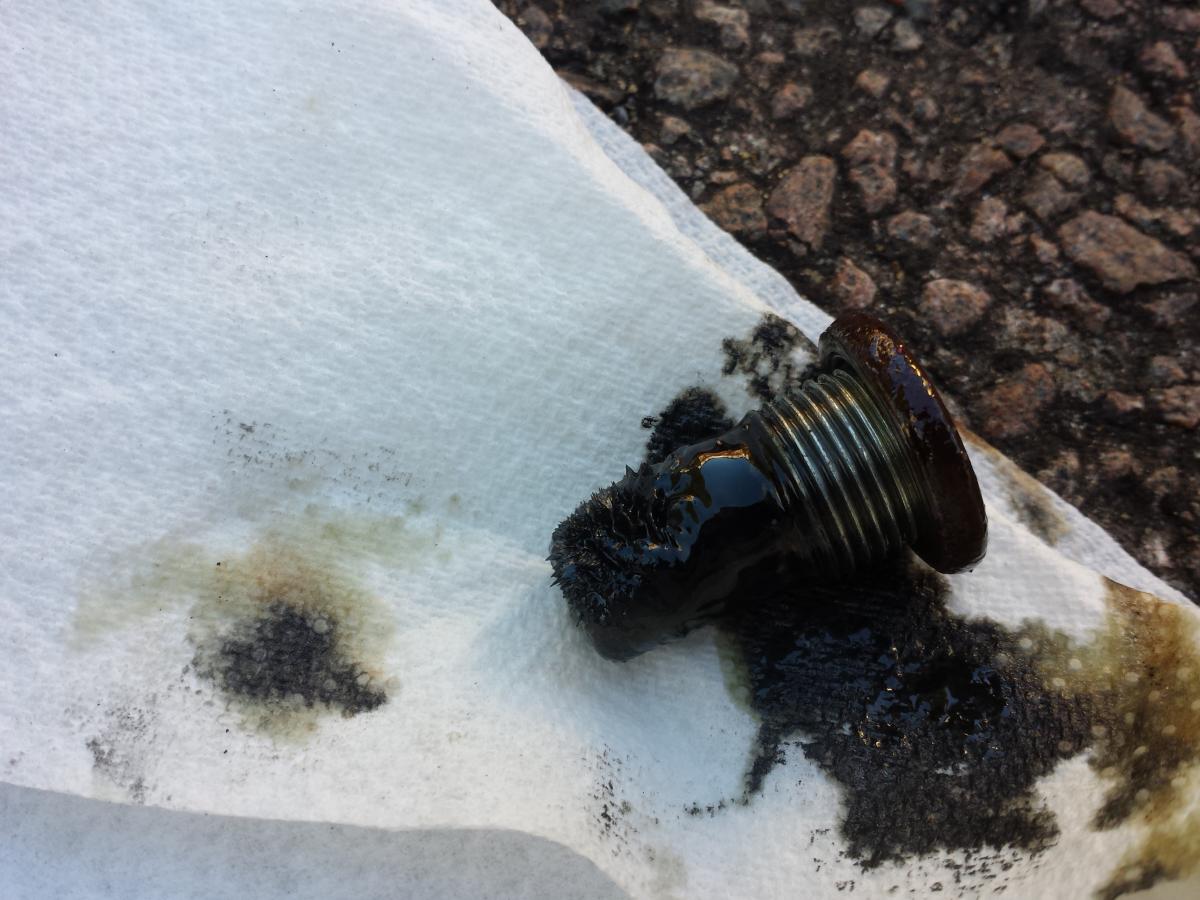
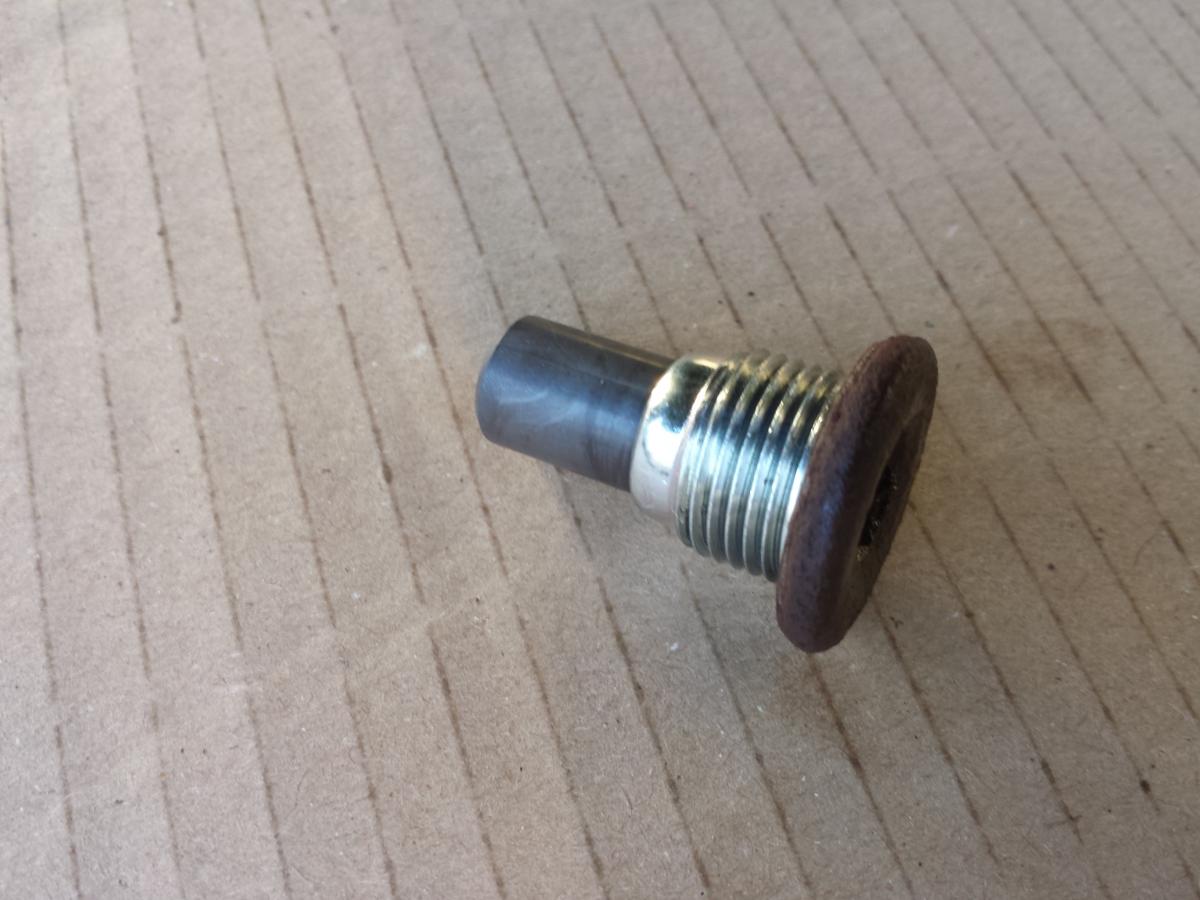
Hi All - Thought I'd give a few pics of my latest fixup escapades on the new ride.. 55-reg with 75k miles. This time, the rear diff oil change. Took about 45 mins, with the majority of that spend trying to undo the filler plug ! Easy job though and well worth doing if you're unsure of history, as I am ! Parts and tools: 1 litre GL5 oil (I went for fully syn at around £15) 10mm allen key oil squirting device (I got the one below from Machine Mart at £9) Fill plug green, drain plug red - Hint: Always undo the fill plug first ! You don't want to be stuck with a drained diff you can't refill ;) On mine, the drain plug was easy enough, but the fill plug took a considerable amount of Plusgas, then 'freeze & release' spray before it would give way.. I drove around for about 15 minutes to get some heat into things before draining. Drain away... I only caught this pic at the end of draining and the oil looks pretty clean, but the first bit that came out was black - The whole lot also stank like rotten eggs.... Please, if you do this - Wear gloves ! To be fair, even the new oil had a bit of a funky smell to it, so I don't think this is unexpected. Magnetic drain plug certainly does its job ! Before: and after: Easy from here - replace drain plug (mine didn't have a washer on it) and refill diff until oil comes out of the fill hole - The Machine Mart pump took 2 fills to get this done (great tool, took about 3 mins). Replace filler plug - mine did have a washer on it, which I just cleaned up and reused, but no leaks as yet ! I think the schedule on this job is @60k, so I'm pretty sure mine wasn't done - But glad it is now !
-
Spot on! Thanks for that.. Now I have half a chance of getting hold of the right one without getting bent over by Lexus!! cheers
-
Hi All, Hoping that someone can throw some light on a little dilemma ! My recently-purchased 55-plate SE-L has the rear DVDs but came without headphones or a remote control. The headphones were easy enough to Ebay (any IR headphones will do, take your pick!) but the remote is seemingly trickier to source as there are several different types. I'd muchly appreciate if anyone who has the same DVD as mine is able to post a pic of the remote so I can be sure I'm hunting for the right one ! Muchas gracias.. I've got this type:
-
Hello - Newbie. First Prob Solved
Forbesy replied to Forbesy's topic in RX 300 / RX 350 / RX 400h / RX 200t / RX 450h Club
Sorry mods - Those pics are far too big aren't they? oops. -
Hi All, I bought a 55 reg RX300 last week - Love the drive and all the toys, but the car is not without it's problems ! I found a few of these before I bought it and used as negotiation points so I'm not unhappy with it - Hey, everything can be fixed, right? ;) The list so far: Water in boot - I've found the threads on here about resealing various seams around rear end, so will tackle that at some point. Power steering pipework - Hillbilly fix discovered with slightly leaky jubilee-clipped joint Rusty chassis - Guess car was in a pretty corrosive environment before. Intend to treat & paint with POR15 Front discs & pads - change 140amp alternator fuse - as below After having the car for only a couple of days, the wife took it out for the first time, only to call me up and tell me it wouldn't start.. Oh dear.. I went to take a look and found that power was coming on - all the dash lights etc. but nav didn't power up and driver's widow wouldn't work - Weird. When trying to start the engine, there was nothing at all, no clicks or clunks, nothing. Popped off the fuse cover and found this - Yes, a nice blob of solder where a fuse should be ! Turns out this is the 140A fuse marked 'alternator' on the map. Easy enough to swap? Wrong! These fuses are bolted in from underneath rather than just pulling out, so - fusebox out: 3 bolts: two in front (into wing) and 1 behind (into bulkhead).. Battery out for access: Unbolt everything, unclip bottom casing from fusebox and push fuse carriers out through the bottom - You can see how they're held in by a series of clips: Once they're out, you have access to the bolts that hold in the fuse: One either side (I marked 1 cable with a dot, just in case I got confused;)) Old one out, new one in - all back together and away we go.. Well, that's the first job done - I think the water ingress is the next most-pressing topic, so will let you know how that goes! Cheers for now..