


JollyRoger
-
Posts
41 -
Joined
-
Last visited
Content Type
Profiles
Forums
Events
Store
Gallery
Tutorials
Lexus Owners Club
Gold Membership Discounts
Lexus Owners Club Video
News & Articles
Everything posted by JollyRoger
-
Hi Guy's, just need a bit of info from any-one in the know, Will an IS200 Transmission Bellhousing fit onto the IS300 Block, or Has any-one transplanted the 300 engine into a manual 200. Looking for options, as I don't want an Auto, but would like a Reliable performance upgrade with out Turbo charging or Super-charging?
-
Removing the cat unstrangles the engine allowing it to breathe out more easily, the best option would be to break the catalyst out of it,s housing ( should come out in chunks of debris and dust) thus allowing the O2 sensors to stay in thier original mountings, the O2 sensors will still anylise the gasses and the ecu will adjust the fueling so it should still pass an mot. I,m getting 30 + mpg all day every day, i travel 10 miles to work and the same home on A & B roads with a few miles of town driving, Get it up to speed and then just tickle the throttle and keep the MPG gauge between 35 & 40, takes a bit of practice but it works, also dont use Tesco Fuel its crap, and is a false economy
-
Category A, Must be crushed, usually someone has died in a Cat A total loss? Category B, Breaker only, cannot be sold complete, must be broken for spares? Category C, Repair not viable, usually hard hit with stuctural damage, needs a vic test before it can be put back on the road? Category D, Beyond economical repair, Price of new parts and labour are more than the value of the car? Take it from me that any sort of a total loss regardless of the category is worth a hell of a lot less, If you get it stolen, or crash it your insurance company will only pay out salvage price for it? I repair acciddent damaged cars for a living and all my dealings with insurace companies are as above?
-
P A G oil is what you will need as its what's used in the A/C system, or a little Silicon spray as it wont deteriorate the rubber, also they arent ordinary o-rings ie (black in colour) they should be green or purple, the R134a refrigerant used in your system can become corossive and will eat through standard black o-rings, You should be able to order them through you local toyota dealer or any aircon specialist. If you still have the old ones they should be ok to re-use?
-
Hello, right back to ya from our fair green isle,
-
Dont let quikfit anywhere near it, all these guys know how to do is overfill the system with R134a, Your also right in saying that it could be a multitude of different issues. When you find the correct relay check that you are definately getting a feed from the A/C switch on the dash, The simplist way to check that its actually working is to give the compressor a live feed drict at the one wire on the compressor, the compressor clutch should kick in, the fans come on and the air inside cool? if it works it will be a feed issue and easier to find.
-
Welcome Dylbert, good to see another Irish LOC member, & the health to enjoy
-
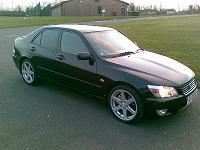
pics of my is 200 sport
-
-
From the album: jollyrogers
-
The oil pump pickup pipe is whats stopping it, that and the crank journal's, would recommend either lifting engine or dropping the craddle, you would need to be sure that your engine is well supported befor lowering the cradle?
-
This will really depend on how good you are with a set of spanner's, did one recently myself and it was pretty easy, in saying that i am a mechanic? You will need a 14mm socket and ratchet also a T50 TorX, brake pipe clamp, flathead screwdriver and possibly a G Clamp, Remove the 2 X 14mm capliper slide bolts & take out one of the brake pads, replace the calpier and push the brake pedal and the free piston will push out to the disk, put the pipe clamp onto the flexible hose and tighten, then remove the banjo bolt on the caliper to free the brake hose, then remove the caliper, Put the caliper into a vice and remove the 4 T50 TorX bolts along the back of the caliper, Reposition the caliper in the vice and rip off the dust cover rubber, youwill see a channel running around the end of the pistons, put the blade of a large screwdriver into the channel and tap the piston out at 180 degree intervals, the piston should come away fairly easy? With the piston removed pick the dust sheild retainer ring out withe the small screwdriver, you probably wont be able to see it but it is in there, Just below the retainer ring you will see the piston seal, pick this out also with bthe small screwdriver. Chances are that the piston itself wont be pitted, just dirty, and that the dust seal retainer ring has rusted and swollen and this is whats making the piston stick, Scrape away any rusty deposits from the cylidner channels with the swall screwdriver and give it a rub with some emery paper, give the cylinder a good clean out with a clean cloth and some clean brake fluid, smear the inside of the cylinder with brake fluid, and then the piston seal, locate the piston seal into its channel, smear a good dollop of cooper grease into the retainer ring channel, Coat the piston well with brake fluid and align it squarely into the cylinder and push home as far as it will go and then position the dust seal into place replacing the retainer ring, ease the piston out a little and fit the end of the dust sheild into its channel. Job Done Repeat as needed per piston.
-
Under Bonnet Clean/paint Advice
JollyRoger replied to gar is200 sport's topic in Lexus Car Care & Detailing
For painting plastic's you will need to clean them well with a good degreaser and the rub them down with 3M scratchpad, 3M also do a plastic primer/ adhesion promoter in aerosol, a light coat with this and let it dry then aresol paint whatever colour you want. If you are only painting plastics Black again put the paint staight over the plastic primer or if you are changing to a lighter colour a base primer will probably be needed also, as for bolt's/nuts and other removable brackets, best bet is to remove, rub down with wire brush then some emery then a couple of good coats of etch primer then a few coats of colour. Both Etch Primer and Plastic Primer come in aerosol, the plastic primer is clear. Hope that this helps, i work in a bodyshop and this is what we do, all above products can be got at any decent motorfactors, an possibly Halfords. -
Turtlewax Black Box Detailing Kit
JollyRoger replied to illestjt's topic in Lexus Car Care & Detailing
Bought this today from Halfords, as i couldn.t be arsed waiting on postage and the fact that the sun was shinning in Northern Ireland today? only have the drivers side + Bonnet & Bootlid done so far, and i am very pleased with the results. Turtle wax Black Box is a three stage detailer for black paint only, & comes with all you need in the box including micro fibre cloths, but i would recomend wearing latex gloves. My paintwork was pretty good to start off with but now shines like a really well cared for Hearse and well worth the £24.00. WIll try & post photo's tomorrow. -
The Brake warning lamp on your dash will come on only when the electrical circut for that lamp is closed, this circut will have switches at your parking brake, your master cylinder and possibly your brake caliper(as a pad wear indicator), the switch above your brake pedal is for your brakelights and should have no other function but to put your brakelights on when you press the pedal. The switches at the above locations open and close the circut, so to eliminate each switch in turn disconect the conector at your parking brake and if the light stays on then disconect at the master cylinder, and the same at each point,if the lamp goes out that will be you faulty switch, if the lamp stays on it is the possible that the circut has a short to earth caused by wires rubbing againts the metelwork of the car body, or if you can use a multimetre you can test each switch Hope that this helps,
-
Just refurbed my own L/H/F caliper today, fully sorted in under an hour, ordred a seal kit from Brakes International, Click on buy online as it will give you better search options via thier online cataloge, also check out , Tools needed are 14mm socket & ratchet, flexipipe clamp,large vicegrips, T50 TorX, the T50 TorX is to split the caliper and let you see what you are doing, youtube should be good for anything you need help with?This is also my first post, so hope that it helps, i realise now the i should have taken some pic's but hey if hindsight wa foresite i'd be a rich man?
-
Hi there, typed Lexus Owners Club into Google, and hey presto here i am, wanted to find out as much as i could about is 200 sport as i could and thought an owners club was the best place to start, i haven't been disappointed.
