Tinonline
-
Posts
782 -
Joined
-
Last visited
-
Days Won
1
Content Type
Profiles
Forums
Events
Store
Gallery
Tutorials
Lexus Owners Club
Gold Membership Discounts
Lexus Owners Club Video
News & Articles
Everything posted by Tinonline
-
 Yes that's the worse I've seen. Beats an old cabin filter from my Alfa 155 came out like a 500 year old body from its place of rest...whole assembly collapsed into light powder. Looks like you've got bees in there!
 -
It's certainly quite naughty...
-
Yes - early Jaguar XK's used the same box and suffered same. Auto gearboxes used to be the most reliable transmission but seem to have become highly unreliable. Don't mention ZF...they are not fit even to write the word gearbox.
-
Another Close Call
Tinonline replied to Scribe's topic in LS 400 / Lexus LS 430 / Lexus LS 460 / Lexus 600h / Lexus 500h Club
Yes this is an indication that you might have some charge but it's not enough to crank (usually) the engine. My Jag does the same - all needles flick to their extreme and back again. Bit like a death throw! My LS dash lights just look dimmed and nothing happens! They should be able to cope with light mileage etc. If you need to recharge and if it's 3 or more years old it's probs done for. -
Thoughts Please?
Tinonline replied to MNP's topic in LS 400 / Lexus LS 430 / Lexus LS 460 / Lexus 600h / Lexus 500h Club
Should be OK really. I changed my belt recently at 70k miles, Year 2000 car. First belt change the car had had. -
Things you might like to know...de-brief from the Cam Belt, pulleys, drive belt pulleys change: A couple of forums have this as a 9/10 and a not for the faint hearted. Well, if you are a regular DIY mechanic it’s a 4-5 peaking storm force when things are not what they seem! It is about confidence and persistence when the annoyances appear becuase it's an OK project. Once you have done it - you could slash the hours/effort off it. 1) You don’t have to remove the radiator or loosen the aircon compressor You might want to tape a thin layer cardboard across the rad to add protection when you get past removing the fan components. Rad in situ does make undoing and going the fan bolts more fiddly. 2) The big stuff is really quite straight forward - even the timing. If the cam snap rolls, use the old belt to put it back to where you want it. If it springs backwards when you are moving it back, best use a socket and ratchet to ever so slowly, little as possible nudge it clockwise. Slow as you can and it won’t snap roll. If you have the tool - great or not - so what. Slowly and it won’t roll or spin a bit. 3) Don’t take the plugs out, engine turns just fine. 4) I missed a wide pair of pliers for those bloomin rad hose clips. Horrible and getting the hoses disconnected. (See what I mean it’s the silly stuff again). 5) The electrical connectors were awful - took far too long and a pta (See silly stuff). Poor design. 6) Crank bolt if CORRECTLY torqued and not previously removed and replaced by a bloody gun, will be one of the easiest tasks on the planet. If it’s over torqued by a gun, you may need a gun to get it off. Or the starter method. I used the allen key in the flywheel and this, apart from my own idiocy on refitting, was the best way. Don’t use anything small...big as poss and you will be fine. My small allen key took a trip around the flywheel before luckily popping down to where I could retrieve it. 7) I read across the pond “yeh simple with a set of spanners” on removing the fan pulley bracket. There are fibs, fibs and well our friends across the pond. Should be simple but it is not. You have little clearance for the top 14mm bolt. Putting it back...tighten up beyond loose, nice and firm...grease up the 14mm’s a little and do those last. I used a small 1/4 drive ratchet and socket. A spanner is doable but use a cloth to protect your hands. That bolt has more turns that a comedian. 8) The electrical connector bracket attached to the fan bracket/ac pump is such a poor idea it beggars belief. Secured by x2 Phillips head small electrical bolts - they are well torqued and stuck and very difficult to get at. Best replaced by small hex headed nuts and not at such a torque. If you strip the toughest one to get at either don’t use the bracket next time around but secure the wiring differently (carefully of course and as or more securely) or cut the head with a hacksaw to accept a flat blade to give you greater leverage. Unbelievable. My 1/4 ratchet to the rescue with screwdriver blades inserted into a 1/4 socket. 9) You think you have researched, oh yes from all over the place. You think you are following the steps. You find yourself deluded/mistaken/over interpreting a single source say over the instructions. Or you lose your confidence. Or both. Hint: Fit the cambelt without the drop-down tensioner to the pulley fitted. I saw photos with it there...don’t pull the pin they said. Well the belt won’t fit with it in position. When the belt is on, that’s when you fit the tensioner and torque it’s bolts up evenly, sharing the turns. That belt will be so tight you’ll pull that pin expecting something to happen? The pin nearly falls out! Nil resistance! Sure obvious, I know. The Gates kit came with instructions...that bit I relied too little on them. 10) Thanks to posts from Lexus comrades, I had plenty of help and encouragement. Hammer and block of wood removes stuck inlet and water pump. That was great advice and gave the confidence to use apply considered and appropriate force. 11) It’s all the silly stuff that causes so much grief. 12) Don’t expect all the fan bracket bolts to fit flush...there’s one that does not! That’s the one that has to secure the plastic cover: left - centre...if you don’t have the cover in hand or to mind. 13) I was always advised that a thin bead of sealant is adequate for mating services. One of the best tutorials shown, has it slapped on like salad cream. When you are using a gasket anyway this does worry me. You want to preserve the olerances/clearances but most of all we don’t want sealant debris in our system. You can brush it flat with your finger (gloved) and remove the excess where you can. Thin bead is enough. 14) Personal preference: on new rubber seals I use silicone grease. Good for the rubber, seats the joint and sub aqua divers swear by it. 15) I know nothing. Different folk will find different challenges. If you are experienced, this will be a walk in the park. That’s how I would feel should I tackle the same project again. 16) OEM or not to OEM is your choice. There's plenty of reasonable to good quality after market to suit all budgets. That what it comes down to: budgets...with a bit of preference. These are sadly, service items...no good having a timeless part when all around it will be dead or failing in a few miles or years. When Lexi are classics and worth loads, that’s the time to fit OEM. 17) Definately refill the coolant via the hex nut at top front of the engine, it's slow and keep going until you fill the main bottle to a good level. Topping up thereafter is minimal and the level won't dive down and suck more air in! Pink is the new red: good quality OATS fluid is fine. It’s not helpful listening to single accounts of “this part from x failing after x and that part from y.” You would need the full comparative stats to even be able to assess the value/difference/reliability. There are poor batches, one off failures...or manufacture-wide failures, as we are all too aware of. I could not have done this without this Forum and the US Lexus forum where there are great and skilful enthusiasts, helping people like me do what we should probably not be doing...but doing it well and safely I am certain. The encouragement and following makes a big difference. Tools: my best friends were torque wrenches. My good old 1/2 drive socket set, 1/4 drive and assorted oddments that helped me problem solve. Bagging up bits and labelling is useful and does not take much time. Still what bolt goes where can be annoying especially at the final stages of putting it all back together. I’d do a faster job next time around!
-
Looks OK in the pics... Stuart - not too bad a price for a fully MOT'd motor? My 70k miler is more tatty than that on the outside...previous owner drove it like a tank...suspect there are demolished walls and bollards length and breadth of the Thames Valley...
-
Postscipt I did my Reading Swansea/return journey yesterday. Brian, aka Titch-LS and Ambermarine had warned me about filling the coolant through the hex plug at the front of the engine - so taking the advice I did this. I couldn't fill the system full this way as the level/fluid backed up to the reservoir tank. So when it got to over the minimum line in the resevoir tank I called it a day and refitted the hex plug. The heating worked straight away. I topped the level up to the max mark via the reservoir tank. I test drove the car a few local miles, it took a while to warm up through this process. The level dropped to between the min and max. But I let it cool right down to cold before rechecking and topping up. Again it dropped again following another run. The same amount. Left overnight to cool. The following morning - day of the journey, I topped up to the max. On arriving at destination I did a quick check - all ok. I'm sure the idle is crisper, engine is quiet and very smooth. On the return I stretched the engine a little more...nice! Checked the fluid level this morning - bang on.
-
Titch Yep, post 03 it's the ZF meccano set, really rubbish. Nothing like as good as a Lexus box. Earlier Ford ones have a few issues but are cheaper to fix. Jags are very quick but I tell you what, with faster gearchanges they would be barnstorming. Kick-down and wait for the rocket...way too slow. If you drive them in the peak torque band, the "R"s particularly, they are too fast on anything but a clear motorway. I'm interested in comparing the power curve of my S with the LS as the LS really has strong pull in mid to top range and both my son and I feel the S is slightly asthmatic, dropping off whilst it's fractionally quicker off the mark.
-
Hi Brian My fave forum is jaguarforum.com where I've been for a few years with my S & XKR which I got shot off. Later S types have the amazing 4.2 engine but you have a high potential for broken 6 speed ZF gearboxes...also fitted to 2003 on XK's and BMWs and Range Rovers. S Type Common faults: suspension bushes, links, gearboxes (it's very common, not just a rumour...), coil on plugs. Pre 03 gearboxes are Ford so smaller issues: plastic change gate unit (now replaced by metal) breaks up, auto gearshift cable jams up, slow changes - needs a couple of new solenoids. All have expensive gearbox oil change requirements - not an easy job as the oil has to be heated through the process. Aircon pipe...only Jag sourced and an absolute *** to fit - leaks like a tea bag. 4ltr engines leak oil from cam gaskets into plugs holes. Majority of parts well priced and available. I'd like a late XKR or S Type R to replace wife's S. I've noticed some the latest Lexus sporting models looking a little Jag like!
-
Hi Well a big thanks to you all for your interest and support plus advice! Bluesman, The Acre and Titch-LS, Mikael - thanks for your latest posts, much appreciated. Suppose I'd better think about tackling something else! Best wishes Simon
-
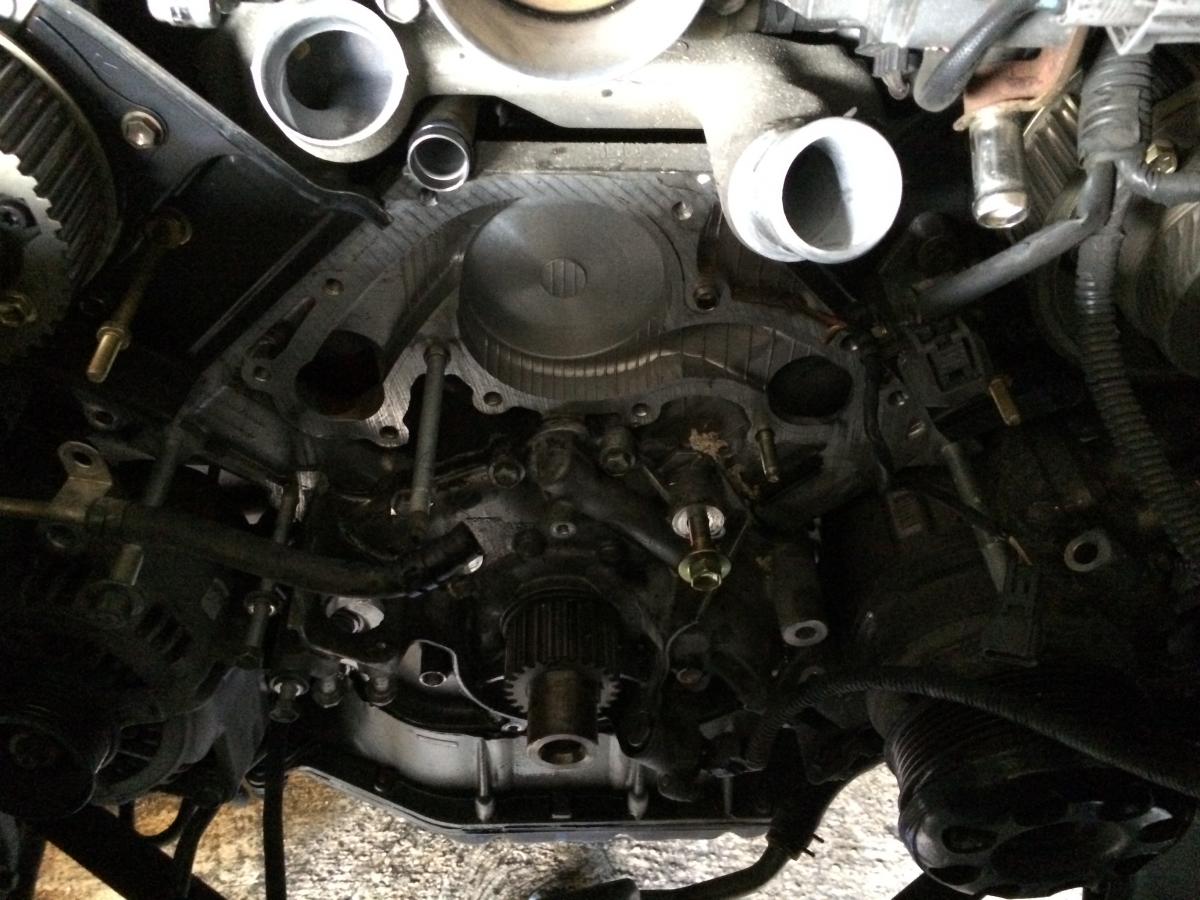
Hi Rich Thanks - this is a 2000 year so as far as I understand it's all electronic as Brain states. When you take the covers off you are greeted by very little apart from the cam wheels. My car has done quite a few years of low mileage and stop and start...as mentioned the drive pulleys had bearing wear and although the cam pulleys were in better shape they were ready for replacement in the very near future. There is nothing designed or fitted for life here that's for sure. My S type has chains...water pump is a 30 minute job and that's been replaced. (Quality item bought on sale for a £45 snip). Nothing else engine wise, mileage is the same. Simon
-
Finished! Took ages to fill via the plug - it didn't fill up but backed up into the reservoinr tank so as soon as it had hit the minimum mark I put the plug and torqued it up. Running it got the heating working ok and the level dropped so I filled it up, running it without the reservoir cap on. Took it for a drive and everything seems very good. The level has dropped again a bit but I'll recheck it when cold. I detected some noise from left of the engine - alternator/steering pump bearings maybe? You might hear it in the clip. Car runs pretty smoothly though when fully warmed up. Checked for leaks, all seems good. You wanted the viedeo...here's two. First one is the genuine first time start! https://www.dropbox.com/s/1gad0ytveazs1rm/IMG_0640.MOV?dl=0 https://www.dropbox.com/s/3wgy76yacnjbdrk/IMG_0642.MOV?dl=0
-
The drive tensioner pulley and idler pulley arrived today. Both are Gates items from RockAuto so I set about getting those on and juggling the black cover with it and the l/h cam wheel cover. Next time the inlet will go on at the latter stages as it makes it a fiddle all around. The missing bolt/empty hole was plugged with a push fit clip. I ended up replacing a single hose clip. On the larger hoses I used a thin film of clear sealant. I was ready to go but my battery (new) gave out again. I'd given it 6 hours slow charge...this time it can stay on overnight. Any more problems and it can go back to the supplier! I set the alarm and with the boot and door open from time to time plus me checking a few things with the ignition on doesn't help. Just coolant now and fixing the lower engine tray and engine cover and a few bits. I didn't dare attempt a fire-up without everything connected - I'd prefer to get some coolant in too, not that the flat battery gave me any options. Tomorrow!

-
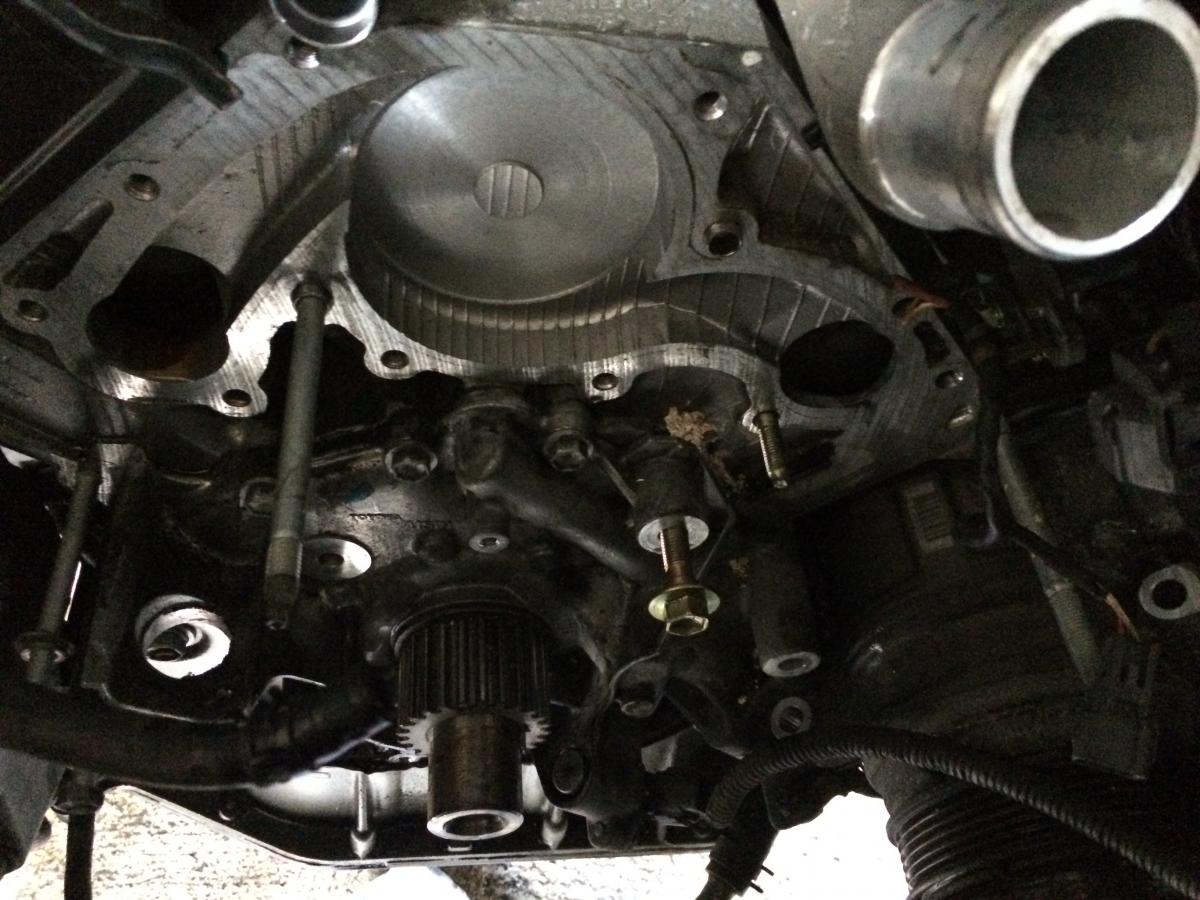
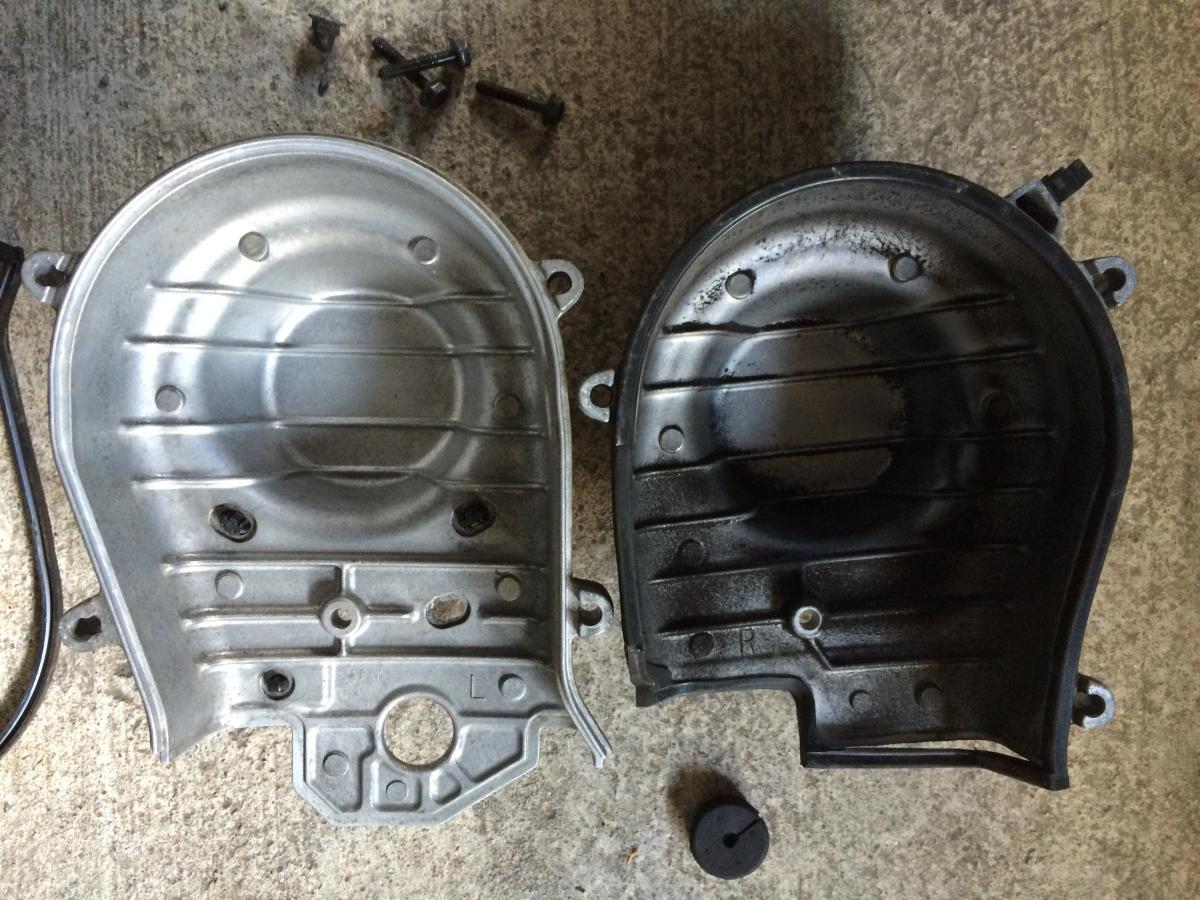
OK I'll video it...! Got the right hand cam cover on and this was fine - needed to fiddle to get the original and optimal routing of the cable that runs from bottom of the block up to the top. I bought a new sliding clip to replace the one I 'assisted' off. The wiring on the soft bracket on the edge of the fan bracket is a bit on the tight side but is not going anywhere. The inlet was ok going on. The kit came with a gasket for it, so I used some sealant, again used silicone grease for the new O ring (in the kit) and added some sealant around the inlet pipe end - went in very smoothly. I might use some new clips for the hoses as I'm not sure how good they will be having been loosened. Might as well change them at this stage. I'm a few days from getting the drive pulleys and have got as far as I can for the time being.
-
Brian Hi and thanks for this, really appreciate it. I slept on it and had another look. The reason I over did the bolt as I had not factored it going over a small cover too...oh dear. From a safety point of view the main work is done by x4 14mm bolts/nuts. I might be able to use a 12mm trim clip to offer a firmer fit to that part of the plastic cover. I will leave as is. So it wasn't the sealant or gasket remanants after all. This morning I fitted the rear under tray, took out the battery for charging as it was flat. And fitted and torqued the fan bracket. I'm waiting on the drive belt tensioner and driver belt idler pulley due soon I hope. Then I can complete the job. All good fun. :winky:
-
Another sticking point - and an annoying one too. Getting the fan bracket back on was a great fiddle. Clearly w/p gasket metal and sealant were interfering with the progress of the 3x12mm bolts. The top left bracket bolt snapped I was removing it as I was not happy with the interferance and inability to tighten up. This time I am not so lucky. The thread part of the long 12mm bolt is not visible and is inside the water pump housing. Few questions: 1) This bracket is not going anywhere and is also secured by many 14mm bolts, well torqued. Should I accept it and continue until w/p is replaced next time? 2) Strip everything back down and get an engineer's skill to clear it? 3) The bolt goes into an insert in the w/p housing. Is there a tool I can use to remove the embedded stud...without damage to the water pump...and without being able to see what's left of it? My gut feel is leave it until next water pump change, not ideal, not my preference either but I'm thinking of practicality. Be good to hear your vote.
-
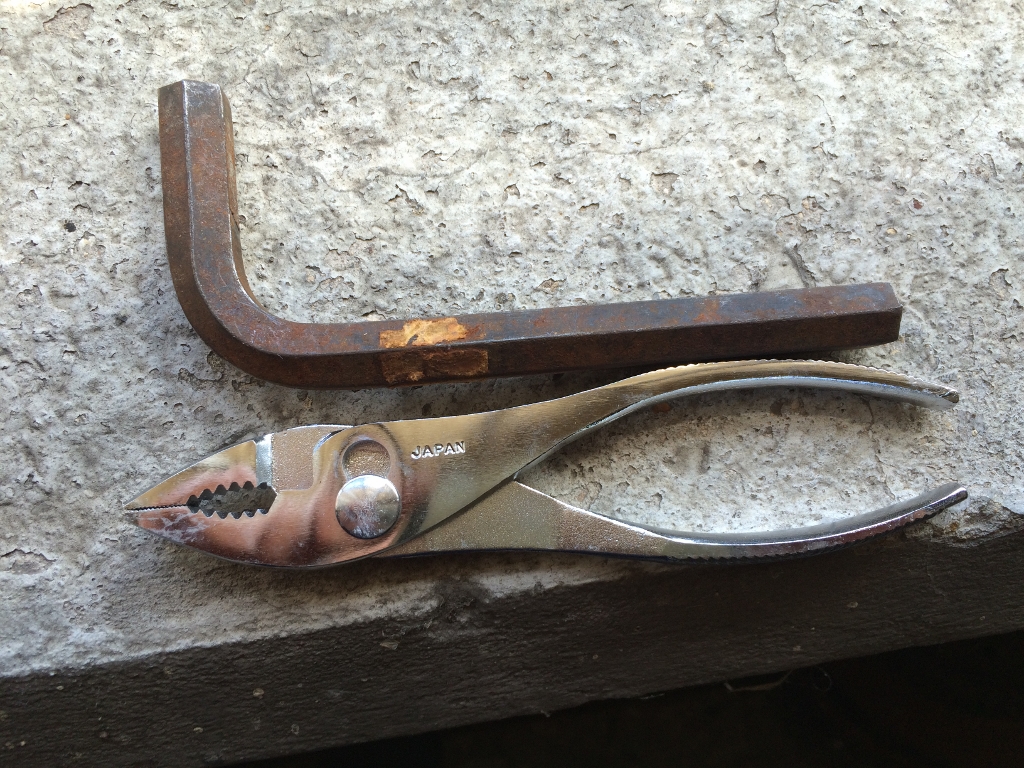
Update...and a few confessions... No it's too tight and won't go on...no getting around that. Tried the tensioner pulley removal and jiggle...nope that bolt won't play as it needs to be spoilt and won't play otherwise. Wait a minute...if I take the tensioner out, the drop down one...although the pin is still in it, the hook like beak of the tensioner pulley can drop further into the hole left by said tensioner. Took unit out undoing the two bolts and drawing it clear. Perfect! It worked. Nice tight fit! This gave the clearance I needed. Leave the tensioner unit until last. That's my first confession: number in instructions is number 11...fitting the belt. Only defence is I was going off a photo tutorial step by step and my interpretation was that it was installed prior the belt fitting. Everything lined up and looked good after two rotations of the crank - I'd put the cover and pulley back on. Second confession and tadpole brain of the month winner. It came to re-torqing the crank bolt. Well my trusty massive allen key that had served so well on the undoing, this time was not wedging. Everytime I turned the crank out it clattered. It would not fit into the hole as I'm sure it had done initially and no slight turning made any difference. I'll try a sturdy smaller allen key: after all the torque has all but gone at the fly wheel end surely. I bottled out with the first one as I was sure it would snap so covered in dust and looking for my torch that allways runs away when I need it and took a decent steel allen key and wedged it in. Gently turning it I felt it lock and heard it. I tested it with a test pull and with a "thwack" but no tinkle of dropping allen key the crank moved. I can only report a complete state of panic at this stage. The allen key had gone, yes into the flywheel housing. No trace. I slowly turned the crank back and checked again, then again. Nothing. I couldn't see it or prod at it...no idea. I turned the crank clockwise and felt some resistance other than compression and heard a clunk. Still nothing to see. Well I don't know what to do at this stage - I mean what do you do? Might as well carry on and after a revolution (I suppose) of the flywheel there was a clatter. Sadly there was nothing on the floor. But...there was the shiny glint of one end of the allen key hanging over the edge! Taking plenty of time I pulled it out. Phew. Of course it would have helped if I had put the allen key in the correct side in reverse of previous procedure... Quite an eventful morning all in all. I checked the timing, all looks good. Pulled the pin - which came out without any resistance. Retorqued the crank bolt. Now I need a break! :luck:
-
Hi Mark From the destructions I have it's CR sprocket first/route around the tensioner & idler pulleys loosely/LH cam belt&turn to tension belt/RH cam...had the nerve to state "keep the belt taught!" Then after checking timing pull the pin on the tensioner. I had a late go but it's not a matter of strength - it's very close but given one should not stretch it (yeh right) or twist it. I have though of gentle oven heat but that's not ideal but it might give me a bit of initial pliability to get on without actually stretching it or altering it - that's a last resort. I think it's back to the tensioner and see if I can get it on that way! :hocus-pokus:
-
OK Thanks Malc - will do...
-
Yes It's a new tensioner "bolt" so the pin has not been pulled. I tried removing the tensioner pulley but getting the unit back in with the allen key bolt proved too difficult and I didn't want to strip th thread. It might be worth another go but I was struggling to see the bolt hole with a light and the pulley/belt in the way. It has to fit square the do up so any pressure or misalignment messes it up. There must be a way...
-
Thanks - I'll check it. However - I'm stuck again. This time fitting the timing belt - I expected a tight fit but this is horrendous. Fitted belt to crank mark, slipped the retaining plate on. Belt around the cam with the lip L/H side. Had the cam slip where it springs forward but using the old belt I moved it back to where I wanted it. If it flicked the other way I did the same with a rachet to turn clockwise. Fitted the belt and buggered about getting as much tension on that side as possible. Then to R/H - or the other pulley without the lip. Well it was way off fitting and I checked the belt length - same and couldn't fit the old belt back on either. Panic... Checked the pulley sizes against the newly fitted - all the same. Buggered about the R/H side and got close but not enough to get the belt on. Closer but not enough. Can't see how I can do this. Belt is tight with good tension all the way around when I'm trying to do the last bit. Any ideas?
-
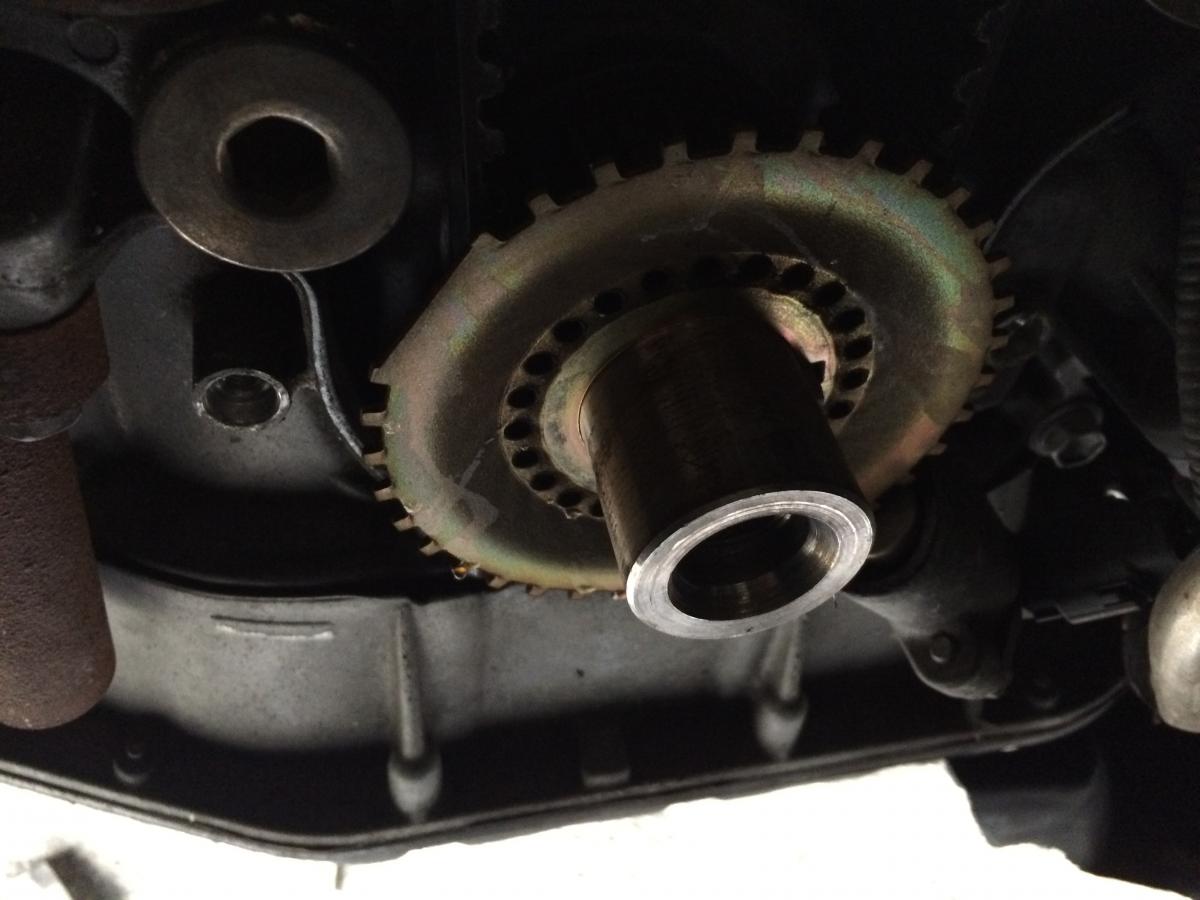
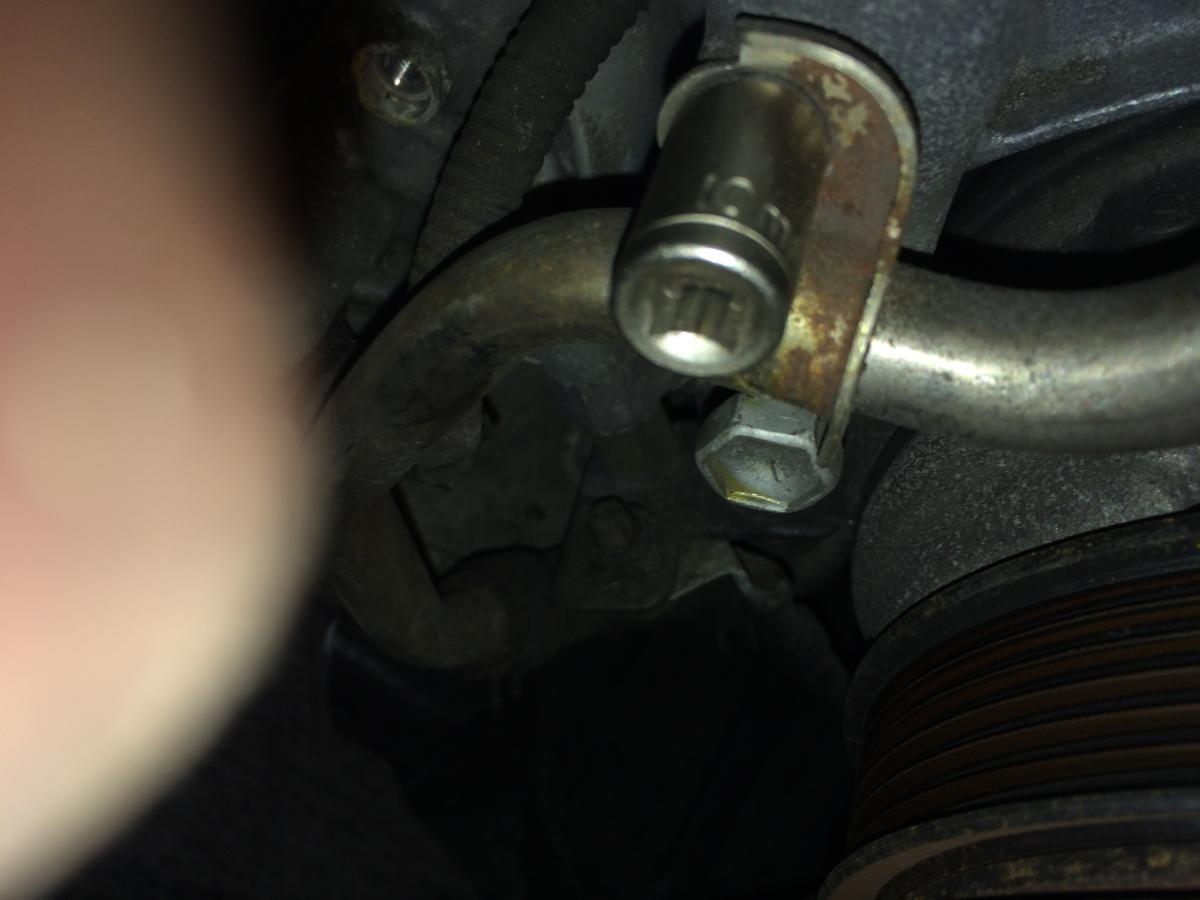
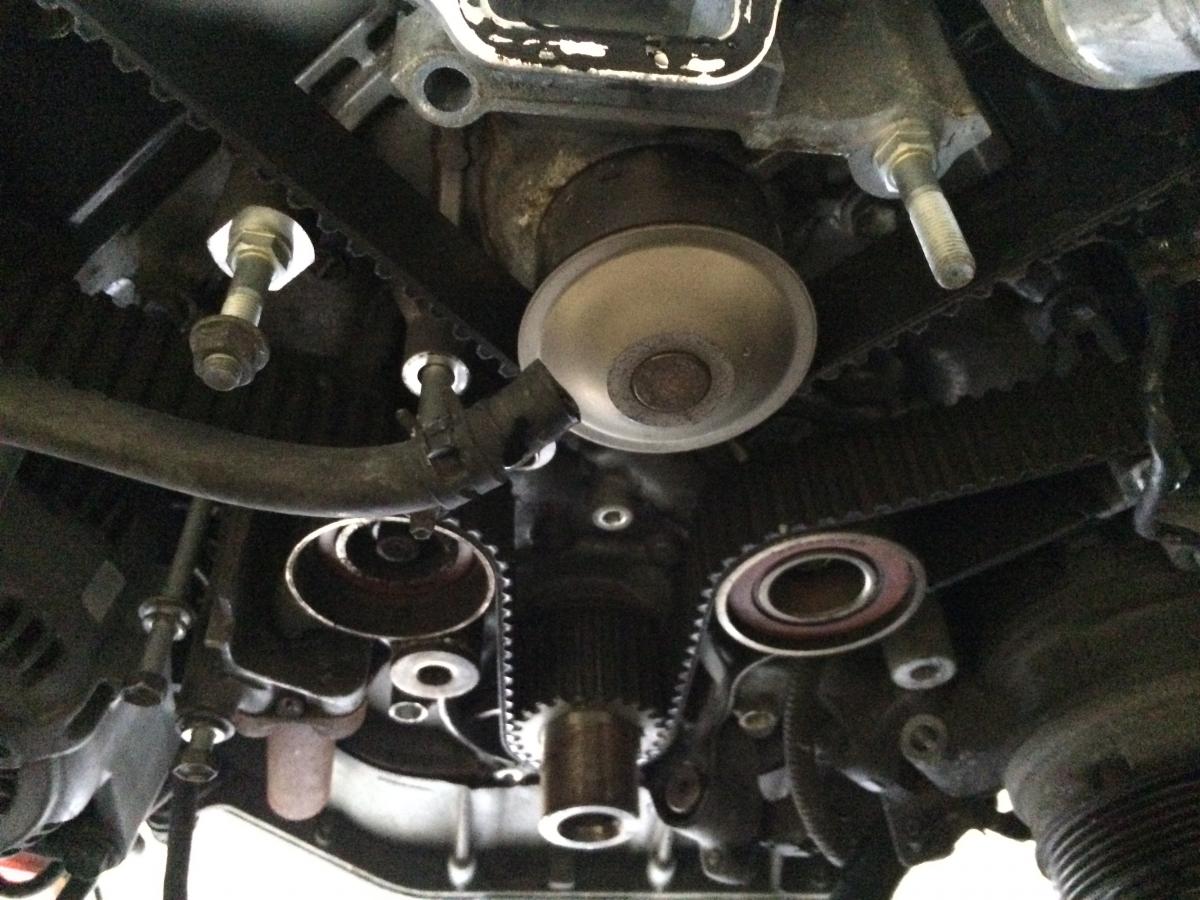
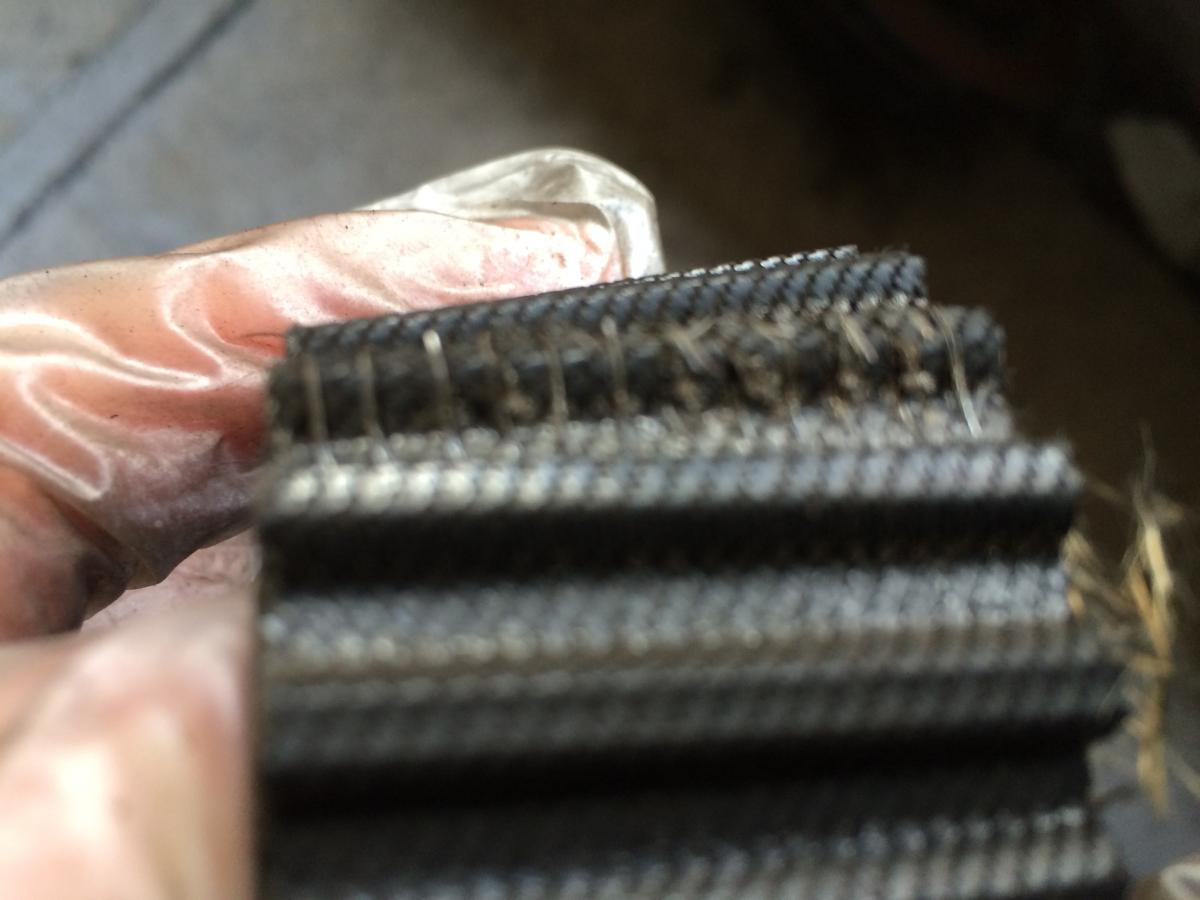
. . so how's it all going ?? Malc Hi Malc and my Lexus friends What a day! I have the front of the car up on axle stands. I checked the security of these and put them up a notch to give me more room underneath the car. One could have been better positioned so I moved it. The trolley jack is under one side although not bearing full weight, just there in case. 1) Found the inspection cover. It faces the front of the car, held on by 2 bolts. You need a screw driver to pry it out as it has a retaining lip. The rubber gasket around the plate is cracked and worn - I'll see if I can replace that. 2) I used the substantial allen key in the hole method. Facing the driver's side as you insert the angled part into one of the holes. It isn't going anywhere and is secure. Then with my impressive torque wrench and impact socket I prepared to fight. Actually it is more a question of getting comfy, the best angle so as not to hit anything...take up the slack...yep looks good...couple of pulls and it's done like undoing a normal bolt! No excessive or outrageous force required. I used a cheap as chips pulley remover and although the bolts were unwilling to screw into the pulley at first they did eventually. I suspect this was dirt inside the hols/threads. 3) I did the crank nut back up and turned the crank to get the timing to 50% on the white dot. Holding the pulley I re-undid the nut. Nothing moved. Cam marks are on the T markings on the body passed TDC. 4) With fiddling and identifying what relevant bolts needed to come out for the pulley bracket, I managed to get the 14mm bolt free from underneath the car. So much for ordereding the 1/4 drive socket - was only a few quid, might help when I put it back together. Wiggling and tapping got that out. I had to gently hammer a small 1/4" drive 10mm socket onto the coolant pipe bracket as it would not easily fit on and a spanner was impossible. This did the trick. 5) Time for the timing belt to come off: I started with the tensioner, then the tensioner pulley with the allen key then the idler pulley. All the time I was watching the cams and belt and crank to observe for any movement. As the belt slackened - everything remained in place. The belt came out and I noted in a couple of places the metal is begining to peep out like strands of wires on the belt ridge. I noted wear on both pulleys and very slight play on the water pump pulley. Then I removed the water pump - more wiggling and gentle prying. Before I start the rebuilding process, I'm going to clean up the pulleys and see if I can buff up the cam pulley covers too. Felt good and everything went to plan. :hocus-pokus:
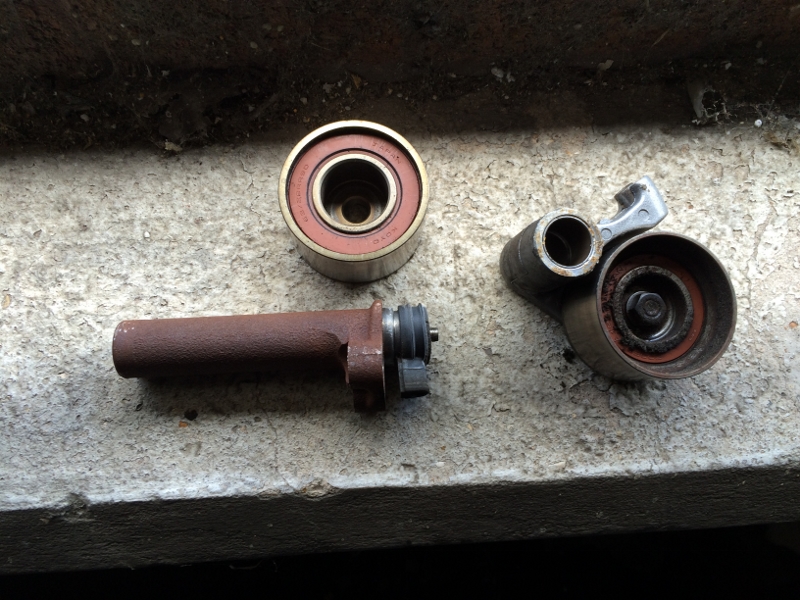
-
Hi Malc Taking a breather at the moment hope to put a day or so in this week. I need to remove the fan pulley bracket next and am waiting on a 14mm 1/4dr socket. Plus the crank bolt needs to be dealt with now. All parts have been cleaned and I'll clean the cams and crank gear too so as soon as I set-up the timing the reassembly will be a straight through process. I won't be using brake cleaner here on in - just a cloth and cotton buds. I've ordered a new drive belt Idler pulley and drive belt tensioner as they are both not worth putting back on the car. There's bearing noise and rough running from the tensioner and movement on the bracket pulley. I'm a bit surprised for 72k miles, probably some mileage left in them but not worth the risk and it would be a poor job putting them back on. Quite struck at the moment how poorly we are served for Lexus parts in the UK. Again I've had to go to Rock Auto as for £84.00 all in I can get a Gates idler tensioner. I've spent £244 on parts in total: Cam belt, waterpump, belt tensioner, idler; drive belt idler pulley, drive belt tensioner. That's fully inclusive. I'll replace the anti-freeze as it's old. I'm not sqeamish about non OEM as these are ancilliary service items of good quality. I'll post an update when I've done more.
-
quite right - it's the fear of getting really stuck but I have put aside time to do it. Today I cleaned up a few parts: cam covers, including using Turtle wax black polish on the seals and grommet as it cleans, protects trim and rubber really well. Cleaned the fan and the coupling as best as I could. I have the little pitter rattle of tiny bearings in the drive belt tensioner pulley and some movement in the fan bracket pulley. So there's no way I can avoid replacing those. For that tricky bolt on the side of the fan bracket, I've ordered a 1/4 drive socket which will go on to my 1/4 drive torque wrench - that'll fit and should be more comfortable to grip and put some torque on it. After that it's crank bolt time.