ahmed24
-
Posts
641 -
Joined
-
Last visited
-
Days Won
8
Content Type
Profiles
Forums
Events
Store
Gallery
Tutorials
Lexus Owners Club
Gold Membership Discounts
Lexus Owners Club Video
News & Articles
Everything posted by ahmed24
-
 No you need to remove the cluster and blank out the led for AFS.
 -
As @McShmoopy said above
-
Oh and regarding this, it’s normal. You probably just didn’t notice it before. This is the reason I am making my own climate control app for the Teyes. The reason the popup appears is because you have the climate control set to AUTO and in this mode the car is making small adjustments like fan speed and flow direction. These adjustments that the car is making automatically isn’t being done by you but essentially the app is listening for these changes as it cannot determine difference between the car making the change or you making it. So it thinks you changed a setting and hence shows the popup
-
I replied on the other Teyes post
-
Try going to Vehicle settings app, then Car Radio then select a factory Radio channel and see if that kick starts the audio. By going to vehicle settings app the going to radio or even cd player, you are bypassing the teyes completely and trying to play through the oem lower unit. If this plays then it’s on the teyes. If it does play, then close that app by swipe up then try teyes audio again
-
As far as I know the vlands don’t have any levelling motors. I could be wrong as I don’t have vlands so can’t be 100%. It’s all adjusted with mechanical cogs. Regarding the AFS, don’t pull the fuse but instead just disable the led in the cluster. It’s so easy to do and you’re not disabling other features by pulling out the fuse
-
I’m not using the Teyes TPMS app. I’ve disabled the built-in Teyes TPMS app and installed a customised Deelife app to look like Teyes UI. I much prefer the Deelife app. Someone I know got the Teyes TPMS sensors but the Teyes app isn’t as well refined as my modified one.
-
The Teyes CC3 is compatible 100% with all 2IS platforms. I’ve installed loads of these units for customers. Here is a video of a 2012 IS250 I did a while back:
-
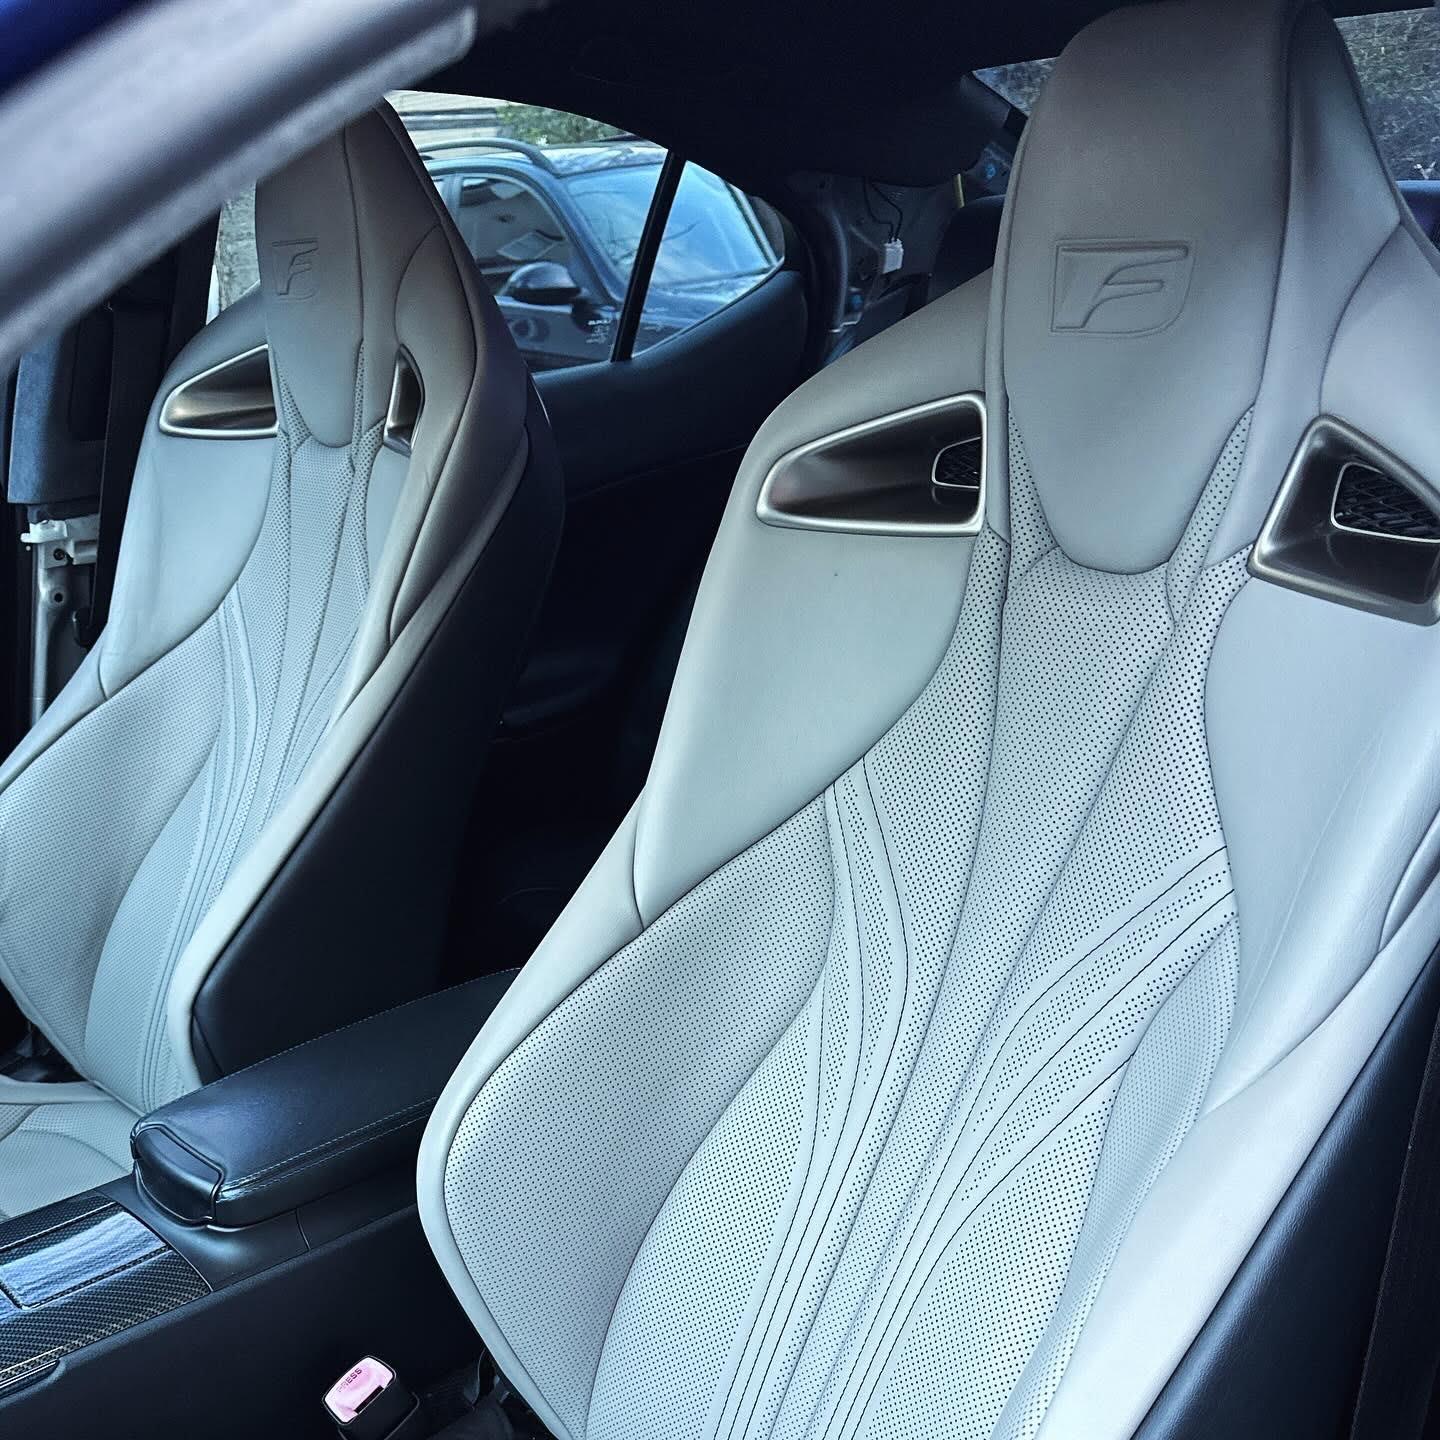
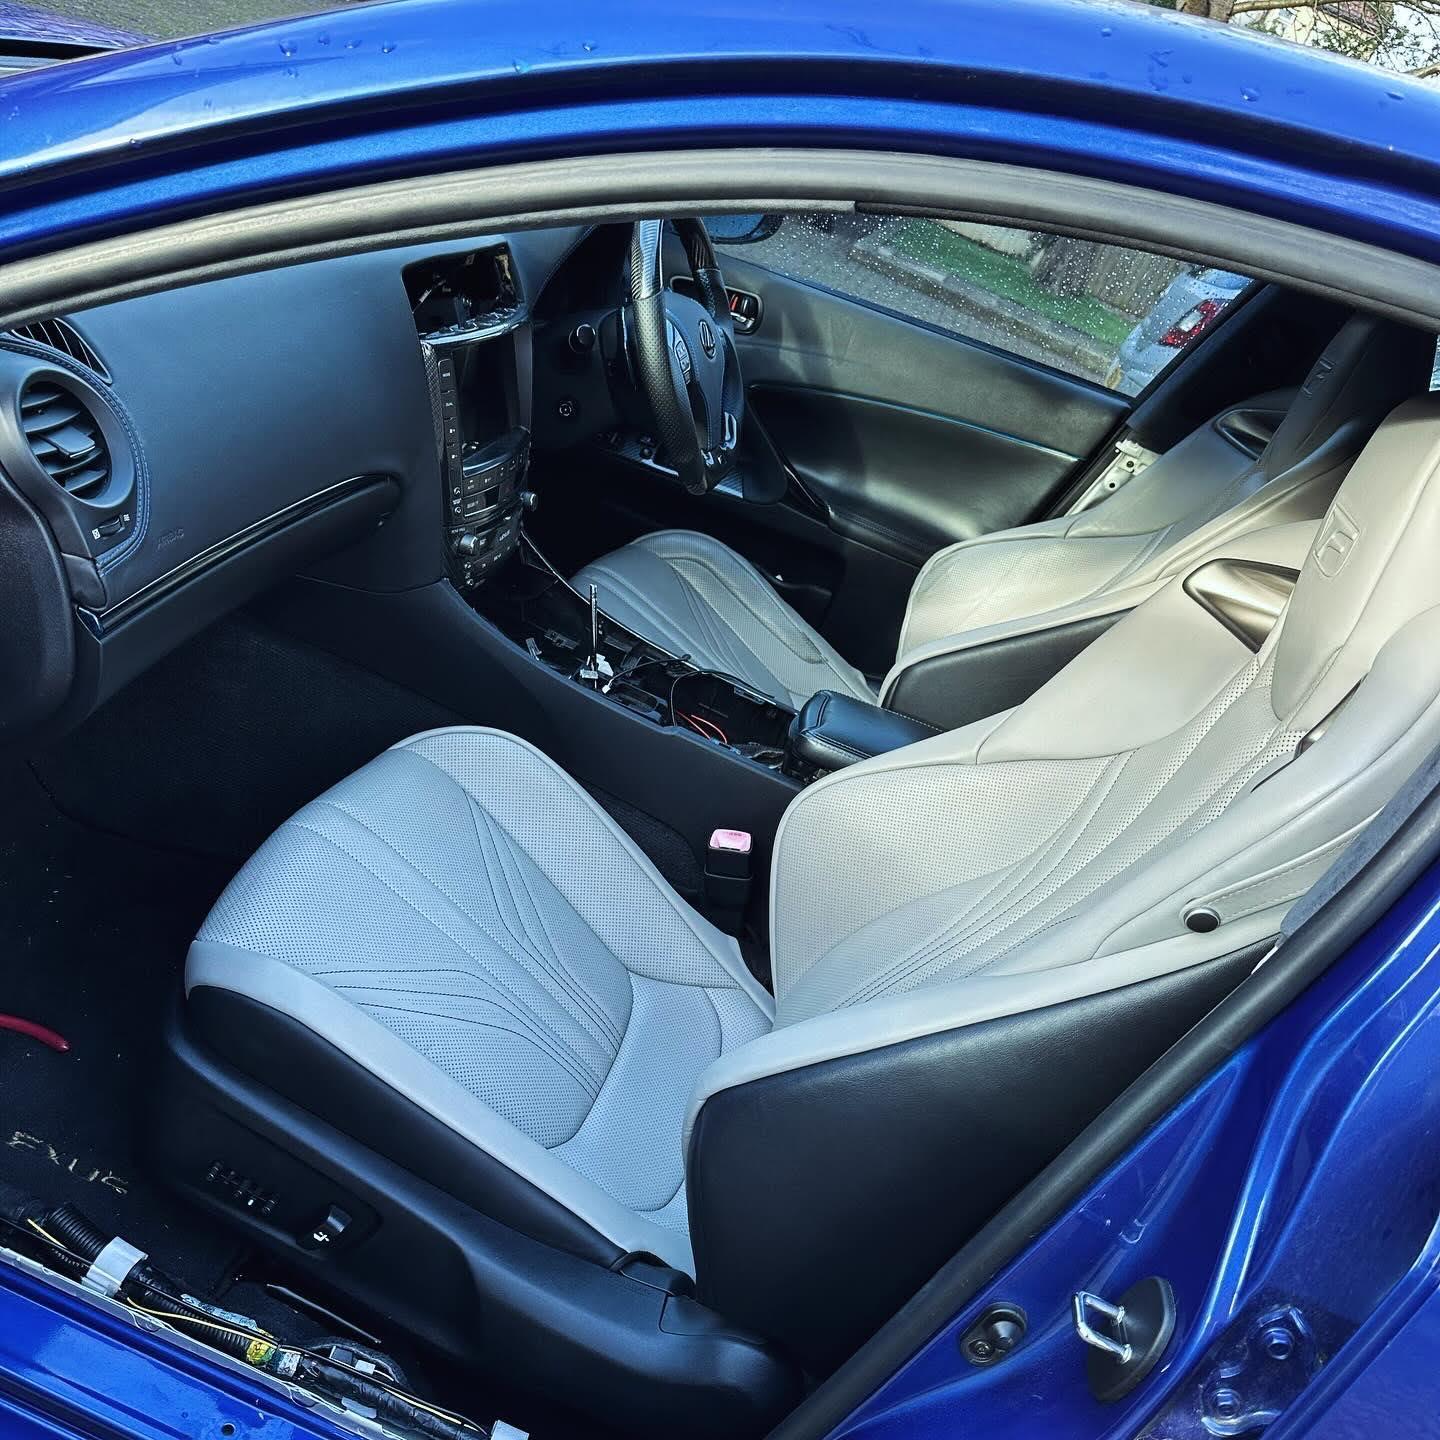
Interior still unfinished and work in progress. But finally got round to installing the Passenger side RCF seat too. Was supposed to do this ages ago but got very busy and the wiring for the passenger side seat is a lot different to the Driver seat and hence wasn't as straight-forward. Passenger seat has the occupancy detection system which involves a lot more work. Full details on this and many of my other mods on my Instagram page. Here are few photos of the passenger seat now in.

-
I got aftermarket replacements from Aliexpress few years ago for like £7 and still working well. Amayama is a great website for genuine parts from Japan. I’ve used it many times. Just be wary of expensive parts will incur customs and import charges. For cheap items it’s perfect
-
Nice 🙂 Where are you based? LHD and RHD wiring varies. Unfortunately to get it all working, it's not as simple as just re-pinning the connector. I spent hours upon hours studying and reverse engineering some of the stuff on these seats to get this to work. Re-pinning only gets the following things working: electronically adjustable seats (full adjustment control) seat cooling Then you have the other stuff that requires extra work like: Airbag Seatbelt buckle Heated Seats Seat Memory Position - This I am still finalising and almost got working, just have not had much time to work on my own car lately. Been too busy with customer cars If you've got an ISF then I take it your original seat does not have seat cooling anyway. and the RCF/GSF seats have cooling. This can probably easily be added in by replacing the switch on the centre console anyway.
-
From memory, It’s got to do with pollen and allergies filtration. So for those that suffer from pollen etc this option is supposed to purify air more.
-
I'd have to check later in the evening when I have access
-
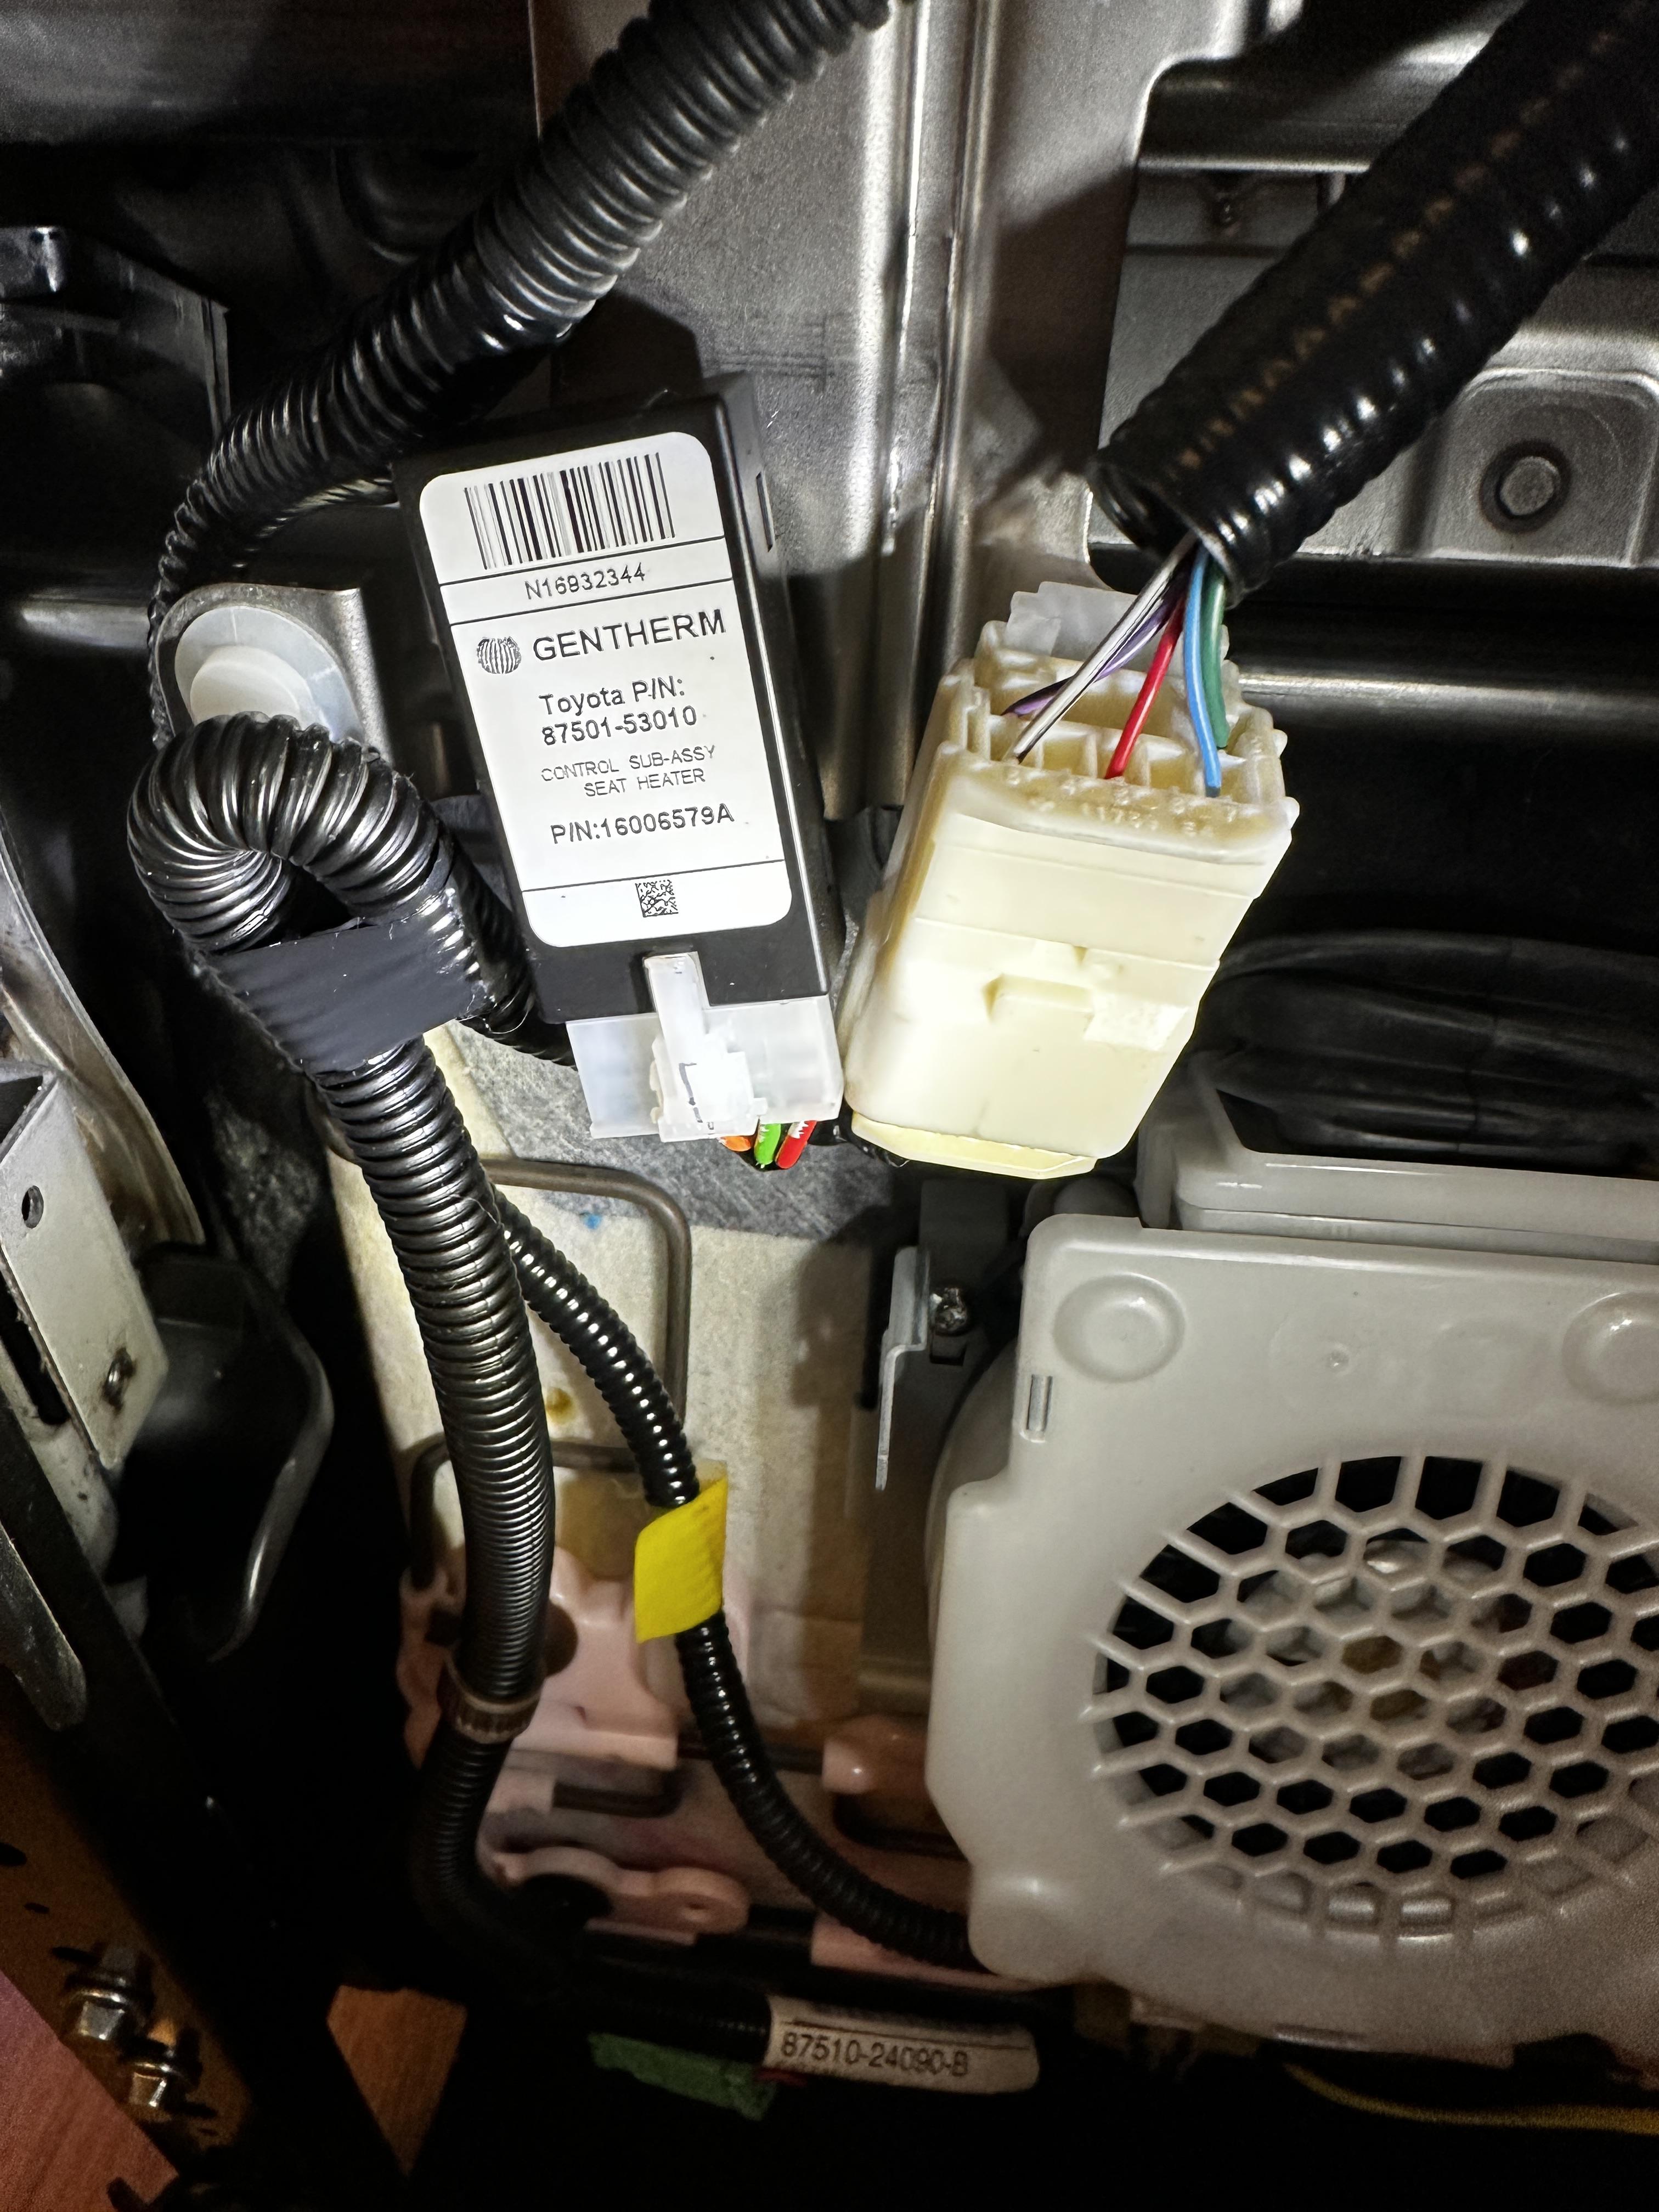
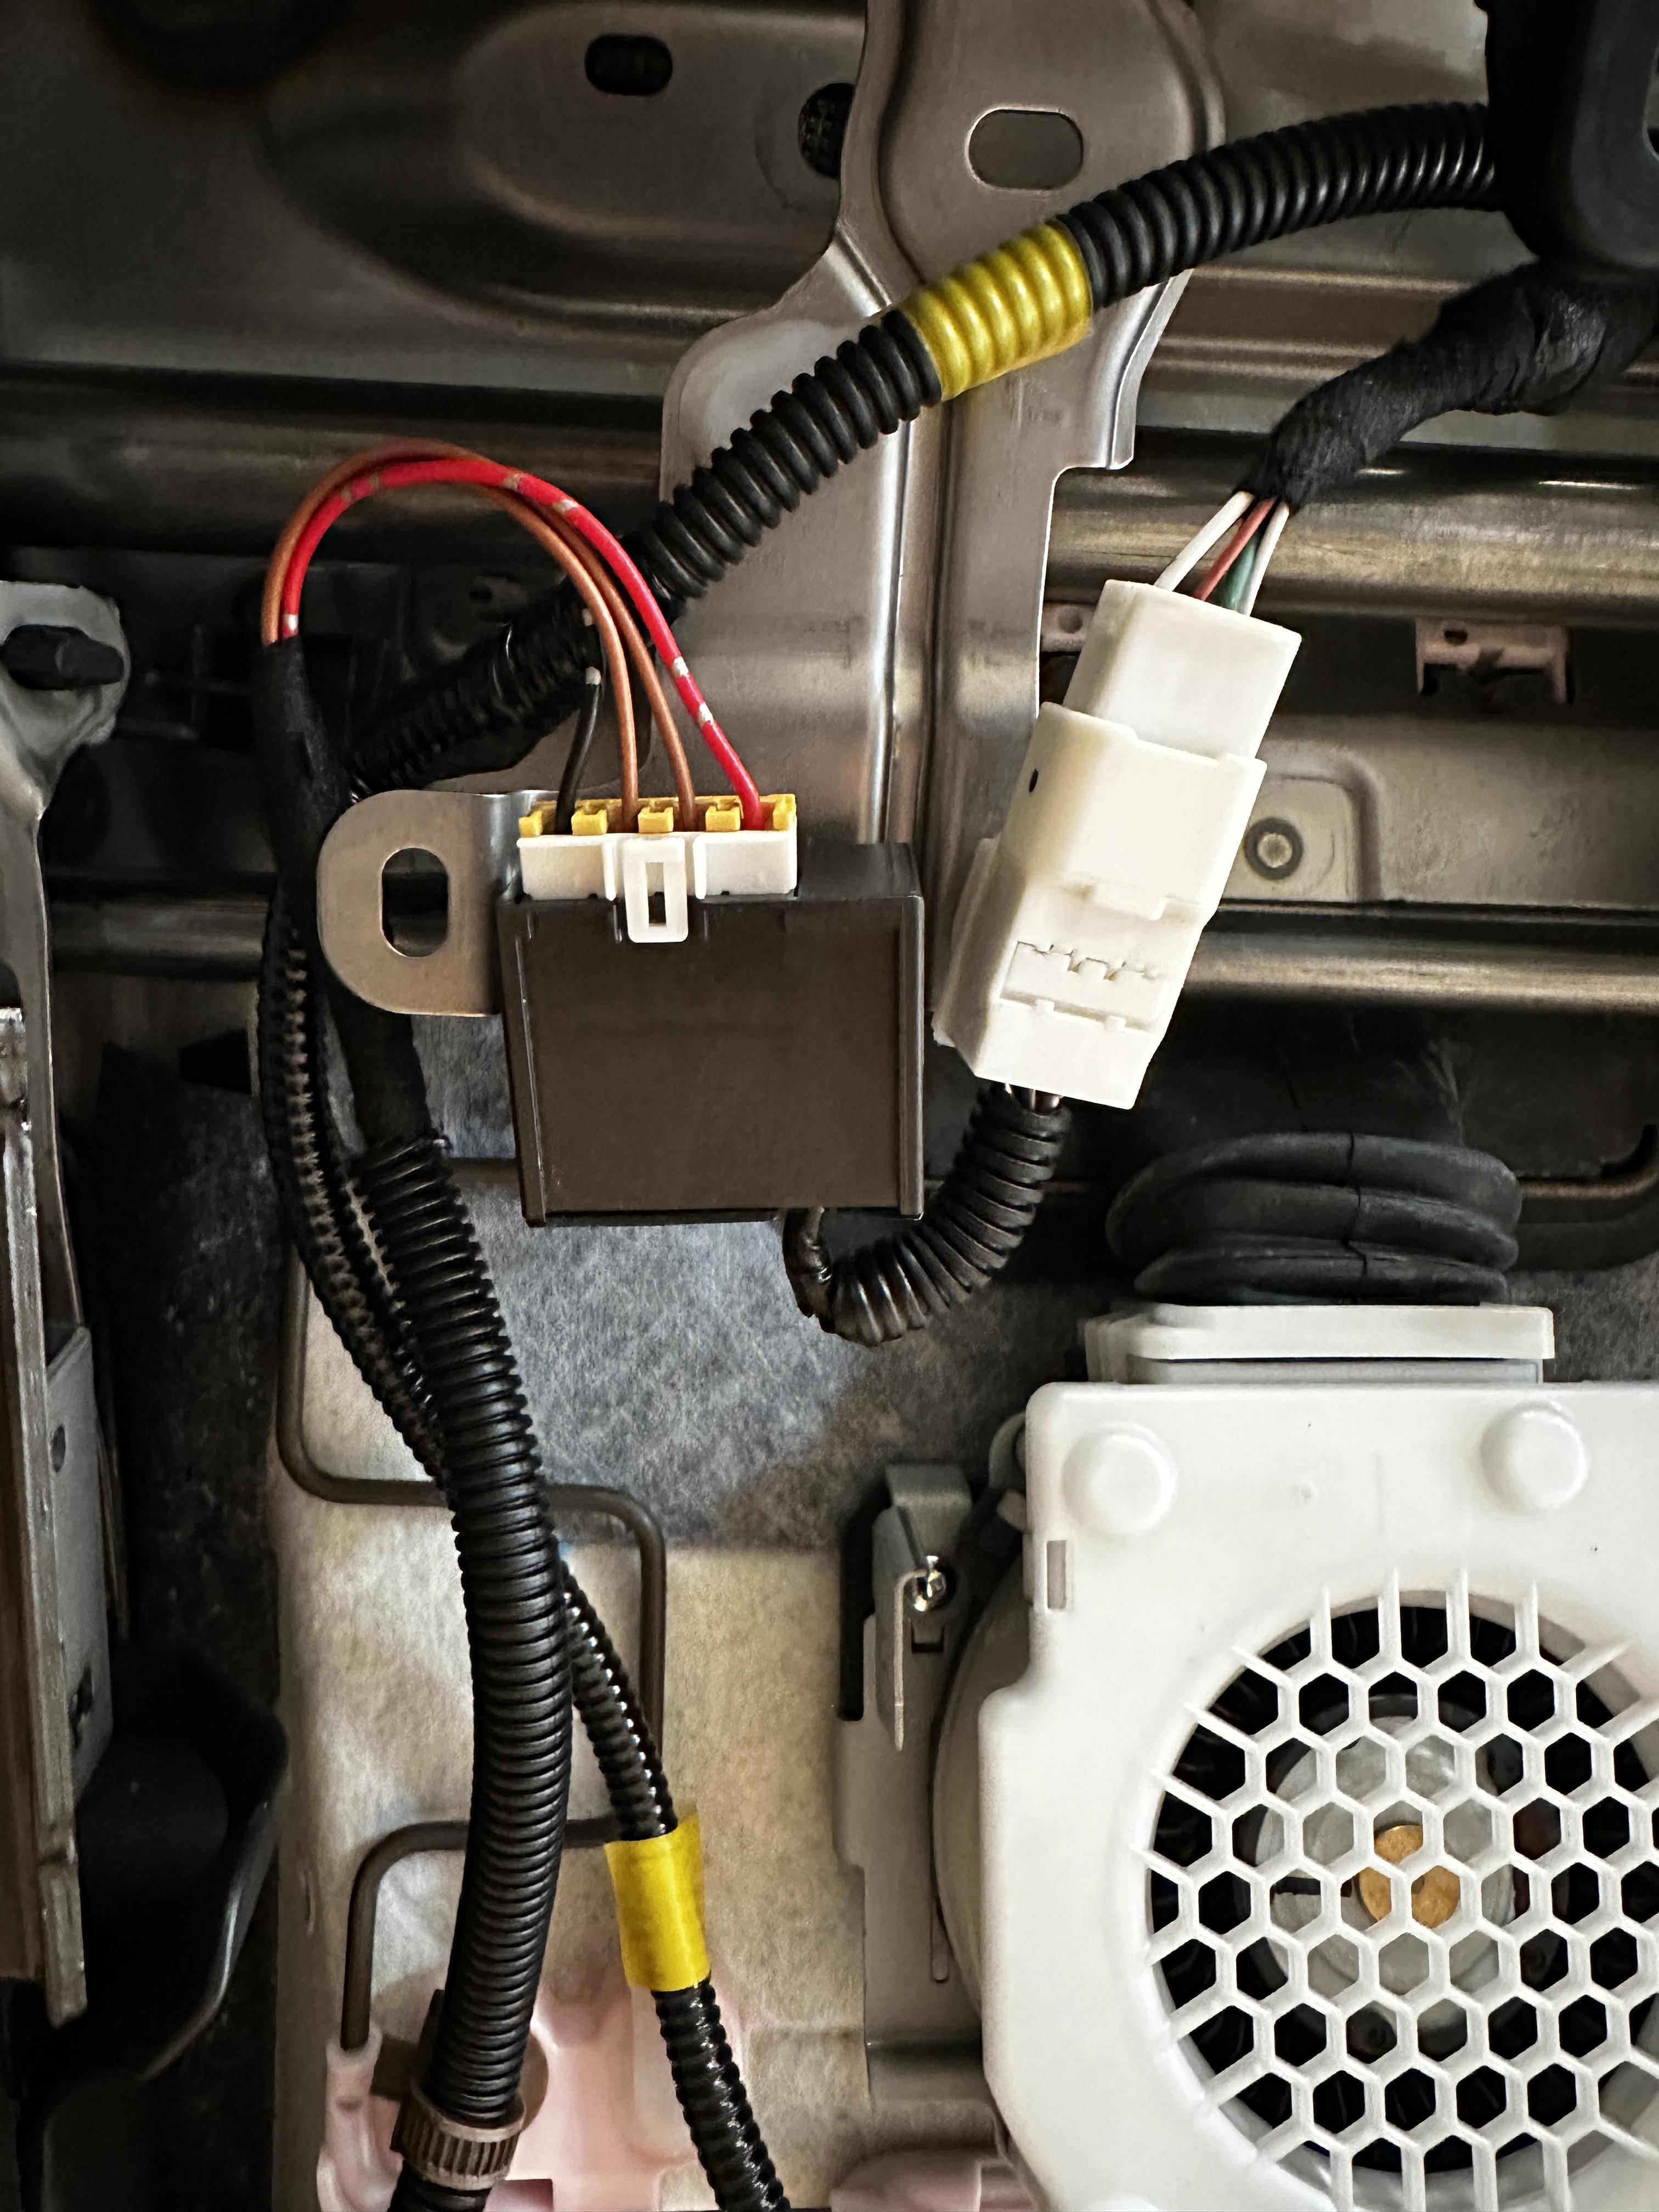
When you find a set and ready to do it, get in touch and i'll assist you with the rewiring. The main connector needs re-pinning to match the harness of the 2IS. The airbag connector or harness needs transferring over. The seatbelt buckle needs to be switched over. Cooling seats work perfectly just by re-pinning, but for heated seats to work, the wiring needs a bit of modification to transfer the seat heater controller module over from the 2IS to the RCF seat. I've done it in a way that the 2IS heater module is directly plug and play on the RCF seat. Below are two pics. First one showing the original RCF seat heater module. and the second one showing the 2IS seat heater module transferred over to the RCF seat. And finally, i'm still finalising the memory seat bit and hoping to possibly get that working very soon too. But in the meantime everything works perfectly except the memory positions.
-
Not sure why images stopped working. I've uploaded them again below:
-
Thanks 🙂 The bottom cushion part of the seat is a bit wider but fits just fine. You still have space to access the door card pockets with door closed. It's super comfy but the seat does seem to sit a bit lower down so needs a bit of getting used to. The only part that becomes quite tight is the bit where the seat belt strap is on the seat. The RCF seatbelts I believe being a 2 door comes from the rear and goes through this strap. The strap adds a bit of thickness and depending on how you position the seat, the strap can start to rub on the B pillar. For example if the seat is adjusted to the max height and you bring the back tilted forward then it can start to rub. But for most people the seat is back enough that it wont cause an issue. I am considering removing that strap if it becomes a nuisance 🙂 Suprisingly, even though the seats are bigger, the rear leg room and space seems to appear a lot more roomy now compared to my originals. I think the back bit they've slimmed down on the seat to create room at the back on the RC.
-
Thank you 🙏
-
IS300h seats in IS250 - Retro fit / Bolt on
ahmed24 replied to H3XME's topic in Modifications & Tuning
Just came across this thread after just completing my RCF seat retrofit. Airbag, heated and cooled seats all can work without any issues as long as you have the correct seats (e.g cooled and heated to match). Remember, a fault light on the airbag system means no airbags will work at all as the system is not active due to the fault. Here is a pic of one of my seats installed. Will be installing the passenger one this weekend.
-
In theory, if you install the the universal mirror module like the one i've installed (I've installed over 30+ units of these on various car brands and models for people ever since I did it on my car) Then tapping in at the point where the Door ECU connects via 2 wires to the retraction motor and then routing the kit back to the original wire should actually allow the original switch to still operate. I can draw up a wiring diagram on how to wire the universal module if you want. But before that, I would suggest try this: the two retraction wires MF and MR that go from the door ECU to the retraction motor, if you can disconnect that from the door ecu and try providing 12v power for a few seconds to those two wires (one way will be make the mirror fold and another way will unfold it). When this happens, check to see if the other side mirror unfolds too. What i'm trying to determine is if its 1 set MF and MR wire that connects to the Door ECU. That way will make it easier to connect the module.
-
The front drivers seat on my 2006 IS250 which i've now owned since 2007 is quite worn and i've been considering swapping out for another second hand one. But given the age of the 2IS, the condition of all the second hand ones are far worse than mine (rather keep mine). Got me thinking about retrofitting RCF/GSF front seats as I really like the look of them. But they are extremely rare to find second-hand. And once or twice I came across them they were selling for 3k plus just for front seats. So that was out of the question. I then considered, that a 3IS set of second-hand front seats will probably be in better condition than some of the 2IS ones for sale because of the 3IS being younger car. But I wasn't willing to spend much for second hand seats that didn't make much difference (I would rather get mine re-done). Then, I came across the following pictured RCF breaking and I thought to myself, let me try asking about front seats..... I was quite sure either the'll have blown the airbags or if they are available they would want a fortune for the seats. I was really shocked when I was sent the following photo of the seat in the car and the reply just said £500 (nothing else, just a picture and £500) I thought to myself, is that for 1 or for both. It was actually for both and was collection price. But as I asked if they could do anything better on the price, i was offered free express pallet delivery. So it was an absolute no-brainer for me. I instantly purchased it. Not knowing if I am going to be able to retrofit it or not, I thought it's worth the gamble because even if I didn't want the seats, I could sell them off for much more than I paid. And if I manage to make them work on the 2IS platform then technically it will become a plug & play seat for the 2IS and ISF platform which I could easily sell on later for a profit. So here is the seats delivered: Now, onto the retrofitting... The RCF/GSF seats have the same cooling fan system as the 3IS and 2IS. Except there is ducted air conditioned air that goes to the fan under the seat which then makes the fan blow air-conditioned air through the seat. I've addressed this with the following 3D printed simple solution: Next... Does the rails on the seats fit the 2IS? Answer is Yes. They are the same as the 3IS and 2IS and all line up and therefore no need to make any adjustments to the rails. The main 17-pin connector on the seat itself (Part number 90980-12373) is identical and exactly the same as the 3IS and 2IS and I suspect Lexus and Toyota use this same connector across most of the seats and models. The only thing is that the wiring and pins are different on the connector. After spending hours and hours studying the schematics of both platforms and comparing and tracing wires and testing them. I finally drew up a plan to re-pin the main connector and I had accounted for every pin from the original car. With the exception of the memory seat pin (which uses a single 1pin for MPX1 communication). I'll cover the memory seats later. Here's a picture below of the depinning: The airbag connector is different but this I solved easily by transferring the loom over. As pictured below: The seatbelt buckle is different and the 2IS seatbelt does not buckle into it. So, I transferred the buckle over from the 2IS to the RCF seat. The buckle on the RCF seat sticks up quite a bit as it's quite slim and low on the bottom corners. The RCF buckle has a nice sleeve for the buckle so it doesn't look bad when it sticks out. When I installed the 2IS buckle, I noticed the metal plate was visible and looked ugly. So I decided to transfer the buckle sleeve over too. The buckle work pictured below: I have successfully installed the drivers seat. It's working very well. I have yet to do the passenger seat and will be doing this over the next few days as the wiring is slightly different on that side. I can confirm the following all work: Heated & Cooled working Buckle and seatbelt system working Airbag system working Power seat working The only thing I have yet to finish is the memory profiles for the seat. Unfortunately the RCF/GSF seats use a new type of CAN body communication with dual wire which communicates the memory button presses with two wires from the door card. Whereas, the 2IS uses a single 1 wire MPX communication. There is two ways to solve the memory seat issue. Easiest is to just transfer the position control ecu switch on the seat itself from the 2IS seat over to the RCF seat. or the other option is to create a virtual signal converter. I haven't decided which method I will use for that yet. But as memory seats isn't something I use at all, I decided to install it without that function for now and I will address the memory seat later. Below are a few pics of my drivers seat now installed. They need a good deep clean and conditon. Once i've installed the other side, I will post more pics and videos showing the seats working. So stay tuned. Updates on here might be a bit slow as I tend to prioritise updates and stuff on my instagram, so feel free to follow me on my instagram for more updates (link in my signature)
- 11 replies
-
- 12
-

-

-
@Linas.P I had a brief look at the scematics but haven't had a chance to thorougly go through the them. I do have access to all the schematics for most cars. Having had a brief look, it does appear the folding and unfolding signal that goes to the retraction motor on the mirror itself is triggered by the Door ECU. The Door ECU then has an MPX connection which seems to be linked to the switches. Therefore the signal being sent from the actual switch is just a block of MPX data which is interpretted by the Door ECU. When the Door ECU receives this data, it then triggers the relay to activate either in close or unfold polarity. If this is the case then the simplest solution would be to directly wire into the retraction motors themselves. But then you will lose the functionality of the internal button (Although there may be a way round that too) Essentially a mirror folding and unfolding just inlves that MF and MR connections on the retraction motor to receive +12v and ground connection for a few seconds. In one Polarity it unfolds and the other way round it folds.
-
Sorry for late reply. Been crazy busy. I’ll have a look at this tomorrow and get back to you.
-
What year GS300? I’ll have a look at the schematics and get back to you. But in theory it would work on any as long as you can access the wires that go from the manual switch to fold the mirrors to the mirrors.
-
No you don’t need to specify quantity. Listing is for a pair (Left and Right - each have their own part numbers)
-
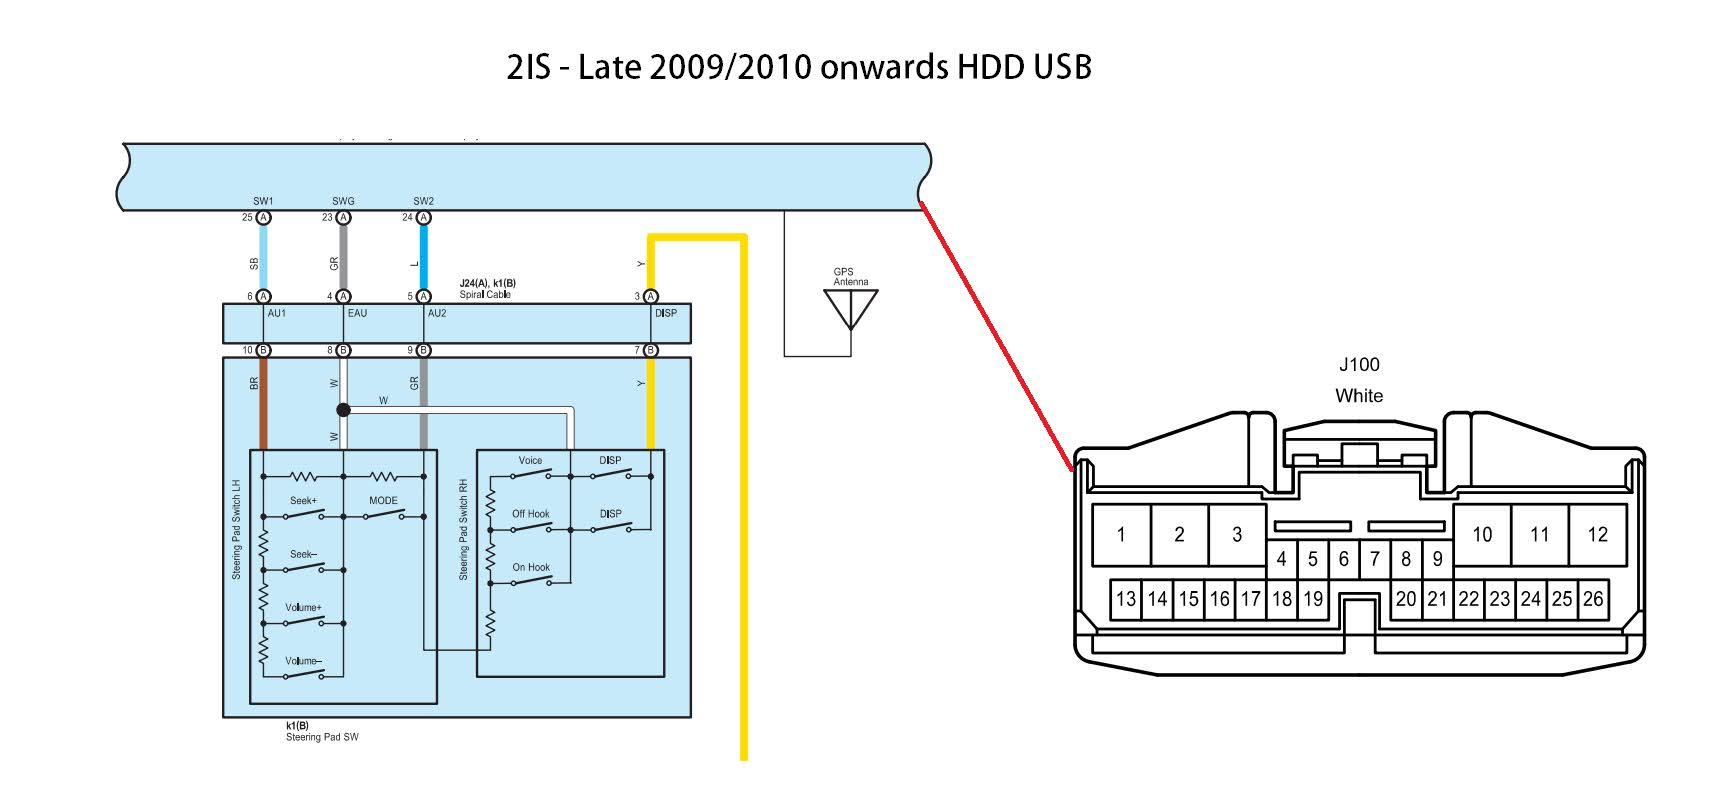
Hi Julian, Apologies for the late reply. I'm not on here as frequently as i'd like to be as i'm usually inundated with messages on Instagram so do try and catchup when I can. In regards to your question regarding the KEY1 and KEY2. Your understanding is correct that KEY1 and KEY2 require an analogue voltage. However, you are mistaken about the steering wheel switches being CANBUS controlled on the Lexus. I've worked on many Lexus models even some newer models as new as 2023 and Lexus/Toyota use analogue voltage for a huge number of functions. I have attached two diagrams below showing the wiring schematics of the steering switchpad for both the pre-HDD 2006 to late 2009 model and also the later model with the HDD and USB function. If, you look at these diagrams you will see that the steering wheel buttons are tied into 3 wires. A common ground, and SW1 and SW2. The switches are grouped into 2 groups. One group has the Voice, Off Hook, On Hook and MODE buttons tied to them and the other group is the remaining buttons (excluding the DISP button as that is directly wired to the cluster) Each button in a group goes a resistor to essentially create a different voltage readings which is then detected by the head unit. So in the case of the Teyes mod, all I did is take the single wire for the group that contains the Voice button and wire it directly to KEY1 on the Teyes unit. Then this let me customise the button mapping via the steering control app. I left the other group alone as the default Teyes pre-coded mappings for that is fine anyway. One thing to keep in mind is that I did not modify the wire for that group on the actual car harness, instead I located the wire/pin then traced that those steering switch wires go to the CANBUS decoder box on the teyes. So, the wire that i was interested in I cut it on the Teyes harness before it goes to the canbus box and I took it directly to KEY1. Hope that makes sense. Below are the schematic diagrams.