

ahmed24
-
Posts
641 -
Joined
-
Last visited
-
Days Won
8
Content Type
Profiles
Forums
Events
Store
Gallery
Tutorials
Lexus Owners Club
Gold Membership Discounts
Lexus Owners Club Video
News & Articles
Everything posted by ahmed24
-
 +1 with heat gun. you can re-form it back to shape. but be very careful not to heat the painted bumper itself. You usually get attachments on heatguns to help direct the airflow so that will help keep the heat concentrated in a certain location.
 -
Thank you 😀
-
Thank you. Yes the headlights really do compliment this bumper which is why I had to make the switch.
-
Thank you 🙂
-
If you simply polish them, they will yellow again very soon. The original plastic usually leaves the factory with a layer of UV protection. When you polish the lens, this UV protection is lost. So there are lots of DIY kits that allow you to light sand back the lens and then coat it with a UV protecting clear coat. These are all DIY solutions that won't really last long. What i've found works best and recently had done to a friends car was my bodyshop sanded back the headlight removing all imperfections and working their way through grit levels and wet sanding for perfect smooth finish. Once finished they finish it with couple of layers of 2K clear coat, then oven bake then machine polish it. The same clear coat that goes on the paint. The clear coat has UV resistance as it's designed for paintwork. The results are amazing. The headlights look brand new again and they will last a long time with the clear coat. And seeing as it's clear coat you have the ability to polish it back a few times without worrying about it yellowing. Below is a photo example of the one I had done on a friends IS250.

-
Thank you as always for your kind words and support 🙂
-
Thank you mate 🙂
-
Yeh because of the size of the item it's extremely difficult to ship. I managed to get the entire thing for just over £500 including all the customs clearance as I used a friends shipping container. The old 3IS bumper is already sold and fitted to another car sorry
-
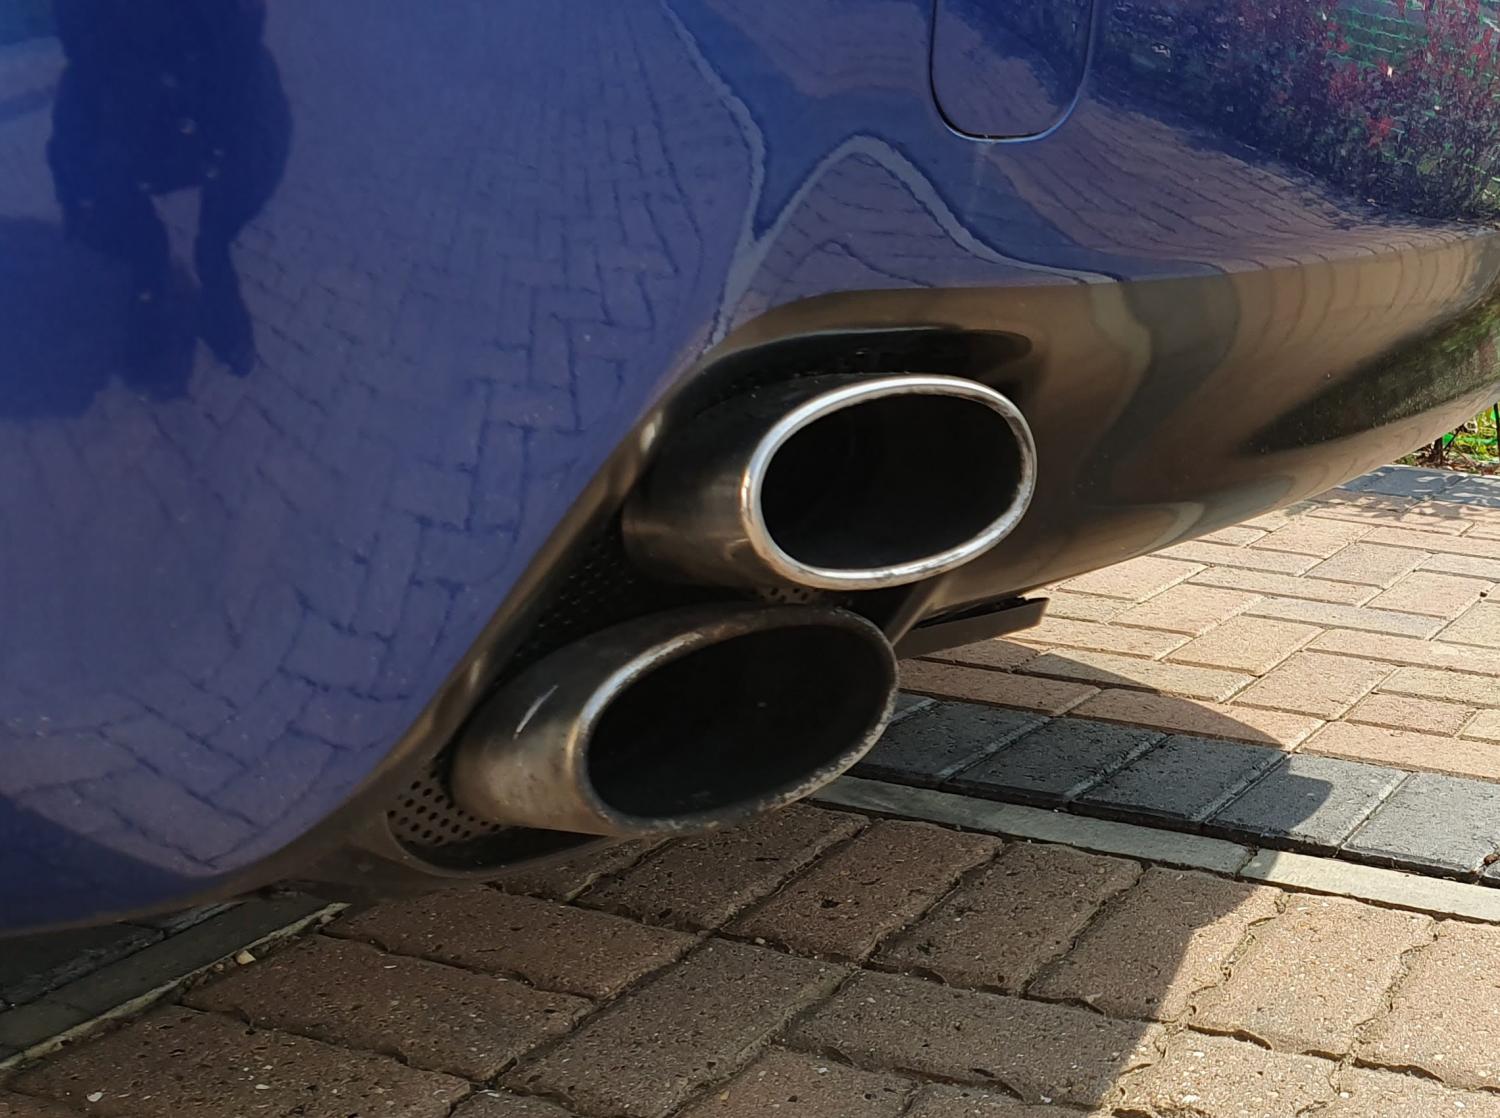
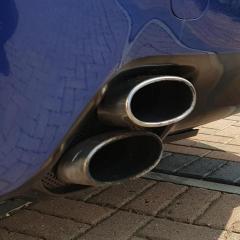
Some of you may know i've owned my 2006 IS250 for a very long time since approximately 2007 and in that time i've done quite a few facelift changes and mods to it. The most recent facelift was my 3IS custom bumper conversion back in 2015. Back in 2021 the chinese made a 4IS style conversion bumper for the 2IS. And after seeing this I was sold on getting one. Specially considering the 4IS isn't available in Europe/UK so it makes the design a lot more unique. I managed to get hold of a bumper from China and through a contact using their business shipping container. Finally managed to get the installation done and thought i'd share photos of my new facelift. I've also upgraded my OEM LED DRL Headlights to the new 4IS inspired design to compliment the front end design. There are quite a few new headlight designs from china for the IS250. The most popular being the version 1 VLAND headlights. I wasn't too keen on them because of square chrome bezels around the projector LED's. Then came out HC motion version which had an animated check/tick LED on top. I wasn't too keen on them either as the check mark didn't quite flow with anything. Then came the latest version which has the check mark full length running all the way down to the kink of the bumper spindle grille corner. I loved the look of this and had to get a pair. Wasn't very easy to source this particular design of headlight as it's too new and most sellers only have the LHD beam pattern version of these headlights. Eventually I found a factory that sold me a pair of RHD beam patterns. Few other things before the pics and video: I imported an OEM lexus short plate holder that comes as standard on the 2021 IS350 in america to mount onto this new bumper. I modified the OEM parking sensor and drilled hole on the bumper to get a flush parking sensor fitment I installed universal side splitters that fit this bumper perfectly. Purchased them for about £20 from eBay and had them painted even though it came in gloss black. I got fitment pretty much perfect. In my opinion it's sitting better than some OEM bumpers i've worked on for the IS250. It required quite a bit of adjustments to get it fitting perfect. And I had to order a specific headlight mounting bracket from the 2009-2010 IS250. This is the only bracket that works with this bumper. I've got some subtle eyebrows colour coded that I will be installing to give the headlights a slimmer look. The last two photos shows an example of the eyebrows temporarily placed on on headlight. I dont always get time to post on here. If you want to stay up-to-date with my work, you can check out my Instagram page where I have all my mods as story highlights. That's where I usually post most of my updates. My instagram link is at the bottom of my signature. Anyway, enough talking. Video highlight below, followed by some photos: Unfortuantely, even thought the bumper was inside a wooden casing, it still suffered a bit of damage where one corner got deformed. I managed to salvage this by re-forming ti with heat and getting the shape identical to the opposite side. Here a few pics of the universal front splitters: Here is a picture of the imported OEM Lexus 2021 IS350 plate holder from America. And here are the new headlights. Headlight video demo can be seen in my video demo above. Crash bar painted black so that I don't see any silver through the gaps Installed OEM foam strip on the corners
- 29 replies
-
- 12
-

-
I think he's from Illinois, America. And people from America generally look down on the IS250 as the rubbish version to the 350. In my experience and having contact and discussion with lots of american customers buying stuff from me this is mainly because in america the 250's seem to suffer from a lot of carbon buildup issues not to mention they find the 250 as underpowered compared to the 350. Ofcourse if we had the 350 available in europe that will be the better choice. But by no means is the 250 a bad car. I've owned my 2006 250 since 2007 and clocked almost 200k miles on it and still runs silky smooth. I do my own maintenance and it's been the best car to maintain and work on too. The 250 is direct injection only and the 350 is direct and port injection. So this helps the 350 not to suffer the carbon issues that the 250 is plagued with. In Europe (well at least in UK) we don't seem to have this issue, maybe our fuels are better. I stick to using E5 and never use E10.
-
Yay! No problem at all. Glad you got there in the end. Remember to peel off the protective transparent film around the two black panels around the hazard light (if you haven’t already). It comes with a protective film so doesn’t look shiny black until it’s peeled off
-
On the aux cable connect to Red RR Out and White RL Out and make sure the following is done:
-
You've not connected the audio connection thats why. I've helped quite a few people with this exact issue. It's very a very simple fix. The connector that comes with the teyes pictured below: The white end of that goes to the back of the Teyes screen and the blue connector goes to the OEM unit to the picture port below:
-
Did you manage to get yourself a new clip? If not, I have a spare new one I can send you if you cover the postage cost
-
If i remember correctly, that part isn't sold sperately by lexus hence you wont find it. It's part of the entire washer jet. You have to buy it as a aftermarket replacement from links like the example i sent
-
Contact Lexus Parts Direct, they sell it for £23.21 plus postage. The connecting clip part number is 8520753040 and here's a few links on ebay https://www.ebay.co.uk/itm/402726262293 https://www.ebay.co.uk/itm/402859319219 You can get it much cheaper from AliExpress if you are willing to wait ofcourse.
-
When you attempt it again, Take pics of all your connections that you made specifically how you connected that connector I mentioned above. I wouldn’t be worried as it definitely seems like connection issue. As soon as you make that connection even with the screen not being connected, the hazard button should immediately start working.
-
The hazards are directly linked via the connector so the canbox will have no effect. If your hazard button isn't working then it's most likely you have not connected the connector that originally went to the following connector on your OEM system. Picture above is of the original unit, that section i've highlighted saying hazard. the connector that used to go to that needs to go to the Teyes wiring loom. I've done quite a few teyes installations on the IS250 since and all work perfectly.
-
If the entire cap fell off, could have been that inner piece was already damaged. That's the main piece that keeps the cover attached to the nozzle itself. Or maybe some thief stole it 🙂
-
That part is the same. Have you lost that aswell?
-
Yes 2009 facelift onwards is the same washer covers. Looking at your pic, you definately have the later covers. So the 2011 ones will work
-
The facelift bumpers have different headlamp washer covers. The part numbers for them are: LH: 85045-53040 RH: 85044-53040 It's hard to be 100% sure from the angle of the picture but it does appear to look like the facelift covers as it sits higher up after the curve. If you take a look at the picture below of my 2006 covers, you can see the the cover sits on the curve edge as the bumper curves downwards. Because of this, the washer jet cover has a groove so it sits on the curve nicely. And below is an example of how a 2005-2009 cover will sit on the 2009 facelift bumper, as you can see the groove that's designed to sit on the curve is now visible because the cover isn't designed to sit flush on the flat surface (if that makes sense)
-
The design of the headlamp washers themselves completely changed and it causes the jet cover to sit on the flat part of the bumper instead of the curve. Picture of 2005-2009 washer jets and the newer 2009+ washer jets below
-
Based on your profile if you have a 2005 IS then the aftermarket ones will fit 100% you can buy aftermarket ones from aliexpress very cheap. The part numbers quoted above by @J Henderson as the correct ones for 2005 to 2009. The -C0 is black colour code 202 and the -C1 is black colour code 212. Advantage to buy OEM is that you will get your exact colour.
-
Headlight washer covers are different from 2005-2009 then the design changed where they sit on the flat part of the bumper instead of the curved bit. If you have the pre-facelift version then you have the ones that are cheaply available otherwise you have to buy oem. The aftermarket replacements are only for the pre-facelift covers. If you send a picture of you existing one then I can tell for sure


