G10RRE
-
Posts
104 -
Joined
-
Last visited
-
Days Won
1
Content Type
Profiles
Forums
Events
Store
Gallery
Tutorials
Lexus Owners Club
Gold Membership Discounts
Lexus Owners Club Video
News & Articles
Everything posted by G10RRE
-
Extended Warranty question
G10RRE replied to G10RRE's topic in Lexus F Club - Lexus IS-F / GS-F / RC-F Club
Car is 2011 so 7/8 years old full service history. So should be fine with regards to obtaining a warranty. Thanks for everyone’s input so far. -
Hey folks just thinking about getting the extended warranty for the IS F. Heard that as mileage gets higher it’s may be prone to the Valley Plate Leak or The exhaust manifold may crack/leak. These sound expensive, would such a warranty cover these eventualities? All fine just now, but peace of mind would be nice! thanks, John
-
Lexus Extended Warranty - Worth it?
G10RRE replied to Casa1862's topic in Lexus IS 300h / IS 250 / IS 200t Club
Hey folks just thinking about getting this extended warranty for the IS F. Heard that as mileage gets higher it’s may be prone to the Valley Plate Leak or The exhaust manifold may crack/leak. These sound expensive, would such a warranty cover these eventualities? All fine just now, but Peace if mind would be nice! thanks, John -
Thanks all. I agree that they will be fine because they will be seated exactly the same on the wheel and there willl be plenty thread inside it. Cheers!
-
Hey, I need new lock nuts and ordered these off Lexus eBay store. https://rover.ebay.com/rover/0/0/0?mpre=https%3A%2F%2Fwww.ebay.co.uk%2Fulk%2Fitm%2F254119566223 the vehicle checker says they fit, but they are slightly shorter on inspection see pic attached. I have not fitted to the car yet just in case, do you think it will be ok? If not, does anyone have a part number that is correct. Much appreciated John

-
VLand Rear Lights, Just for info 😎
G10RRE replied to NothernDan's topic in Lexus F Club - Lexus IS-F / GS-F / RC-F Club
Yes, see pic below. Both sides have dogs, and these are also where the reverse lights are. Double check the sellers description first just in case there are models without!
-
VLand Rear Lights, Just for info 😎
G10RRE replied to NothernDan's topic in Lexus F Club - Lexus IS-F / GS-F / RC-F Club
Thanks, took me a few triple checks before I pushed the brakes or turned on the lights again! All good though... If you get round to it, have fun! -
VLand Rear Lights, Just for info 😎
G10RRE replied to NothernDan's topic in Lexus F Club - Lexus IS-F / GS-F / RC-F Club
Hi I recently got these too, but I was hoping that during the day when the lights are OFF that when braking ALL lights came ON at the rear to give that nice L shape. As you know on stock lights and VLAND only the outer lights light up when braking, making it look like your inner lights are busted, due to the L not being right across. All is ok at night as your inner lights are on already. So after some thought I wired it up to do this... Steps below if anyone’s interested. Video to demo what I mean: https://youtu.be/7FFRfFMkdGY Hope it all makes sense. I would say, as a disclaimer that you should check your wire colours on the back of the VLAND lights are the same. I imagine they will be. Get a VOLT meter to double check. This is how I discovered what each colour was for. Materials 1. Fused relay – I used 10amp to match fuse weight the car recommends – Normally open relay (4 prong) 2. 10 amp roll of electrical wire 3. 10 amp spade connectors 4. Wire cutters 5. Electric insulating tape 6. Various tools to take clips off boot lid etc Steps Diagram Below also. 1. Remove tail lid carpeted cover to expose tail lid wiring and back of VLAND lights. 2. Pull back right hand (recommended if following these steps) boot carpet to expose one of the outer rear VLAND lights and wires. 3. Splice a long wire into the RED brake wire of the VLAND outer tail lamp. You may want to use a VOLT meter to double check what wires are what, in case yours are different. 4. Wrap splice in tape so you don’t short anything. 5. Run this wire up the tail lid hinges ready to plug into the relay. 6. Add a spade connector to this wire and plug it into PIN 86 of the relay. 7. Cut another similar length of wire and add a spade connector and plug that into PIN 30 of the relay and the other end into a 12v supply that is available or the battery. I used the ML Amplifier 12v In. Left hand plug, top left red wire. You may want to use a VOLT meter to double check what wires are what, in case yours are different. 8. Cut a length of wire and attach one end to a good earth. I used a bolt of the trunk lid supports. And plug the other end using spade connector to PIN 85 of the relay. 9. Finally run a short length of wire from PIN 87 of the relay to the GREEN wire of the inner VLAND tail light. You may want to use a VOLT meter to double check what wires are what, in case yours are different. Testing 1. Ensure no exposed pins/ wires are touching anything conductive. 2. Go push the brake pedal/ask a friend. With the lights ALL OFF you should hear the relay click and both the outer and inner lights come on along with your brake lights. 3. Let off the brake and all should go off, you'll hear the relay click again. 4. Turn on your lights to ensure they light as before, try the brake again to ensure that the brake lights come on and go off on release. 5. If all ok, tape up all connections securely and stick the relay to somewhere on the trunk lid. 6. Reapply all carpet covers and tidy up! Now you'll have a fancy looking rear end when braking during the day when your lights are usually OFF. Good luck! -
Winter Tyres on OEM 10 spoke wheels IS F
G10RRE replied to G10RRE's topic in Lexus F Club - Lexus IS-F / GS-F / RC-F Club
Grand! Ordered these before reading this, glad to hear positive feedback 👍🏻 -
Winter Tyres on OEM 10 spoke wheels IS F
G10RRE replied to G10RRE's topic in Lexus F Club - Lexus IS-F / GS-F / RC-F Club
Thanks for info Killysprint, any twellsie , seems like any premium brand is very similar overall in performance. And Phoenicks try https://www.mytyres.co.uk/ or https://www.oponeo.co.uk more choice and same brand front and back. hope that helps! -
Hey everyone, With the snow in the uk last year I somehow managed on my summer Michelin’s/bridgestones with the IS F It wasn’t a fun experience! Well sometimes it was fun. Ha! I need new rears, and was planning on a set of winter tyres, front and back. Has anyone got any tried and tested suggestions, we might not get snow, but better wet performance and general low temperature performance wouldn’t hurt. Eyeing up... Nokian WR A4 or Michelin Pilot Alpin PA4 good, bad, indifferent? someone suggested Nankang SV2 winters?? Quite cheap prices compared to above two suggestions. Any help very much appreciated. Thanks, John.
-
Air Con Low port location
G10RRE replied to G10RRE's topic in Lexus F Club - Lexus IS-F / GS-F / RC-F Club
I just fancied a DiY instead of wAiting st s garage... Found it though 👍🏻 Big L cap on it was obvious and it’s on the right hand side under engine cover if anyone wonders! -
Air Con Low port location
G10RRE replied to G10RRE's topic in Lexus F Club - Lexus IS-F / GS-F / RC-F Club
Yes the low port so I can top up the gas using one of those kits you can buy. ta John -
Air Con Low port location
G10RRE replied to G10RRE's topic in Lexus F Club - Lexus IS-F / GS-F / RC-F Club
Hmmm looks like a stinker to get too ha ha! doesnt look like our engine bay but is it in the same place? -
Hey, can anyone help locate the low port of the air con system on the IS F 2011? Much appreciated, John
-
Nice video, both look as capable as each other. https://youtu.be/uGz7witB2e8
-
Nice video, both look as capable as each other. https://youtu.be/uGz7witB2e8
-
Marginally better with alignment, but suggest possible caster brackets to fully fix, it’s not that bad for me to do the repair yet! Or I’m just used to it? Hmmm
-
Exhaust Back Box Drooping
G10RRE replied to G10RRE's topic in Lexus F Club - Lexus IS-F / GS-F / RC-F Club
Do you have some more info on what you got done, a video would be great. I'm worried about drone at 2k revs and below! Thanks -
Exhaust Back Box Drooping
G10RRE replied to G10RRE's topic in Lexus F Club - Lexus IS-F / GS-F / RC-F Club
@Big Rat thanks for the links! Like the idea of a valved one... quiet when I want and Loud when on it. We shall see! -
Exhaust Back Box Drooping
G10RRE replied to G10RRE's topic in Lexus F Club - Lexus IS-F / GS-F / RC-F Club
Been thinking a while for a custom... any good recommendations? -
Exhaust Back Box Drooping
G10RRE replied to G10RRE's topic in Lexus F Club - Lexus IS-F / GS-F / RC-F Club
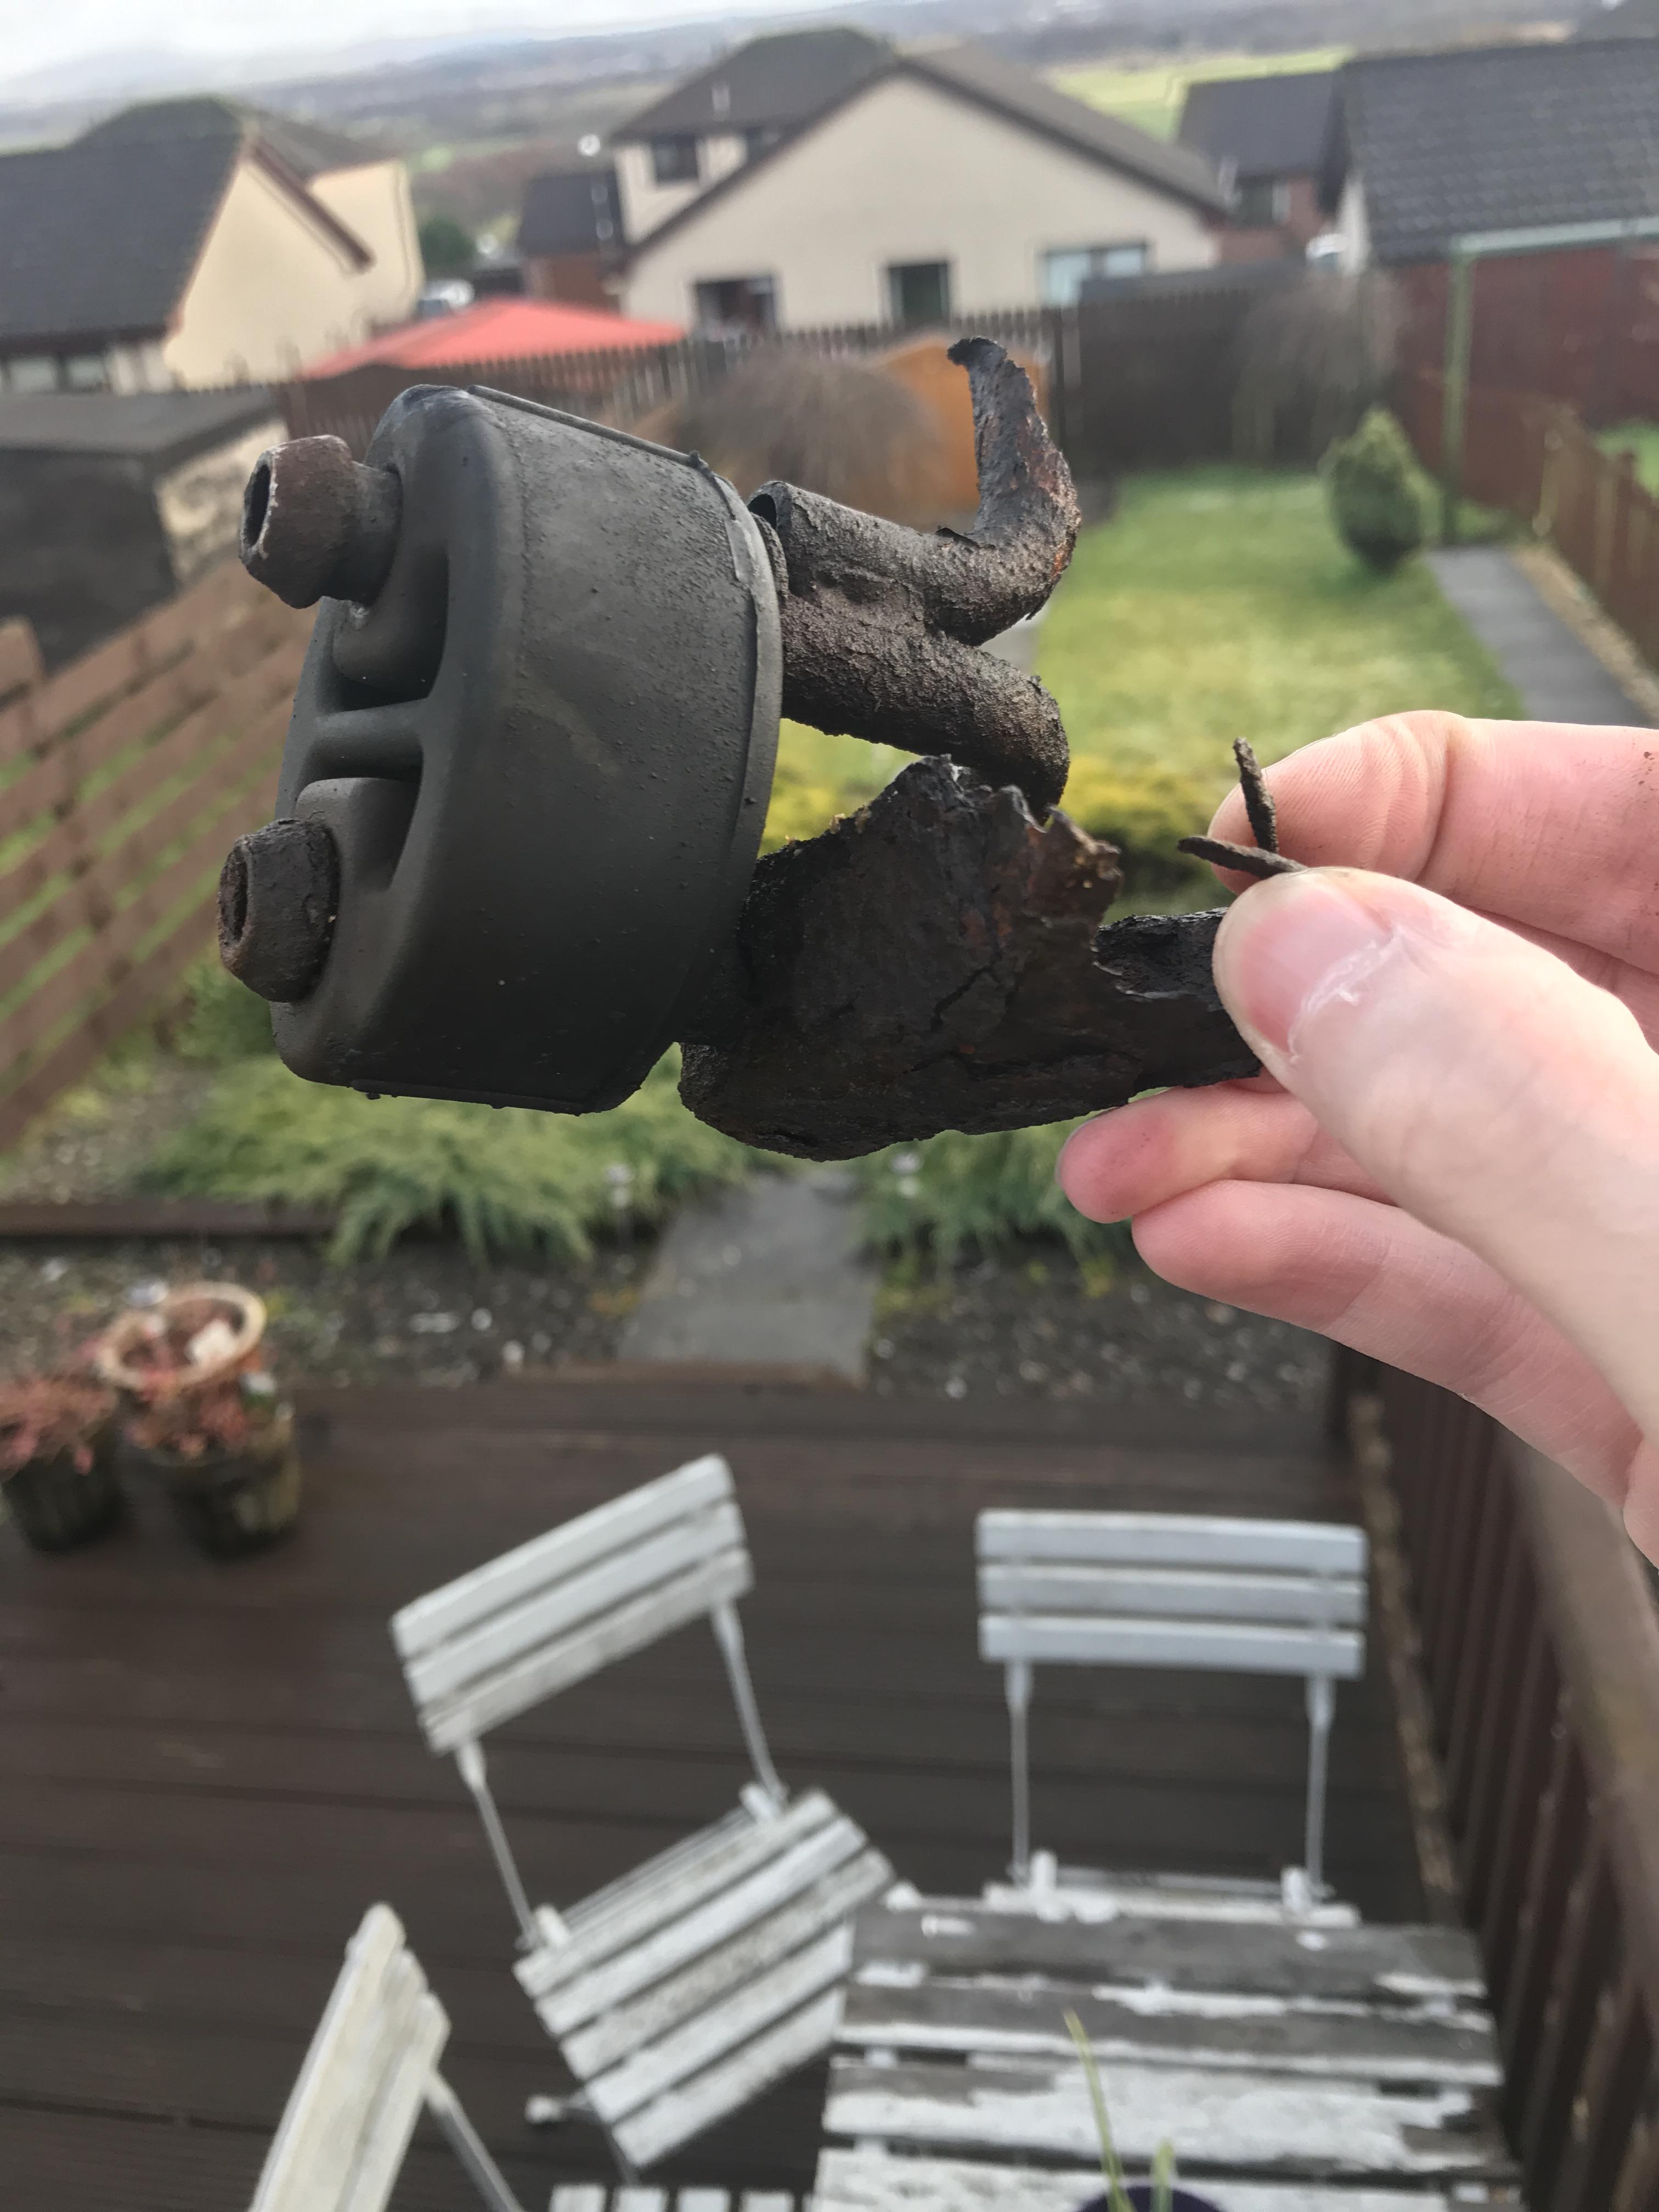
Hmm Iooking at my exhausts the prongs have rusted off the back box too, so nothing to hook onto even if I got new brackets. Time for a custom ? 😁 maybe! -
Exhaust Back Box Drooping
G10RRE replied to G10RRE's topic in Lexus F Club - Lexus IS-F / GS-F / RC-F Club
Oh dear!
-
Hi All, Looks like my back boxes are drooping, without looking (its pouring rain) does anyone hav an ideas if its just the rubber hangers that might be the culprit? Both sides are dooping. Thanks, John
-
Let’s see your F stinking dirty.
G10RRE replied to Flytvr's topic in Lexus F Club - Lexus IS-F / GS-F / RC-F Club
Lots of driving lots! Dirty winter days yuck... and white really shows it 😞