Leaderboard


Popular Content
Showing content with the highest reputation on 11/16/2019 in Posts
-
I finished doing the rears today and all I can say to anyone thinking of doing it forget it if you don't have loads of patience! It's definitely not a job for the faint hearted. Maybe it's because I tackled all four that I feel that way. Anyway, it's riding nicely, no noticeable difference from the original setup. One knuckle missing so could be worse!
 6 points
 -
Just a quick piece of advice when dealing with disconnecting battery's and reconnecting always neg terminal first and then positive and when reconnecting neg gets fitted last . This stops sparking terminals reducing the risk of exploding battery's when gasses are present .as will smith would sing boom boom shake the room .2 points
-
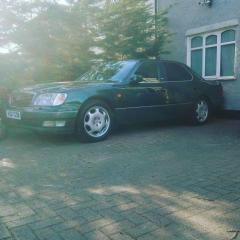
Been thinking about getting the alloys powder coated for almost 3 years now, I needed new tyres so took the opportunity to get them done. Should have done it earlier not bad for an 11 year old car
1 point
-
I'm sure they will find a way of clawing back any savings...1 point
-
Thanks Roger, although I'm not sure if it was being brave or stupid! There's some great info out there which made it possible, and I'm very grateful to people who take the time to make videos etc. I guess like anything, having done it, it wouldn't seem so daunting next time, although I don't plan on there being a next time!1 point
-
Hello all, Apologeis for the lack of update - car's been behaving great, and I've made a start on one of my big(ish) projects - a subwoofer install. I want to use the raised shelf at the back of the boot - so as to retain access to the spare wheel - so main point is I'll be removing the factory sub and using a box that takes up that shelf space and no more. For wiring in the engine bay - the objective was to be as invisible as possilbe, no silly large gauge wire, big fuse holders or after market battery clamps (although I accept the need for all in certain circumstances). Used a Rockford Fosgate 8awg OFC kit wiring kit for power & ground; power comes straight from the battery via a 60amp fuse mounted close to the battery tray, and used an existing grommet for vehicle wiring loom to get in to the cabin. Battery tray removed, and grommet opened for batt + cable in to the cabin. I did try to use the larger grommet to the right - couldnt get enough space so put it all back in to place - it's open in this shot though: Closing both grommets, using corrogated plastic sheething and mounting the fuse holder (plus a liberal spray of fluid film anti-corrosion spray: Crimping a battery terminal (not glamorous but what the hey): Finished product with the battery and tray re-installed: batt + cable installed on the factory terminal: All fits under the factory terminal covers - and the new fuse is servicable with the vehicle battery in place: I won't bore you with fishing the cable through the cabin - save for getting in to the boot via the back seat. Followed this tutorial for removing the back seat and rear parcel shelf - to get the power cabling for the sub through to the trunk, and remove the factory sub: https://www.clublexus.com/forums/gs-2nd-gen-1998-2005/552625-2gs-stock-subwoofer-replacement-w-pics.html Mine looked like this with it all stripped out and the rear seat pulled forward for acces: More to come in a moment!1 point
-
2m Ive got some slack that I can pull out and poke back into the centre consol again, but I wouldn’t get less than 1.5m1 point
-
You could try https://toyotamaps.online/map-updates. Have updated maps on 2016 GS300h recently and this guy was really helpful. WhatsApp contact is very good.1 point
-
No it doesn't, the ls400 is better built1 point
-
Wanted, left handed unicorn. Good luck mate. Not sure many of these will come up 🤔1 point
-
I may still have some capacitor kits left over from some rebuilds and kit supplies for some members a few years ago, I will have a look over the weekend and let you know. Just done a same day turn around on a 1994 climate control LCD for another member yesterday, already refitted and working fine.1 point
-
Well, the Tailgate is now working correctly . Dont really know if it just sprung back into life or was something to do with what i did ! I read the Owners Manual, and there is a little cover that you prise off with a Screwdriver that lets you get at a little lever that you turn clockwise and it unlocks the boot . This allowed me to fully open the Tailgate. I pressed all the buttons to close it but no joy, so physically pushed it down into the Lock Position. Still no joy trying to open it with Remote or Manual so was going to try the Battery Disconnect this weekend . Just been shopping and the pressed the Tailgate Open on the Remote not really thinking , and it opened with the beeping . Its now opening and closing as it should do ! Thanks for your help .1 point
-
If you look further up the thread you'll see that the OP bought them from PB Coilovers in Taiwan (via eBay) which are the same ones as Godfrey is selling, so it seems like you've dropped lucky there if you can work out a deal with him.1 point
-
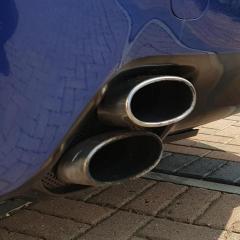
Looks great. +1 for powder coating. Makes a huge difference. Had my 13 year old ones powder coated too to Anthracite earlier this year and makes a huge difference. Few pics of my powder coated wheels below:1 point
-
Hi Britprius. I watched numerous YouTube videos. Loads of informative stuff that's been helpful. That said they are also a bit misleading. I tried to free the timing chain cover plate, literally for hours. Trying all I could, until my patience ran out and I resorted to strength (temper) and pulled a little harder. Only then did I find out that the oil scavenger pipe is actually bolted to the place. Not as the videos indicated. None show it to be bolted. So, new pipe ordered at £98 from Lexus. For anyone reading this in the future, to access the the nuts that connect the oil scavenger pipe to the front plate, you need to drop the steering rack and then drop the 'large' sump. You'll need to access four bolts in the 'small' sump. There are also two nuts that are very difficult to reach. I had to remove some of the bell housing so I could get a socket in. As you say I could have just changer the chain, but I went for fitting a chain kit that has all the timing components.0 points


.thumb.jpg.12f72e57889297bfdbcd9c419c4af260.jpg)