Leaderboard


Popular Content
Showing content with the highest reputation on 12/28/2017 in all areas
-
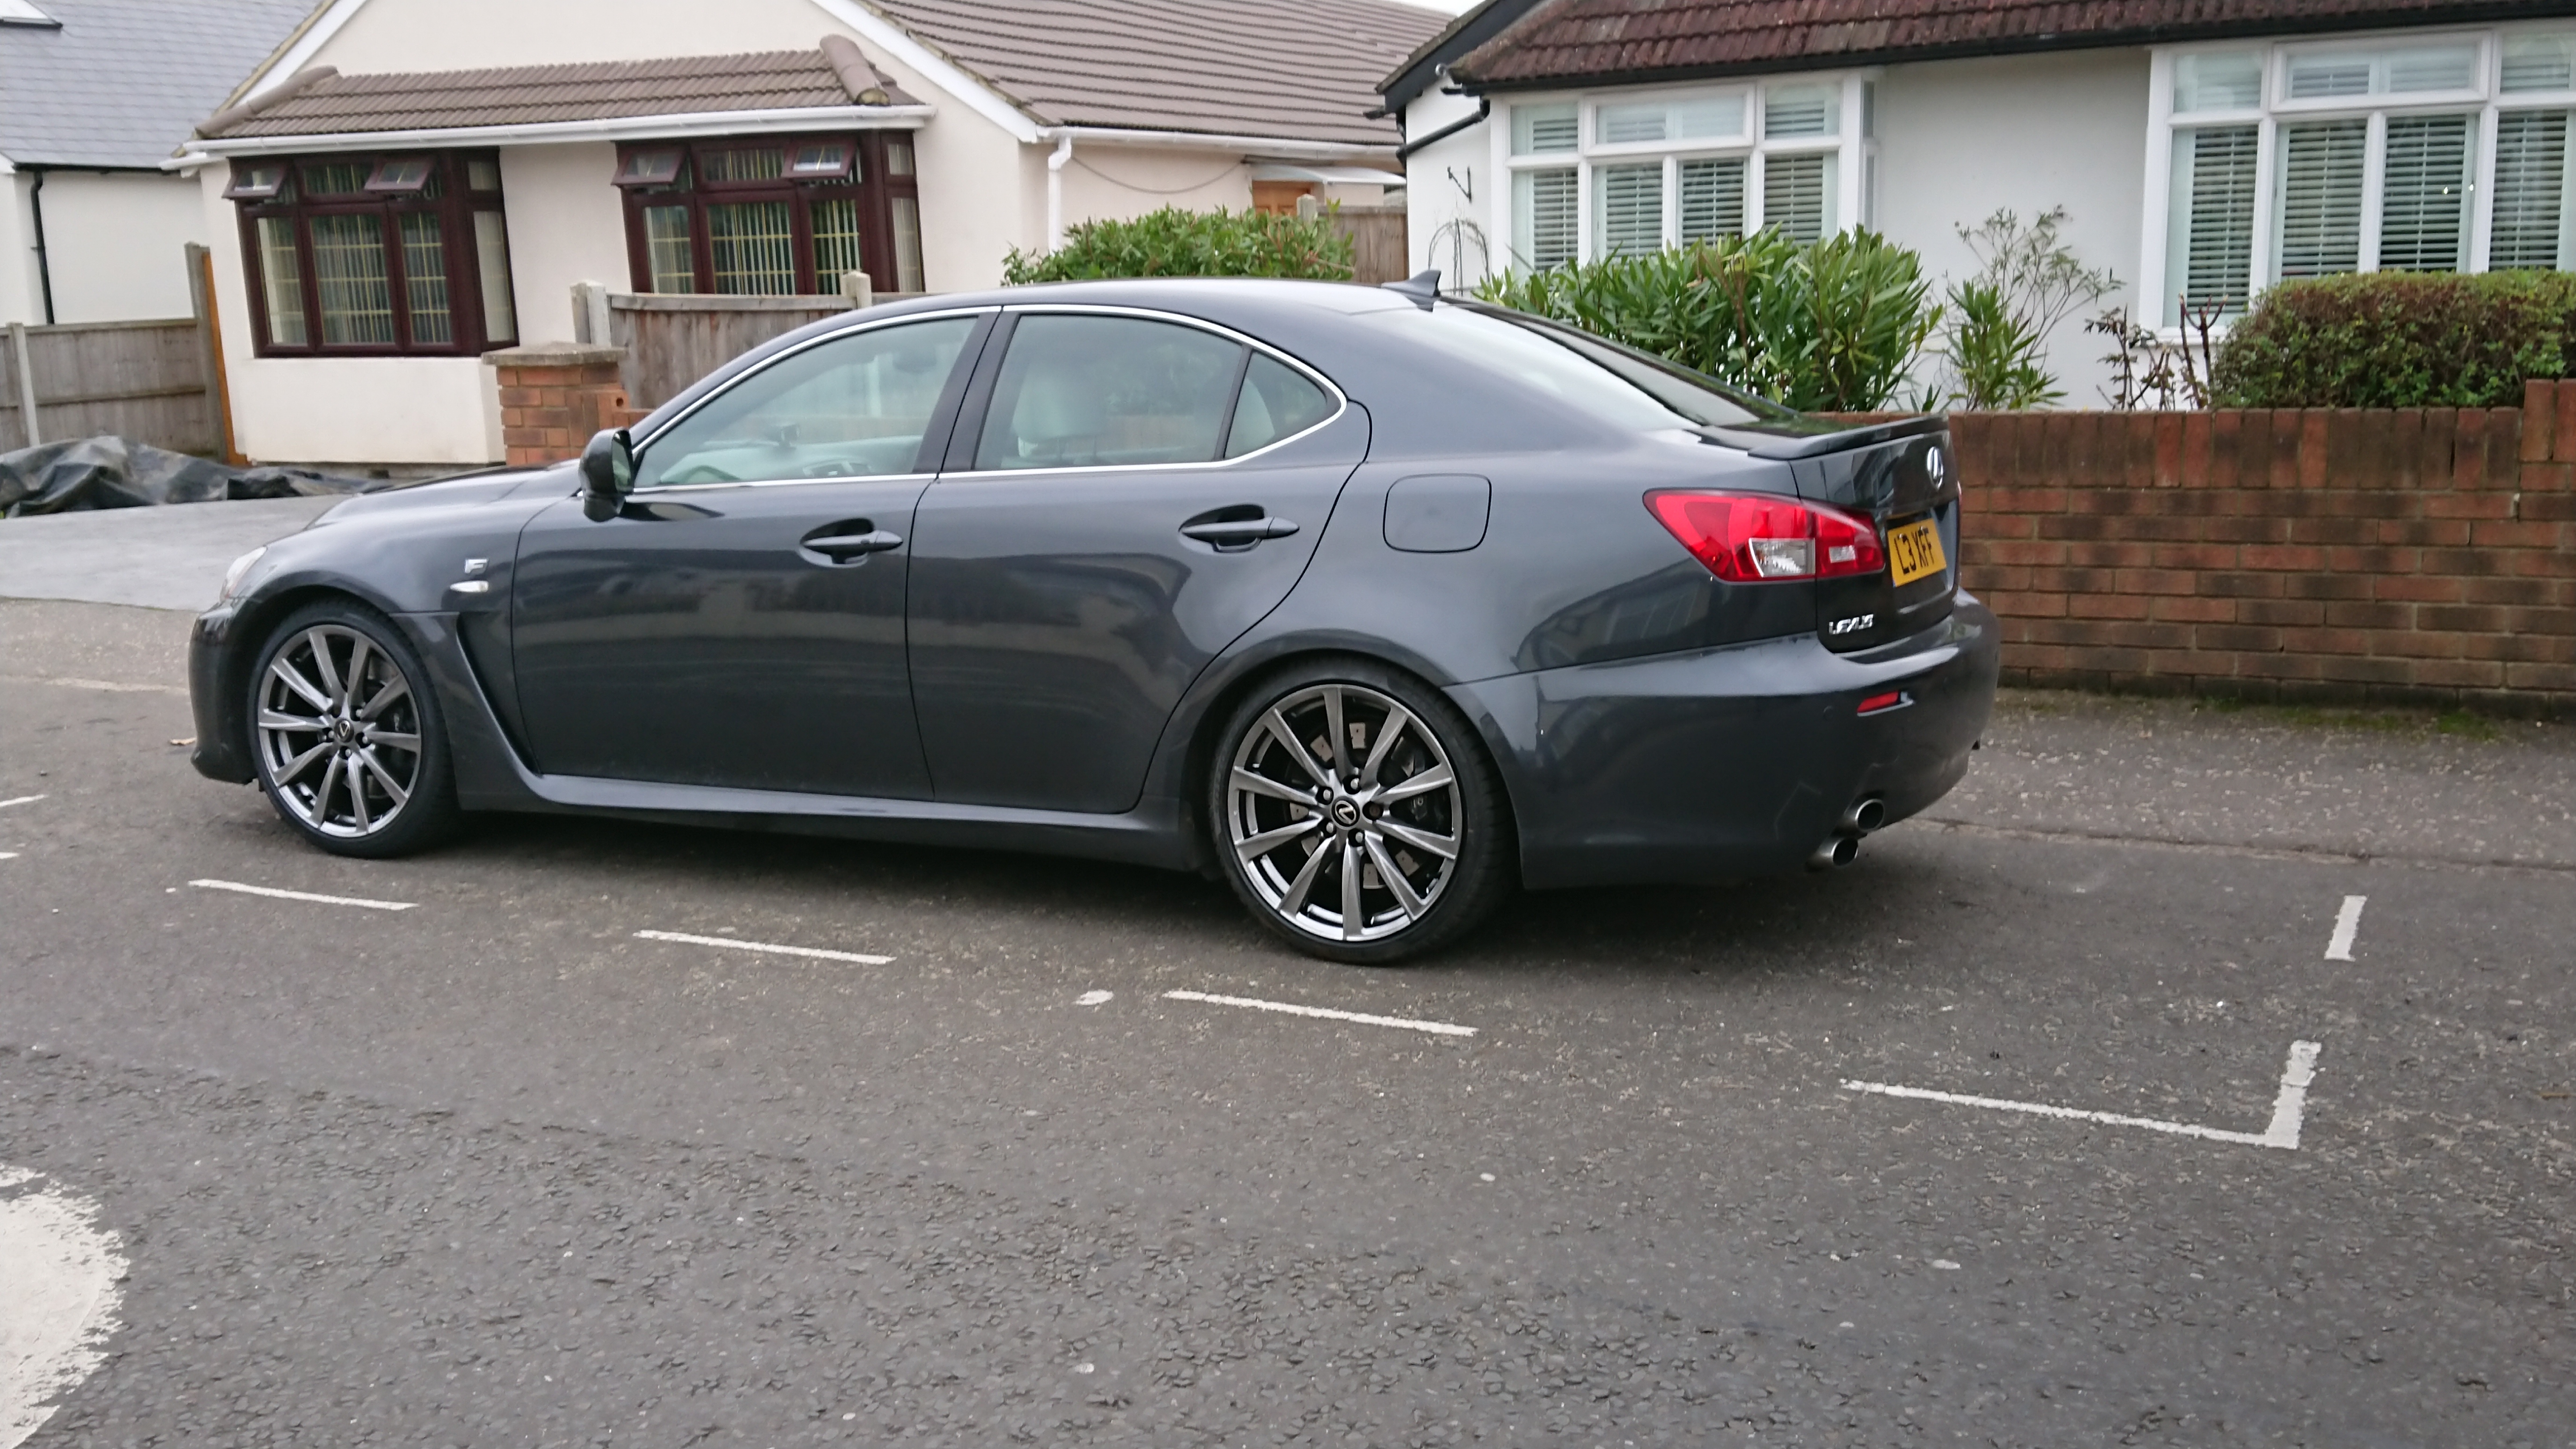
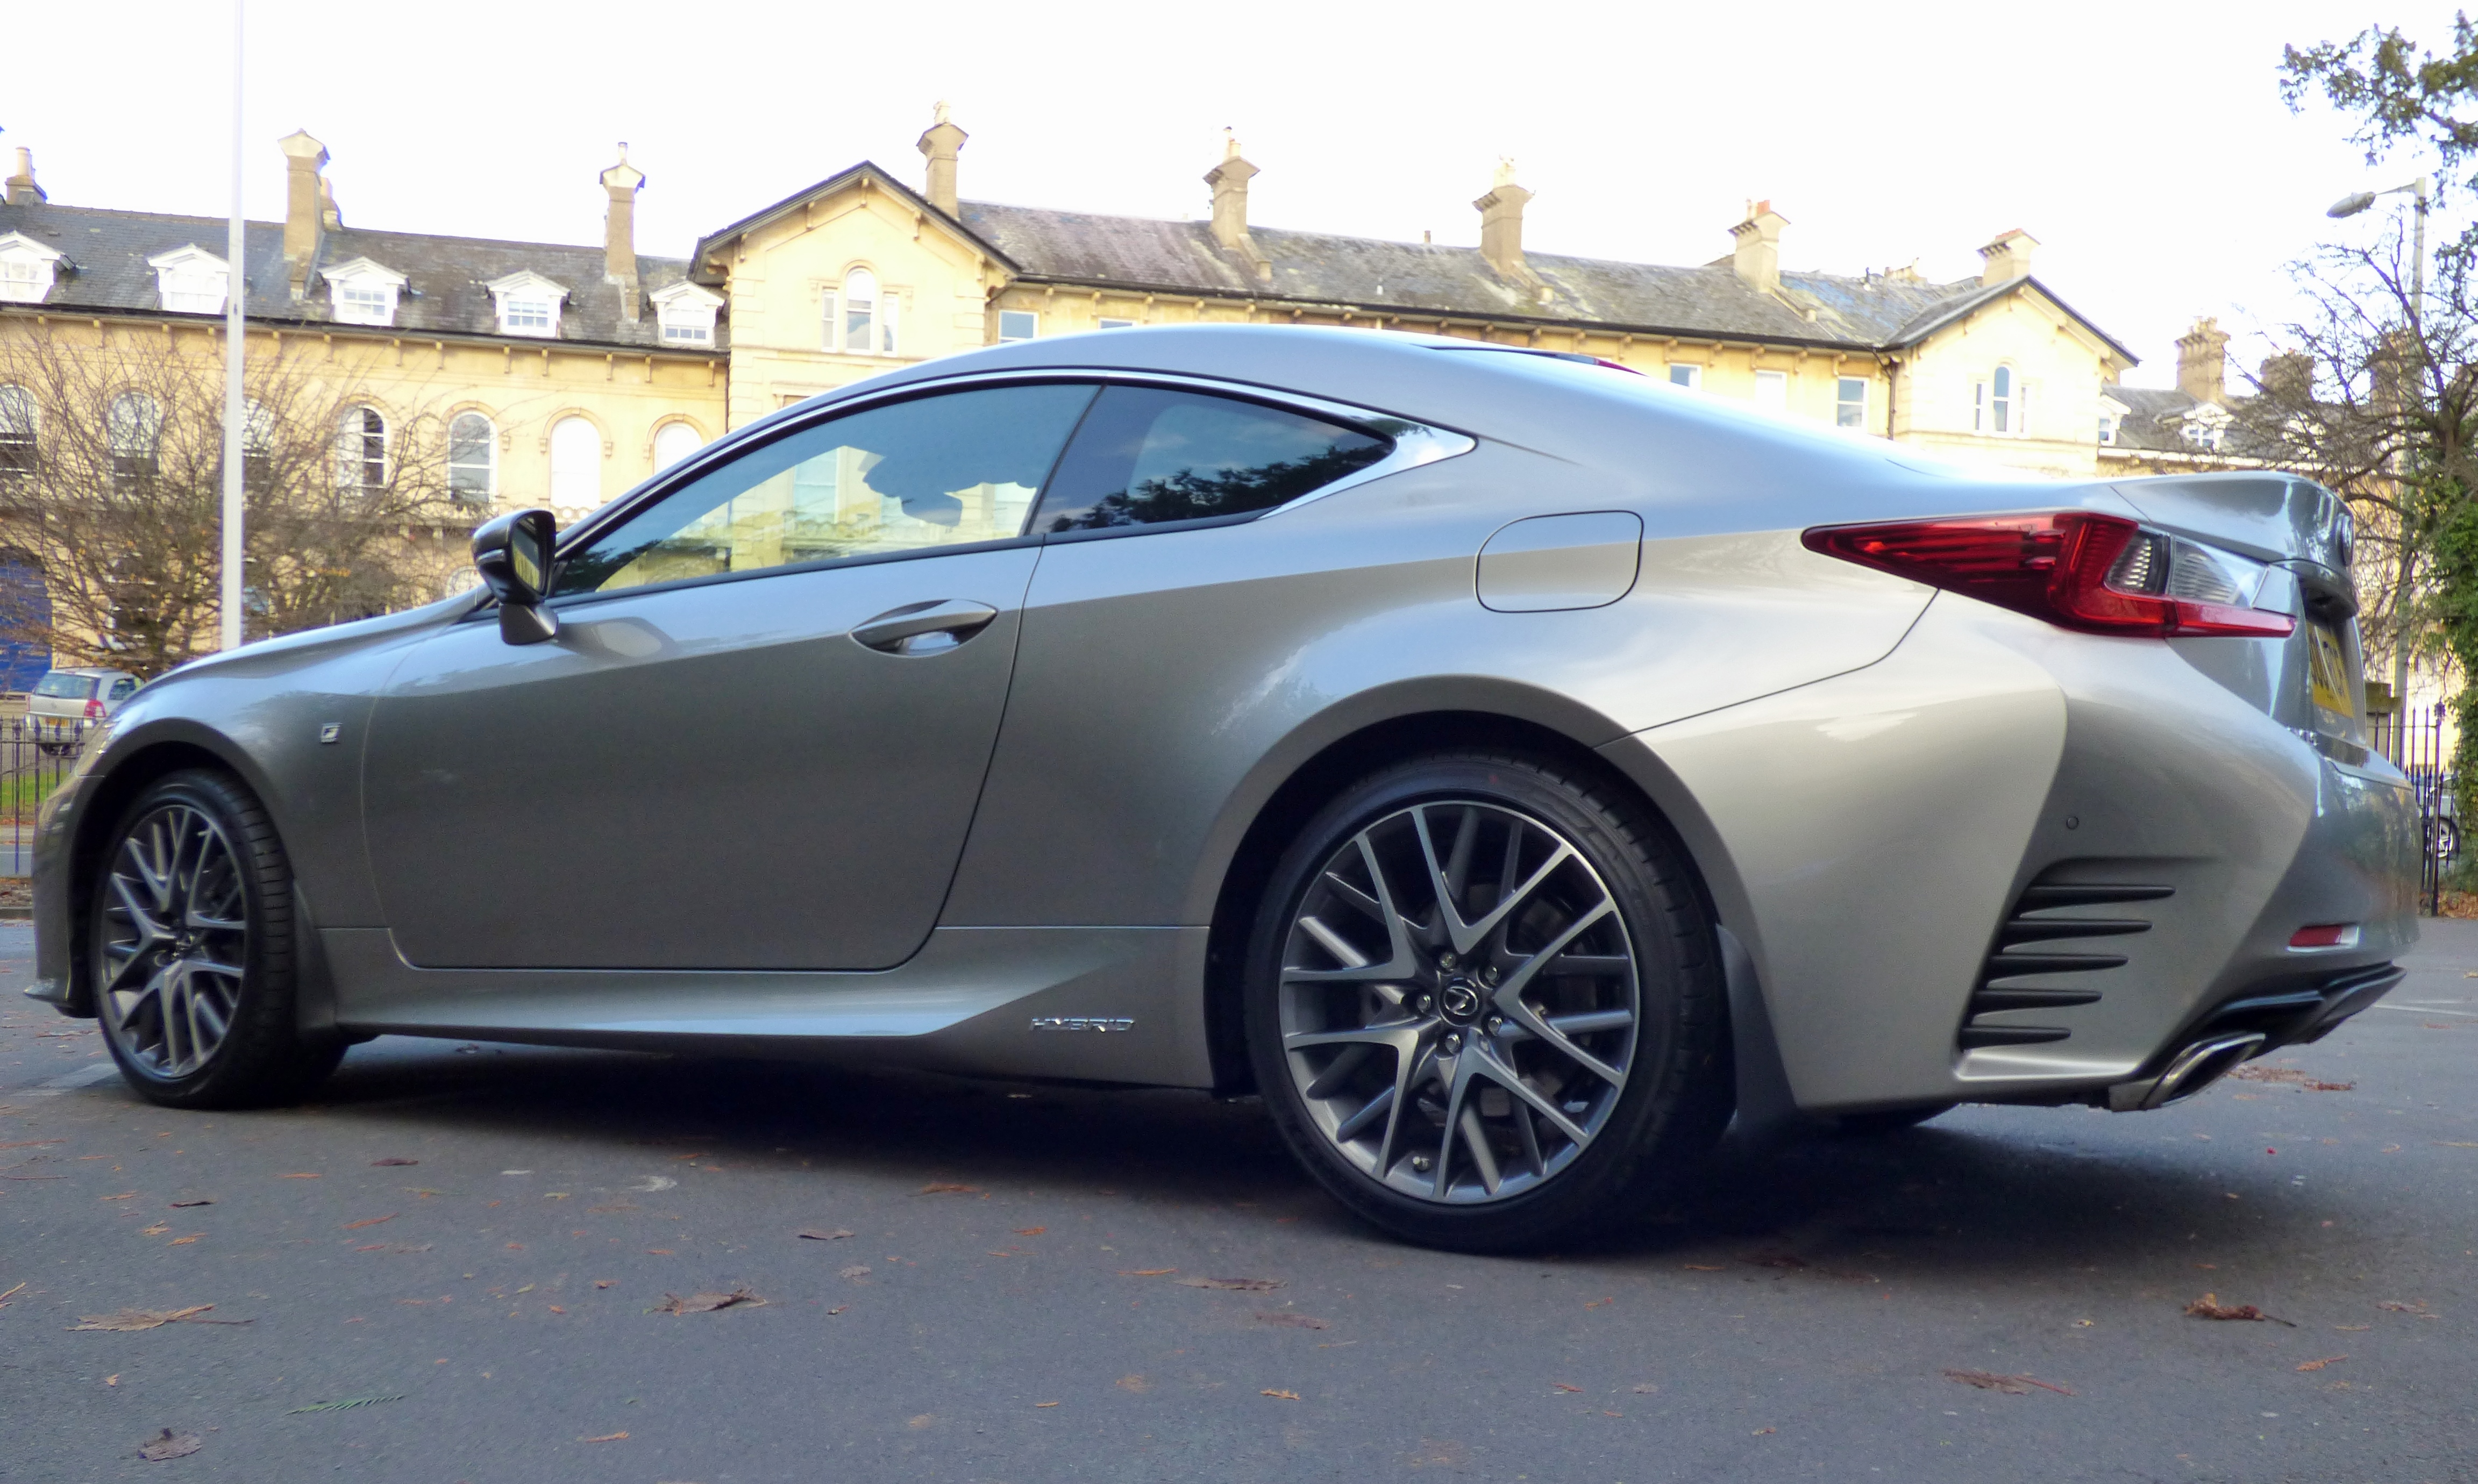
Probably more like my last white one..lol J was clearly in no mood to take pictures here. You can see the quad exhaust set up.
 3 points
 -
My partners in crime... Bert the Maine Coon on the left and Ernie the little grey fat one on the right. Nothing like a black ISF ;-)
2 points
-
Good thread, love technical debate 👍.... Not far off...
2 points
-
I could be wrong, but it would be my guess that keeping a car garaged would contribute greatly to some parts lasting where on others they fail, including the windows which can delaminate. If it spends a third of its life protected from the elements, it seems to make sense to me. As someone once said, we're at the lower end of the motoring food chain with these cars, but at least they go wrong far less than anything else comparable. I've not had a major bill in 9 years with either LS, not bad going!2 points
-
Toyota oil is fine as long as the grade is correct. 0W-20 seems to be the preferred grade for the engine.2 points
-
Thought I would share this with you, sorry if that has been posted, I did search and could not find anything...... I went to get into my car this morning, pressed the unlock button and the alarm went off, but the doors did not open. I tried pressing all the buttons, nothing, it just kept screaming at me. So I unlocked the doors manually, got in and tried to turn on the ignition, got the engine management light on and that is all, no Ready light came on, alarm was still going off. So I went and got the other keys I have, the grey and black keys, they had not effect either and appeared to be fully charged, so I could not shut the thing up. Then after about 5 mins, the alarm stopped and there was a continuous loud clicking under the bonnet, a bit like my four way flash should have been working but they were not illuminating. So I called my Lexus dealer who suggested it was due to wireless interfearance in the area, not convinced on that. So I called the Lexus roadside cover out and straight away that chap said, "Flat car battery". He lifted the bonnet and took the plastic cover off so he could show me the battery, there is a little optic indicator on the battery that indicates its state, my battery clearly showed "Charge was necessary" which is indicated by a red dot surrounded by white. He connected the booster charge pack thing from his van and straight away the car remote worked and everything sprung into life. The problem with my car is due to me doing a lot of very short journeys where I am not passing 25mph, so my engine does not kick in very much at all, especially with all this nice weather I have not been running my air con or anything, just open the sun roof and go. The other two indications the optic tells you is: All red with white dot = needs topping up with water All blue with red dot = Is OK All white with red dot = Charge necessary. I now have the car on trickle charge to sort the problem. Hope this helps anyone who end up in this situation. :)1 point
-
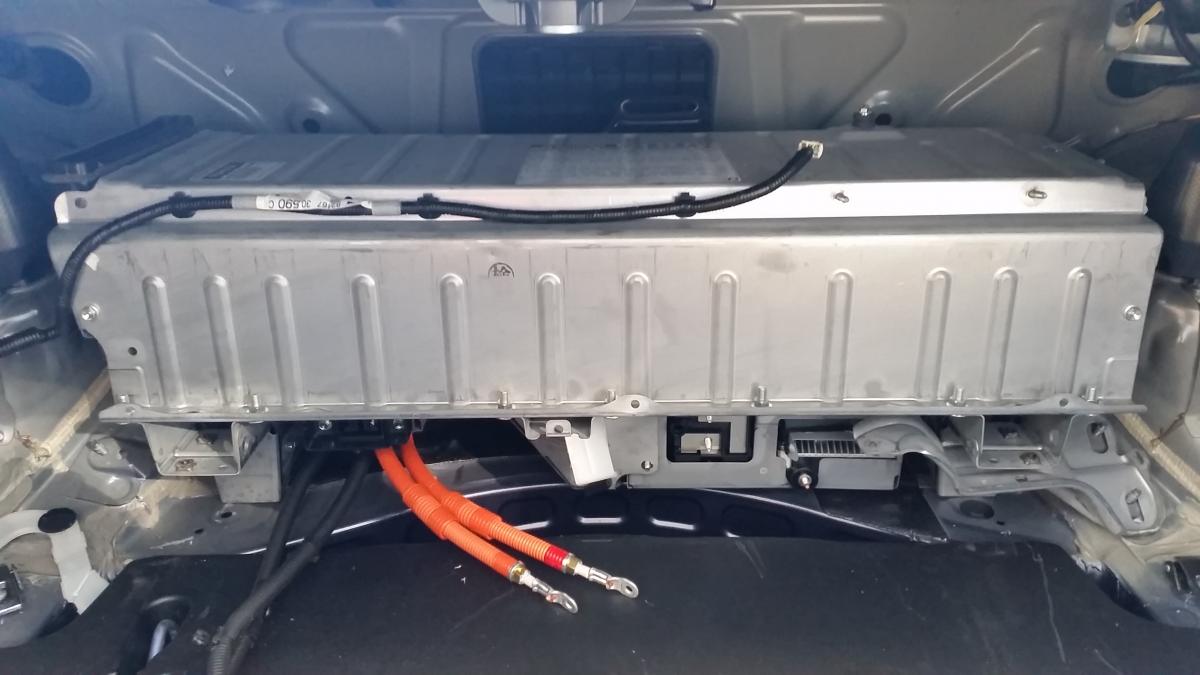
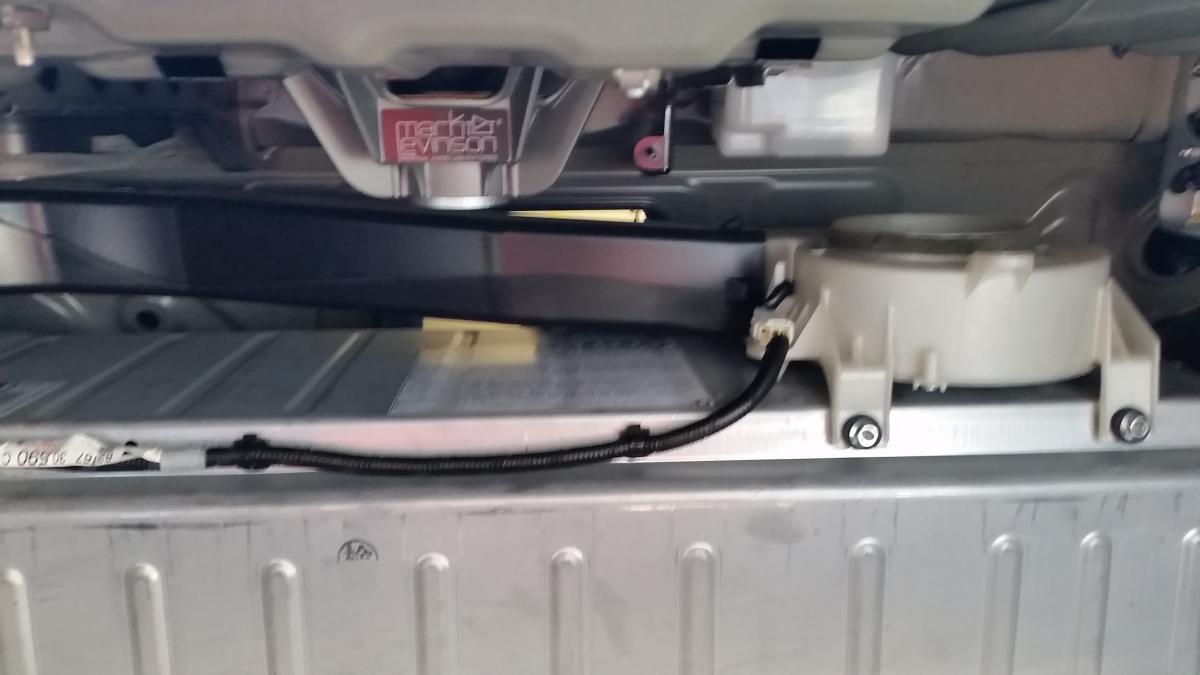
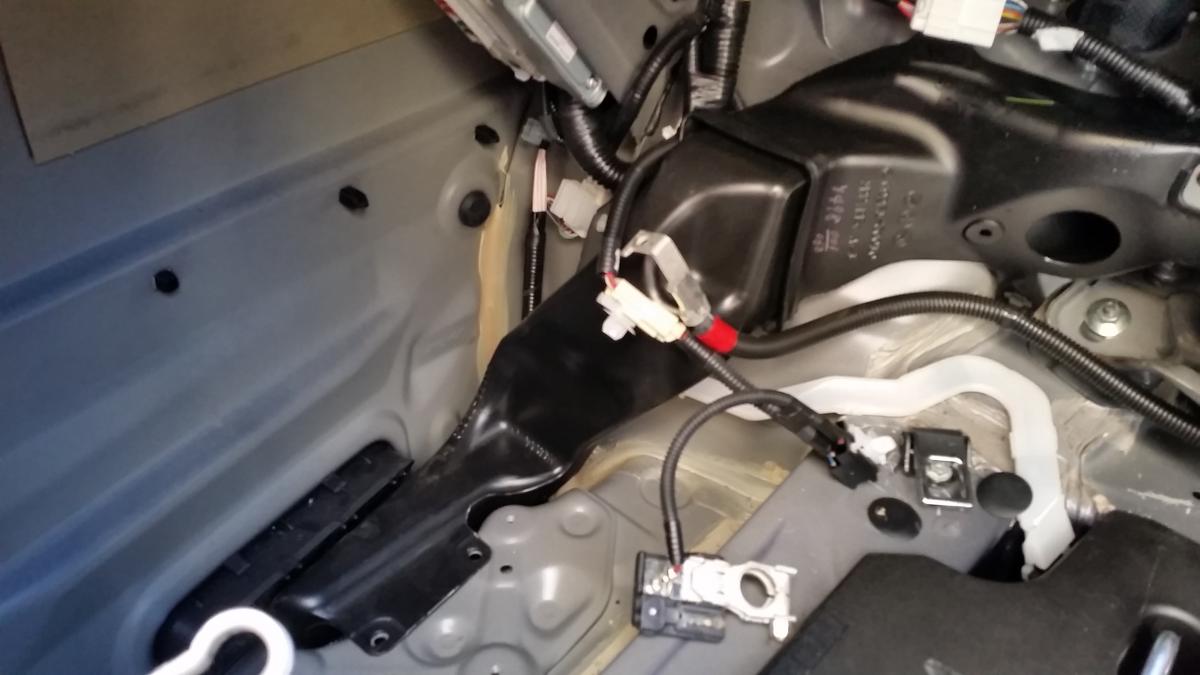
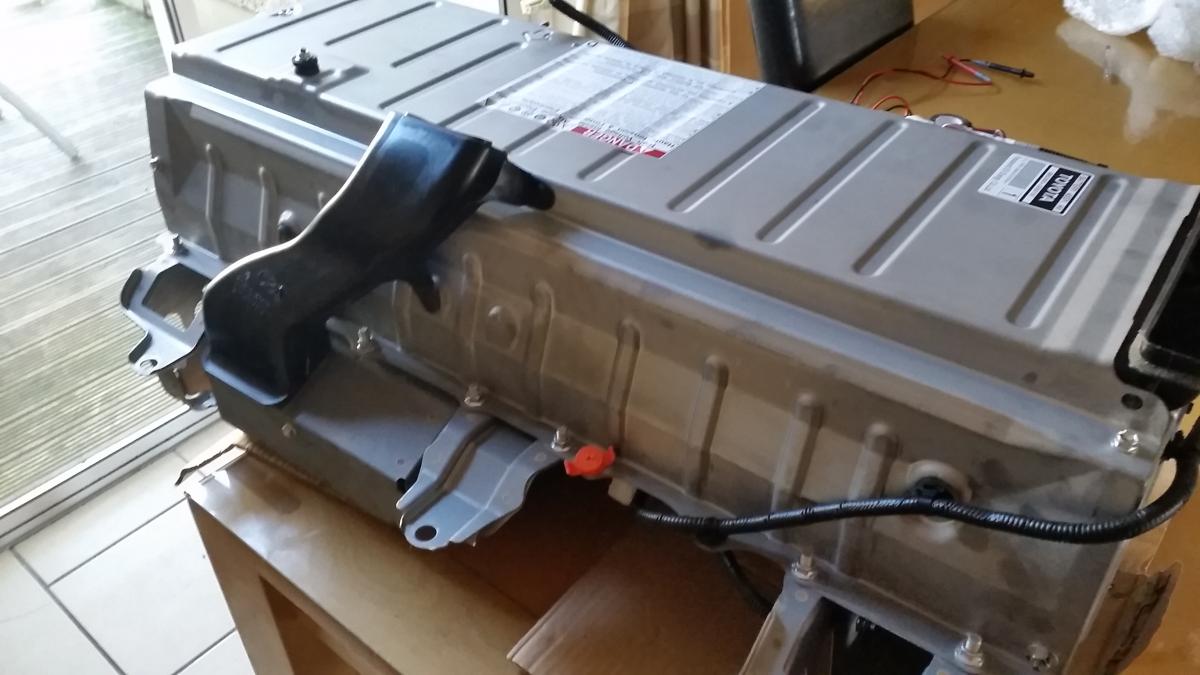
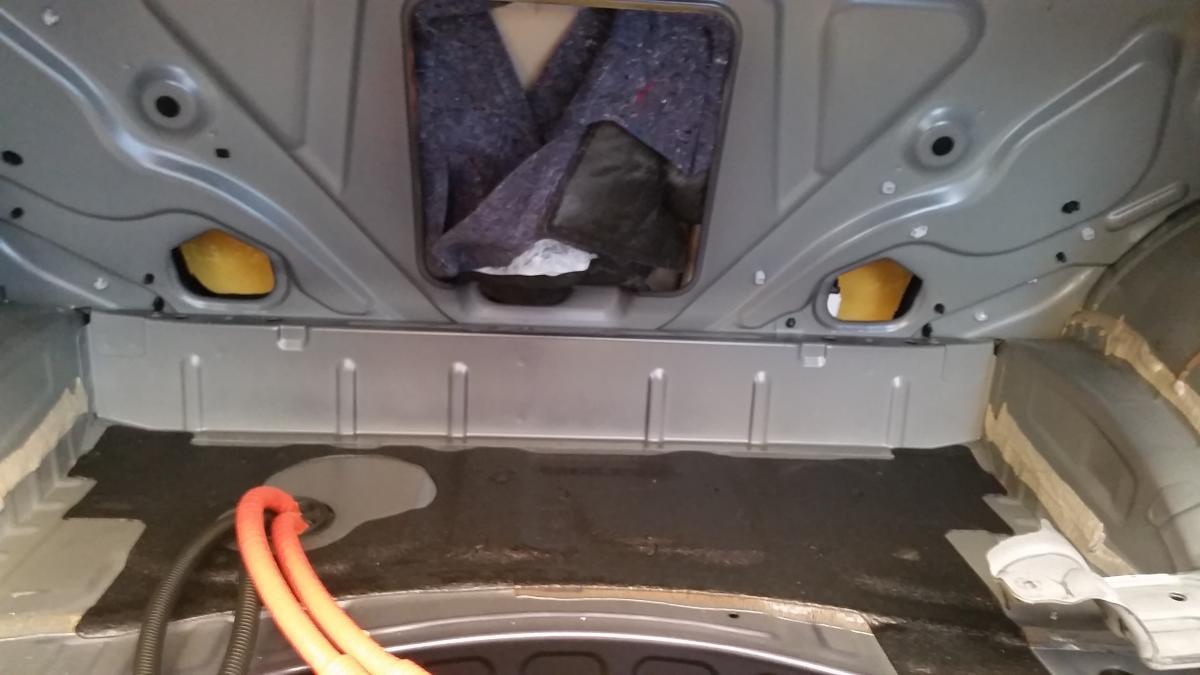
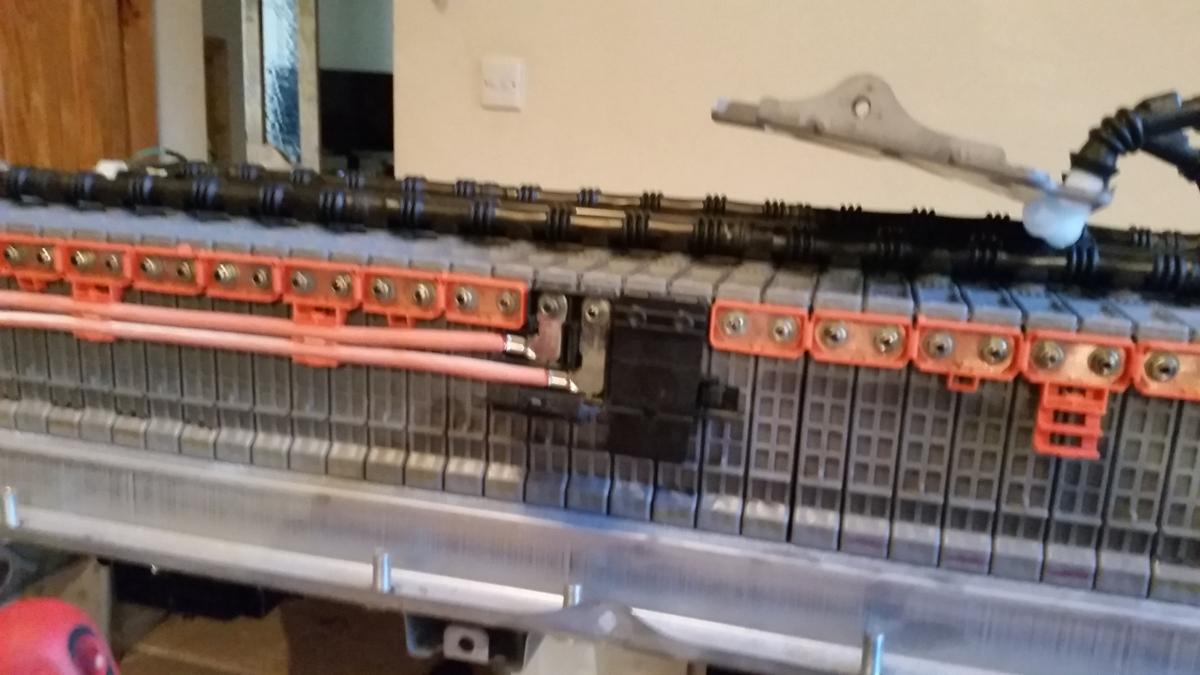
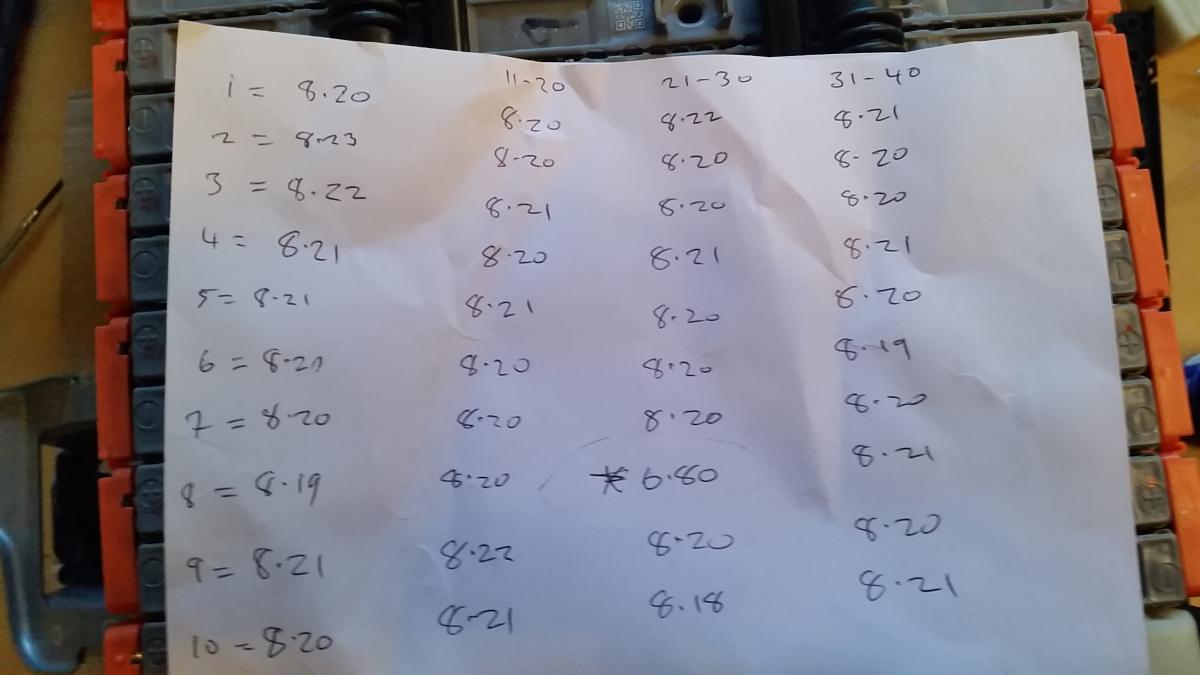
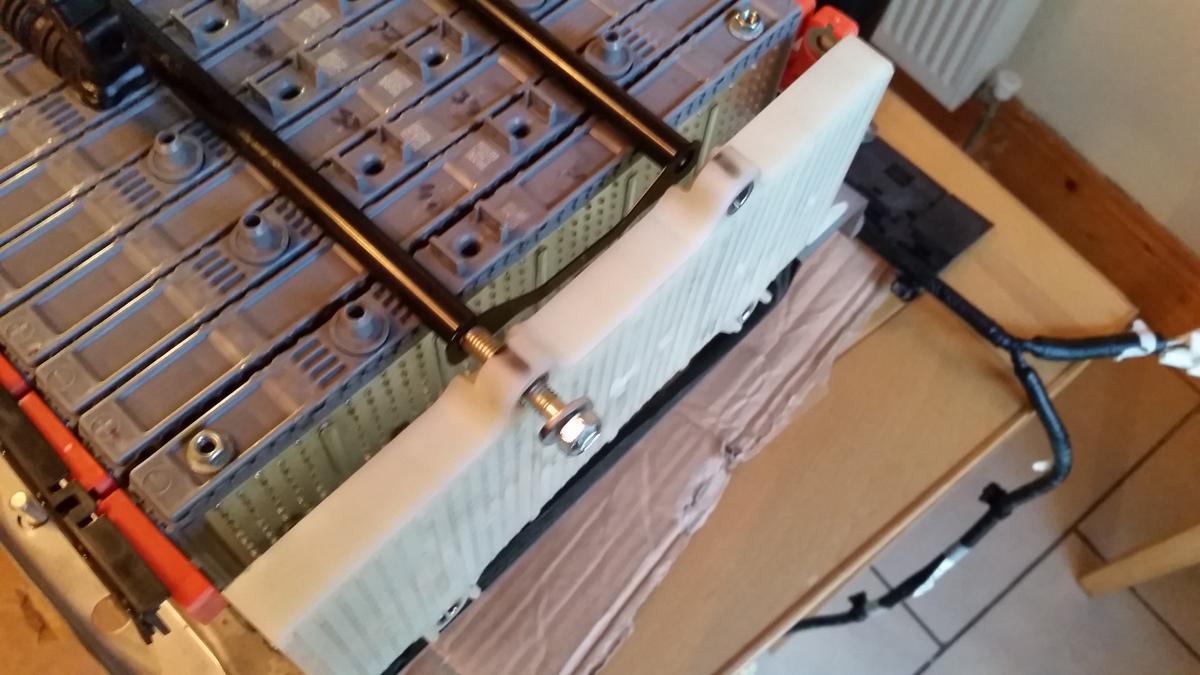
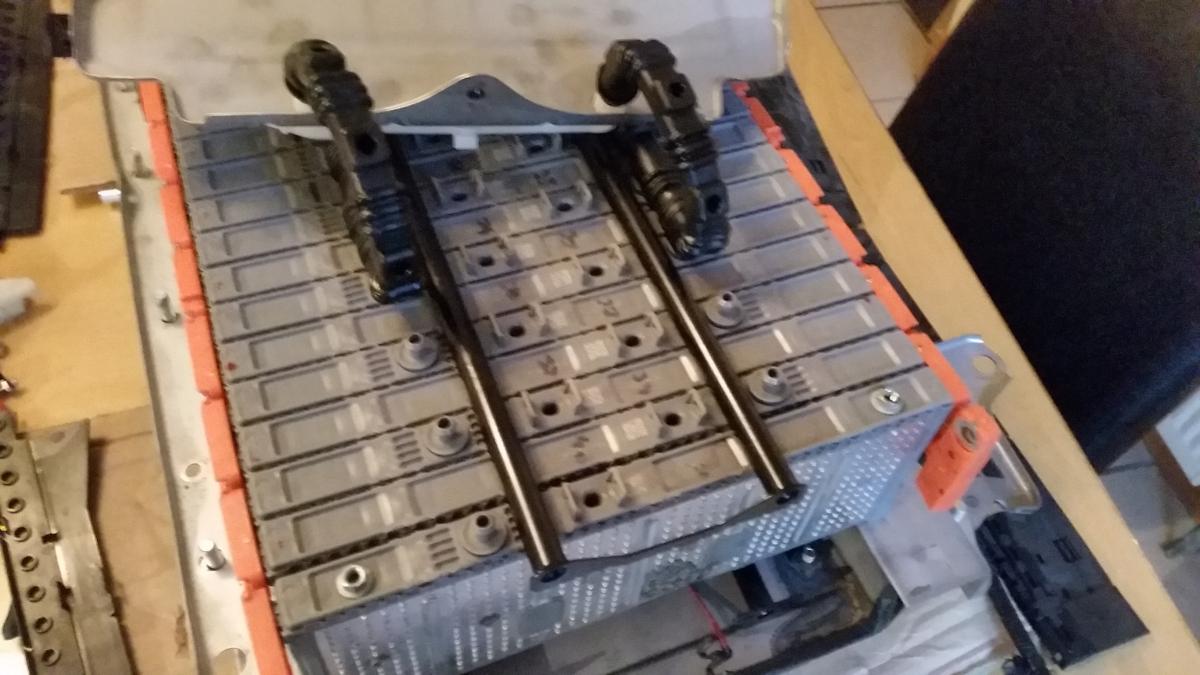
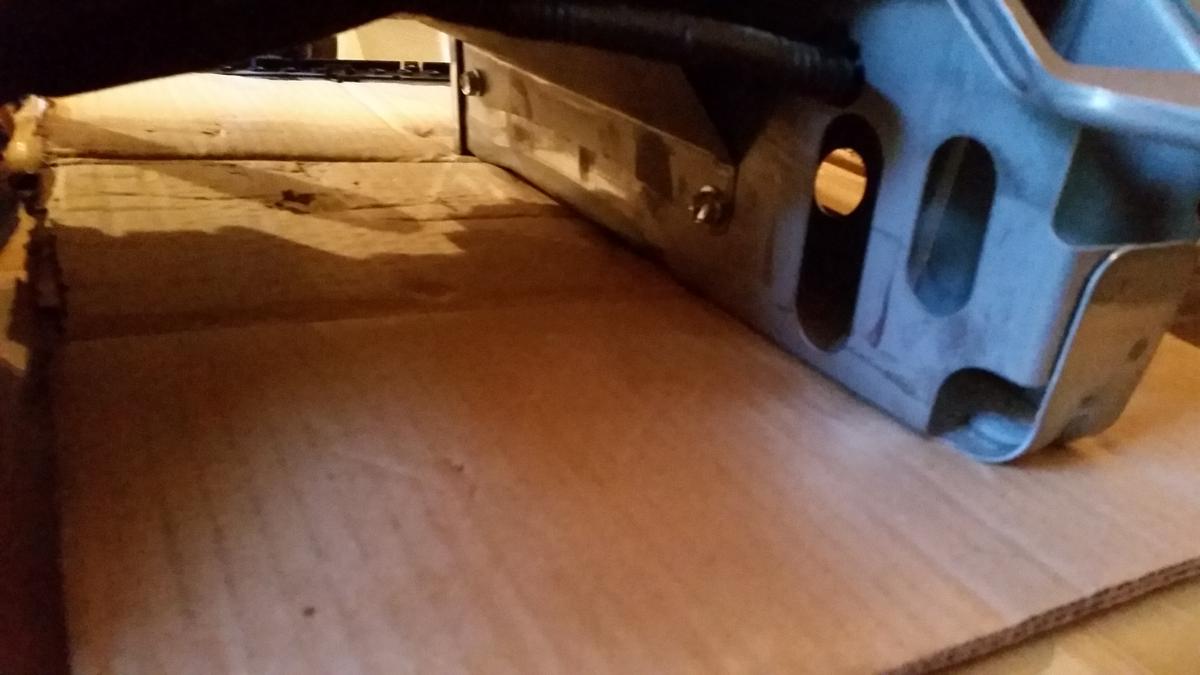
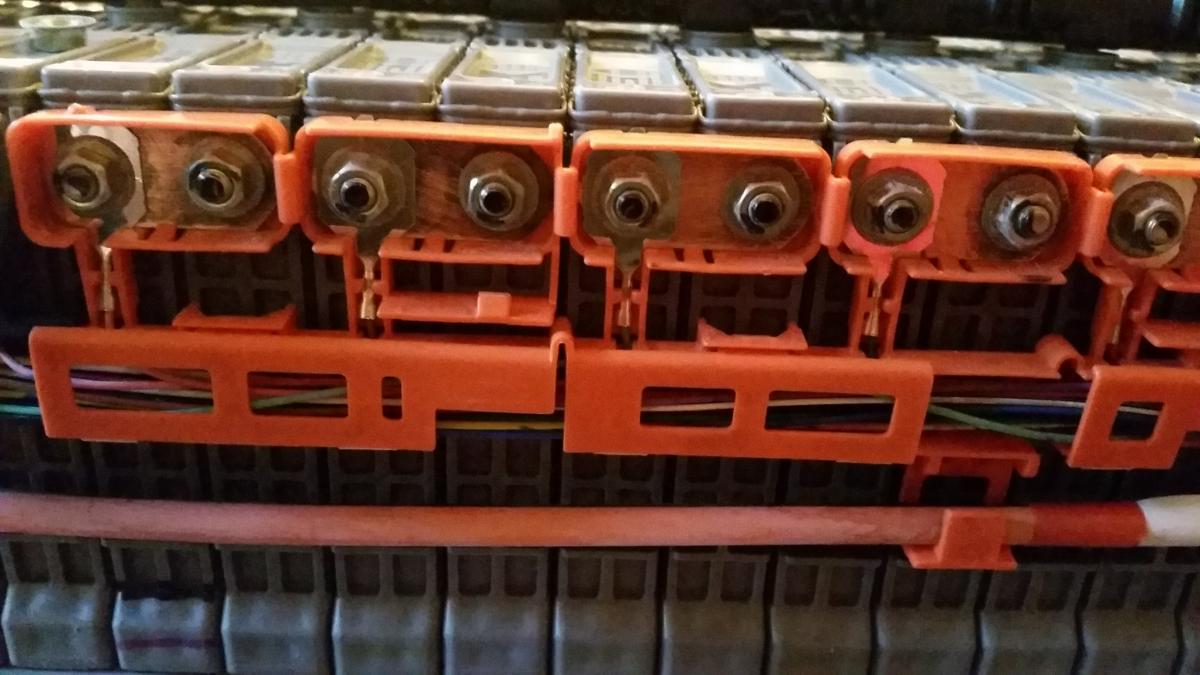
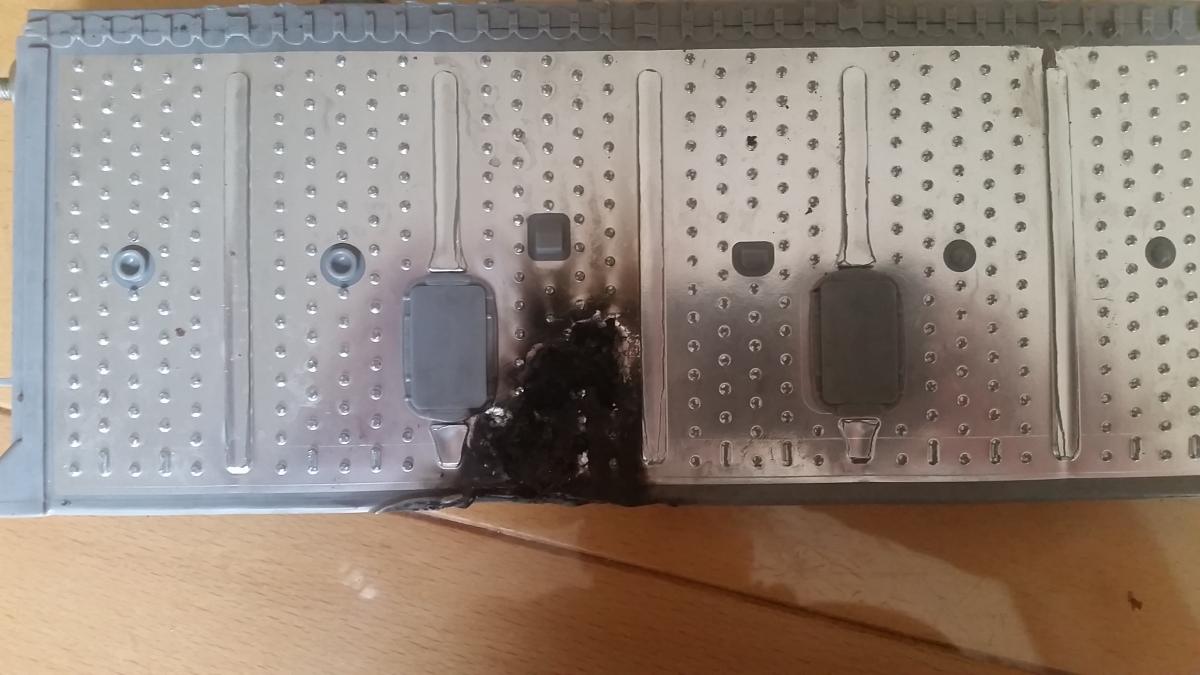
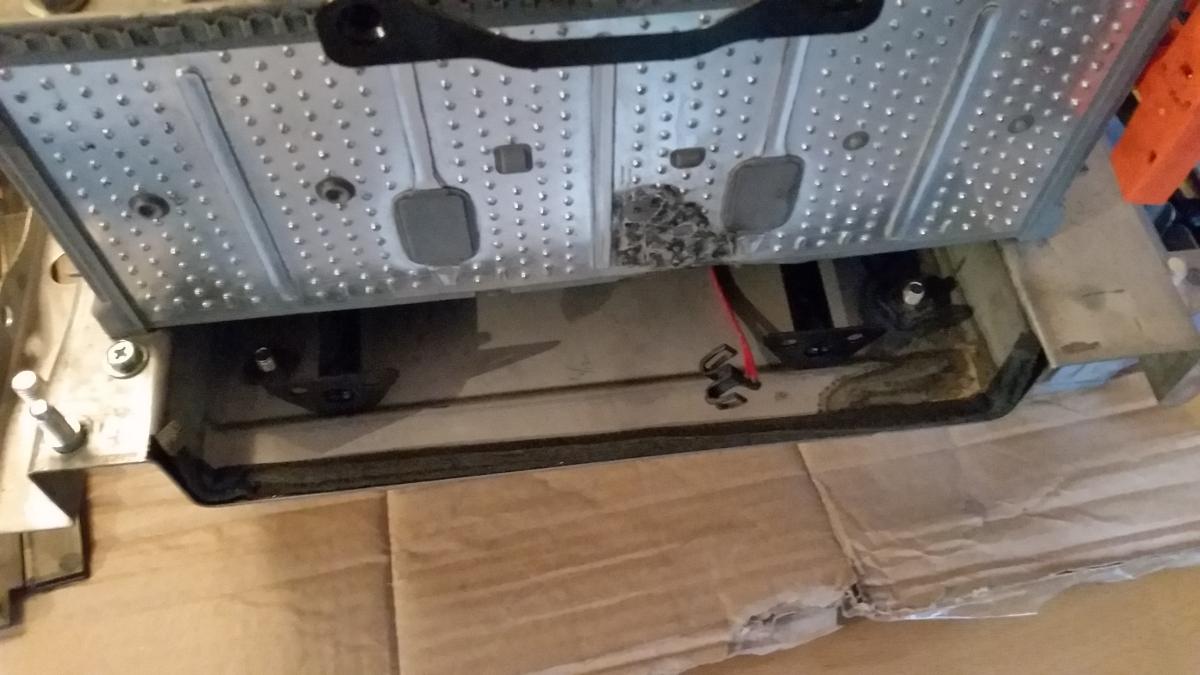
I got the dreaded Check Hybrid, Check VSC and Check EBC warning lights. Fault code readings P0A80 Hybrid and P3017 (battery cell block number 7 fault). Having gotten a quote for around €6000 to fix it, I decided to do it myself. I ordered a battery cell on ebay for €45.00 delivered to Ireland. Tools needed: Socket set with 8mm, 10mm and 12mm. Flat head screwdriver, long nose pliers and a multi meter to read voltage. (You may also need a slow trickle 12v battery charger, I'll explain later). Time needed: about 4 hours, more if your connections a very dirty. 1: Remove ALL carpeted paneling from the boot (trunk if you're in the US). This is done by inserting the flathead screwdriver into the black plastic rivets and popping them out. Remove the boot flooring too, just leave the tool tray in place. You will need the 10mm socket to remove the rear boot floor luggage anchor points once you've popped open their plastic covers. The upper hanging points need to be squeezed to remove. Disconnect the power supply to the light on the right hand panel. 2: Remove the orange circuit breaker on the HV battery by sliding to the right and then pulling towards you. 3: Remove the black air duct on the bottom of the HV battery by popping the 2 black plastic rivets. 4: Unplug the power supply to the white cooling fan on the upper right of the HV battery and remove the 2 nuts holding on the fan. This should allow the 2 upper black ducting to move sufficiently to be able to remove them. 5: Open the panel covering the 2 Orange Cables (3 x 8mm nuts) and disconnect the 2 orange cables, (you can tape them up with electrical tape if you so wish). Pull back the rubber cover on the Black cable and unbolt that too. You should now look something like this: 6: Disconnect the cable running from the HV battery to the 12v lead battery. Continue to remove the 12v battery by disconnecting the +ive and -ive terminals and the white connector plugs attaching it the the HV battery. Also need to take off the temp sensor and the vent hose on the 12v battery. Remove the 12v battery support bracket and the battery tray itself. 7: Remove the last 2 bits of black ducting that was clamped by the 12v battery tray. 8: Remove the white tubing on the right of the HV battery. 9: Remove the 4 12mm nuts holding the base of the HV battery in place, 2 on each side. 10: You need to unbolt the nuts hidden behind the back seat headrests. 11: Pull the rear seats forward enough to remove the large plastic panel in the center between the rear seats and the boot wall, its hidden behind the fireproofing fabric. Use this panel cover to hold the seats away from the boot wall by wedging it between seats and wall. 12: Pull back the fireproofing to reveal 2 smaller access panels covered by a black sticky rubber square. Now remove the 3 12mm nuts holding the HV battery to the boot wall. 13: Now the tricky bit, lift the HV battery over the bolts in the boot and slide it out. (I recommend putting cardboard on the tool tray to avoid scratching when sliding the HV battery). If you are strong enough you can lift the HV battery out on your own, if not get help, it weighs about 50 kilos. Your boot should now look like this with the access panels behind the seats visible: You should also have this, I placed mine on some cardboard on my kitchen table: 14: Take off the HV battery cover by opening all the 10mm nuts, and a few 8mm. unclip the black cable while taking off the three cover panels. 15: Unclip the black plastic covering on both sides of the HV battery to reveal the 8mm connector nuts in the orange casing. 16: Number the cells 1 to 40 using a permanent marker. Use your multi meter to get a reading across each of the 40 individual cells, i.e. one lead on the +ive terminal of the cell and the other on the -ive, and record your findings, as you can see cell 28 was low for me: 17: Pull back the rubber vent tubing running along the top of the HV battery until to get beyond your bad cell/cells. 18: Remove the white end panel holding the cells in place: 19: Remove the 80 x 8mm nuts in the orange casing and clean if necessary. I used bleach and some sand paper to clean all nuts a copper plates, if you're gonna do it - do it right). 20: Remove the 8mm nuts holding each cell in place underneath until you reach your bad cell (this will probably involve removing the support leg and the converter assembly unit below the HV battery: 21: Good cells look like this Bad ones like this: 22: Start replacing your cells back into the HV battery, it doesn't matter what order and you can't mess up polarity as it only screws in on one side. I put my new cell in last in case it was a dud. (If your new cell is of a lower or higher voltage use a slow trickle 12v battery charger to get it to the same voltage as the other cells. 23: WATCH THE TEMP SENSORS UNDER THE BATTERY CELLS (3 of them), MAKE SURE YOU CLIP THEM ON AS YOU GO. See the black plastic clip peeping out here: 24: That's it you're done, just reverse everything to put in back in. Mind your back and don't bother touching cell 1 and 40 at the same time if you have the orange connector put back on. Good Luck!
1 point
-
It amazes me how many of these cars are photographed for sale without the leather and carpets being cleaned. Mine is the same year with 65K miles on it and it's a lot cleaner inside than that one. Some of them are too lazy and don't deserve a sale.1 point
-
Cost cutting is the answer. I'm pretty sure not adding those lights made a huge difference to stop them from putting them in. The RX has them. No snow button as I believe eco works in the same/similiar way. The RX no longer has it either1 point
-
Amazing @Warrington guy!!!!1 point
-
1 point
-
That's very reasonable, they look fantastic!1 point
-
Hi guys, Unusual post, but you can get 20% off nearly everything on eBay between 12pm and 6pm today! Maximum discount looks to be £75. Best way to check is add to basket and use the code PNY2018 (don't buy it now, so then you can check if it works!) I'm going to get 2 Nextbase Dashcams (412gw) for £160 which seems like a bargain to me. More here: https://www.hotukdeals.com/deals/20-ebay-discount-12-to-6pm-today-only-2866107?page=15#thread-comments1 point
-
My IS250 lives in ECT Power mode!, I found the throttle curve (response) was too non linear in normal, if I'm on a long drive with my other half in the car I sometimes stick it in normal mode to have a gentle drive as she gets car sick if I hammer it round too many roundabouts! Andrew1 point
-
Mk 2 ABS pump/unit was a known weakness but I presume that was dealt with in the last of the Mk 2s and I hope in the Mk3. CVT is continuously variable transmission not constant velocity which was a description of type of universal joint in which the input and output rotation speeds were the same regardless of the angle between the input and output shaft (up to a point). Used on front wheel drive cars. The DAF CVT was indeed belt driven and was perhaps ahead of its time but the F1 Williams was not. Google "F1 CVT" for more. John1 point
-
Thanks a lot Mr Pants. Mine played up last night at 1am woke up the entire neighbourhood. Did not know what it was causing the alarm so tried turn it off and on a few times and it went off again and again. Mate I was stressed. After reading your post, replaced the battery and bam its gone. Thanks for taking time to share this info.1 point
-
1) yes I would presume they would cover it under warranty up to 10 years 2) yes once the hybrid battery warranty from the health check is over you would have to pay the costs. This is unless you opt for extended warranty before 10 years old as Lexus dealers will keep rolling it over year on year if you first took it out before 10 years of age. 3) There are many RX450Hs that have sold and as of yet, I don't think any have had hybrid system issues. They are bulletproof. 1) there is no difference issues an tyre size between luxury, advance, F sport or premier spec. They are all running on 235/55 r19 4) Few reasons. The tyres I wanted Lexus didn't supply. These were michelin latitude tour Hp. Also it was cheaper by £200 to get my own tyres and have them fit rather than getting the oem tyres from them. I didn't want scratches on the rim either. Lexus use the automated tyre fitting machines with no metal touch points. I believe £50 was an offer price. I think they usually charge £100 for 4 tyres fitting TPMS wasn't on my F Sport as it was an early 2012 car. I believe TPMS became standard afterwards.1 point
-
Just to clarify the use and wear factor on the LS400,I have owned two of these cars the Mark1 which I owned for 14 years and was 20 years old when I sold it from 50k miles to 185k miles and my present Mark4 which I have owned five years and it was 19k on purchase and as now got 36 k on the clock and is 20 years old next November. I have spent nothing replacing parts on the Mark 4 and it passed its last Mot as it did all the others with flying colours. I replaced all the control arms on the Mark 1 no drive components and no engine parts apart from the coolant temprature sensor. The exhaust Y pipe flanges needed welding the last year I owned it. The springs did not fail but the bushes on the shocks were worn at the bottom . The obvious factor here is usage but the mark 4 had a better and improved suspension it has not rusted in the places the mark 1 did and overall it is a much improved vehicle than the series 1. In summary comparing the two, experience shows that mileage is a greater factor than any other and care of the vehicle both in driving and servicing will prolong its condition . There are members who believe that low mileage examples can be a problem for lack of use and don't subscribe to the fact they should have a premium price on resale,I disagree having had 25 years of experience of these cars my advice is when looking for a purchase keep the mileage factor as the number one priority .1 point
-
I've always been more concerned with bodywork, wheels and tyres. Being a new car, all should be ok but I check them nonetheless. I stand at the front on each side and look up the side of the car looking for dents/dings/blemishes. I do the same from the rear looking back along the side towards the front. Two keys. Full documentation set - should be in a black pack. Ask the sales person to talk you through what docs you should get. You should have a warranty booklet, a service book, a (car) user guide, a satnav user guide and maybe 1 or 2 others. Handover should be good, never had a bad one from a Lexus dealership. Check the invoice matches the details you signed for when you agreed to buy the car, ie the new car order form you signed. Just make sure the numbers are the same. Make sure you take the things along that they ask you to bring on day of collection, especially if part-exing something. Make sure you are getting a new model year NX, there may well be some old model NX's still out there. I'm afraid I can't tell you how to spot the two models but there is a thread on here about the new model year differences. It would be a shame to pay all that money and get an old model year new one and not a model year 2018 model. Unless you've done a good deal on one of the last models of course. The differences are slight and both would still be new cars but I think I'd prefer the slightly updated model if I was collecting in January 2018. Personally, I wouldn't bother checking that everything worked, I'd trust Lexus manufacturing and the dealership checking everything. Get your phone connected before driving off - normally they'll take you through this. Also set your home destination in the satnav if fitted, again they'll normally do this. Finally, look out for any kamikaze pilots on the way home to make sure no one prangs it when it is still shiny and very new!!!1 point
-
Happy Xmas all. I may be back with an ls next year . Be it a 400 430 0r a celsior1 point
-
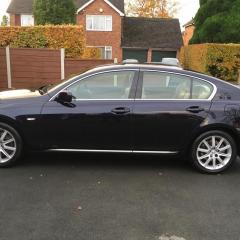
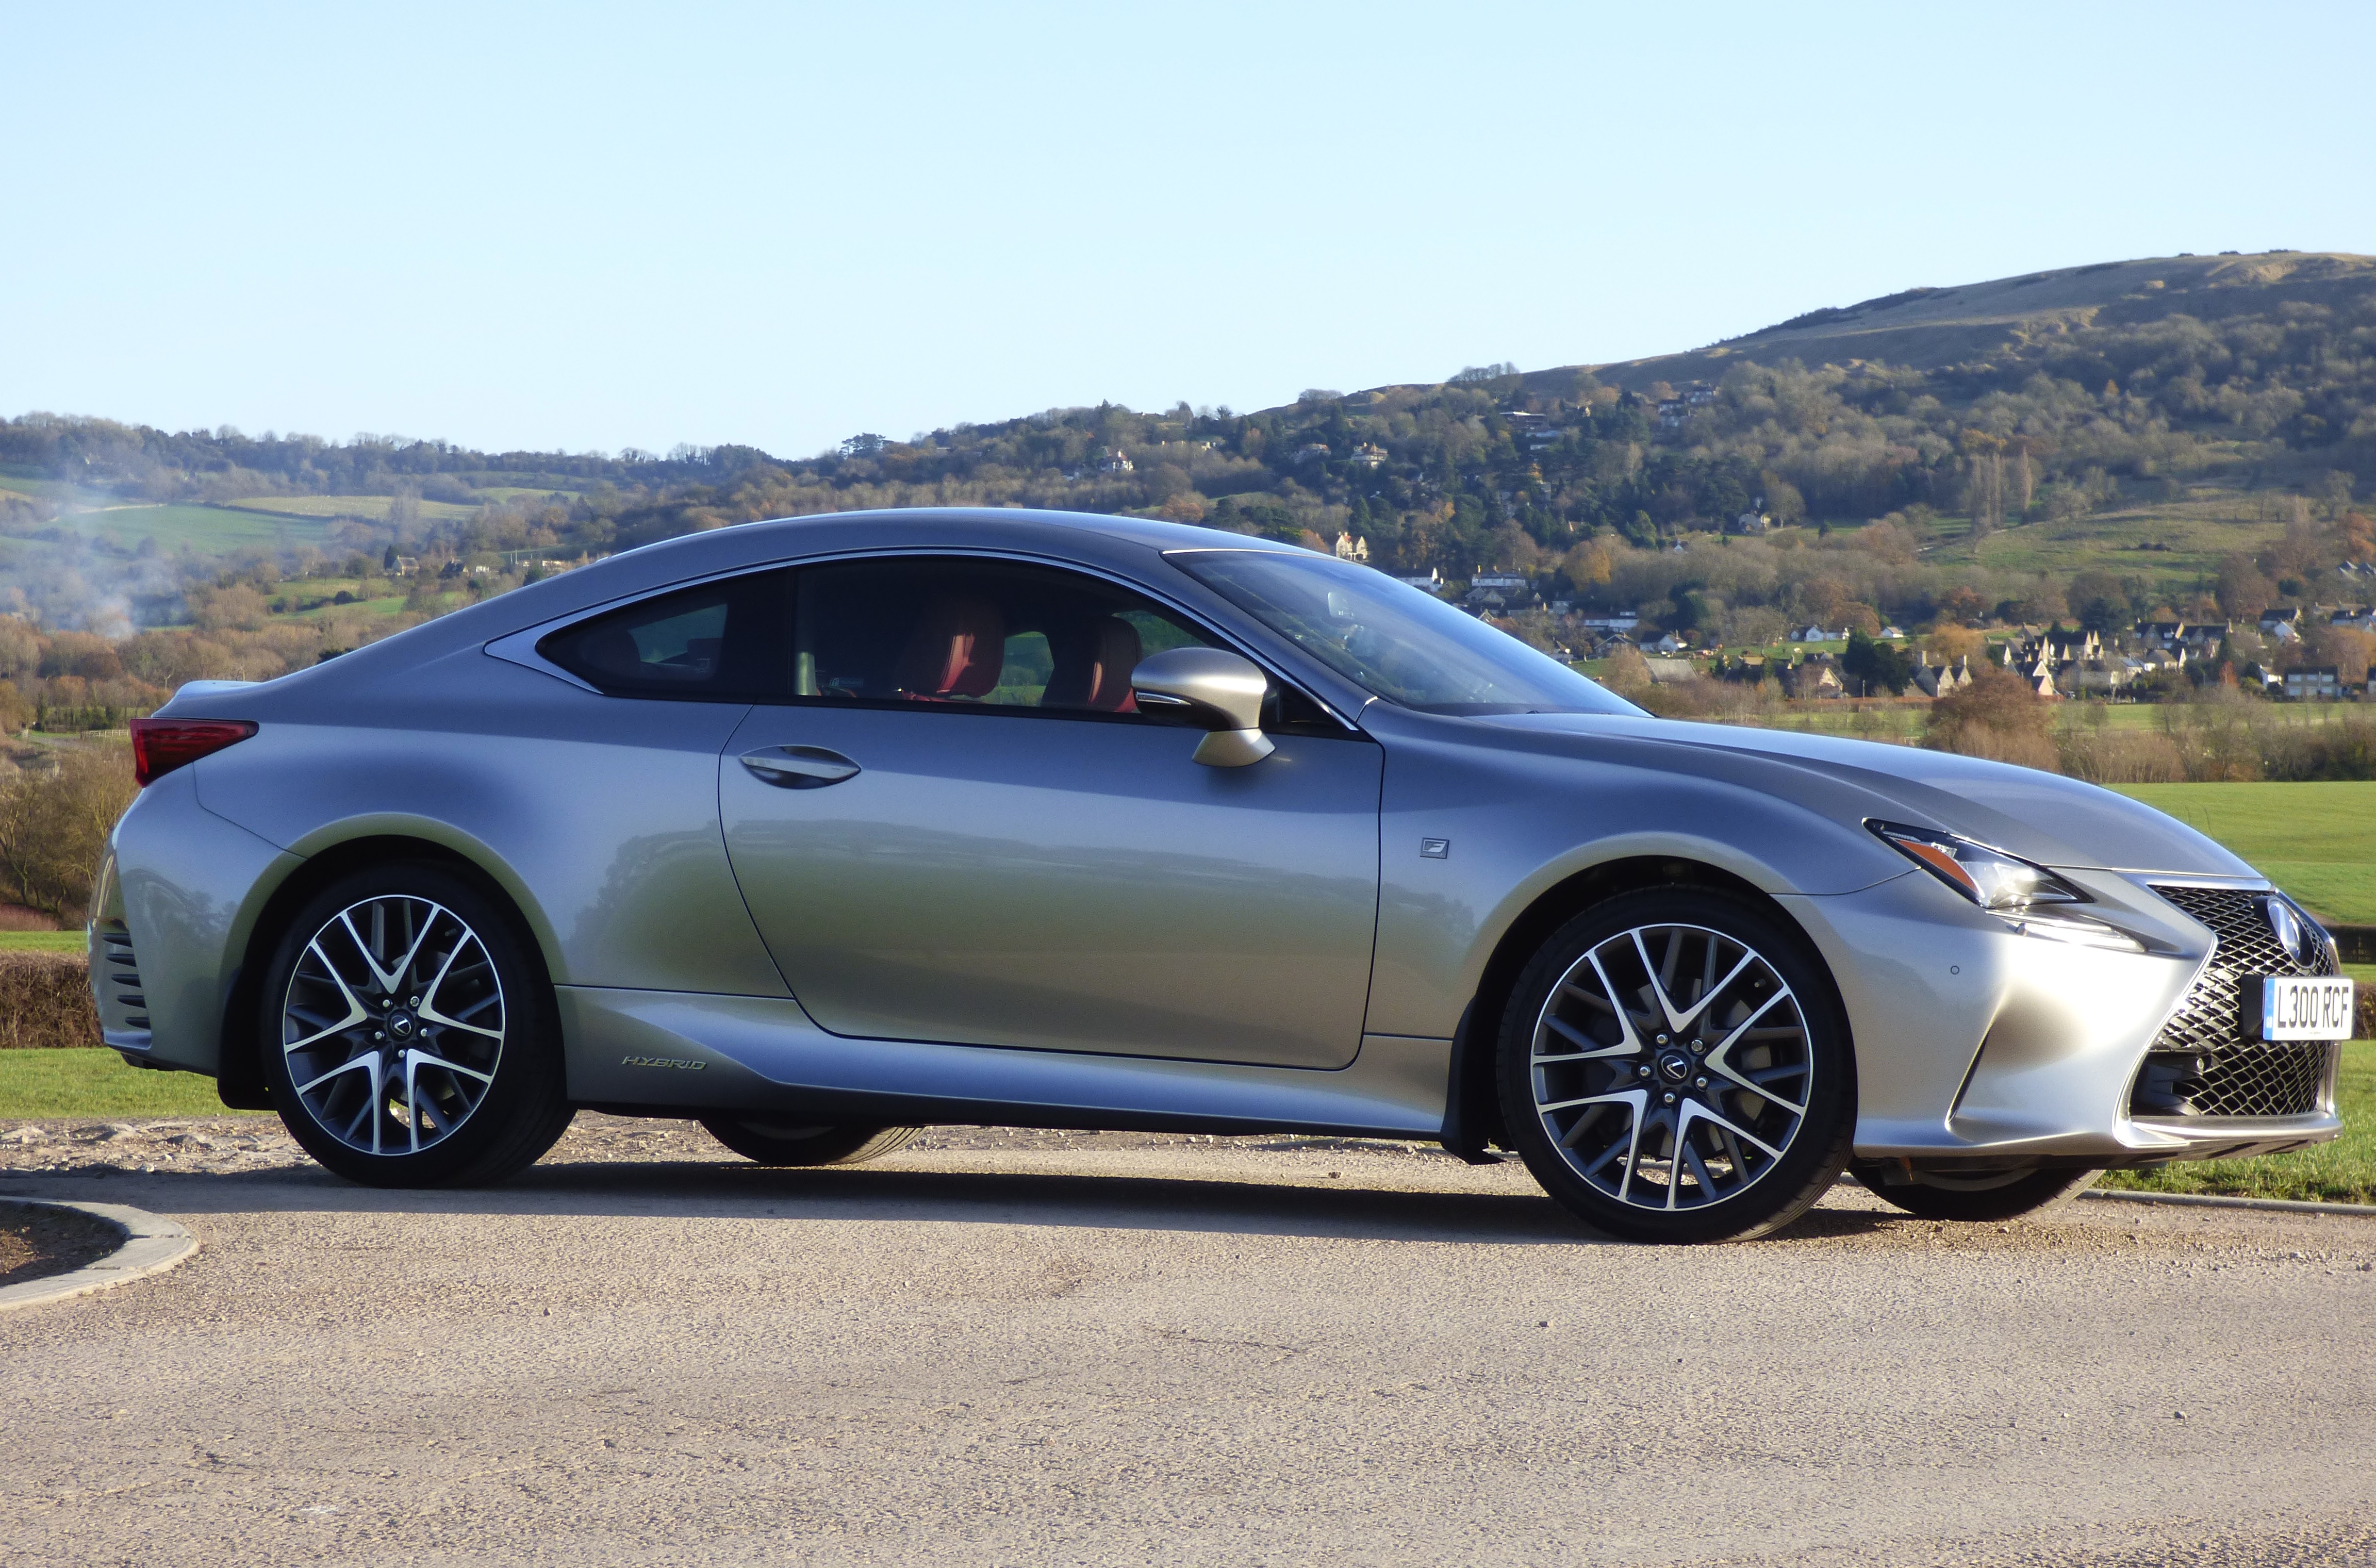
Managed to get some shots of the new acquisition this weekend. Still getting used to all the stares when queuing in traffic....
1 point
-
If LPG actually worked why would car manufacturers mess about with petrol/diesel/hybrid systems? Surley if they could market a luxury vehicle which runs reliably on half price fuel they would all offer it ?My LPG converted GS 300 burnt it's valves out twice in 1 year Avoid.1 point
-
Thanks guys. I just thought it was odd that maximum power is not achieved until they travel above 140kmh as per YouTube? Oh and BTW...I was tossing up between a BMW 335i & GS450H - the below clip sealed the deal for me personally :) https://youtu.be/7mEJAGw_nNU1 point