
Leaderboard


Popular Content
Showing content with the highest reputation on 05/05/2019 in all areas
-
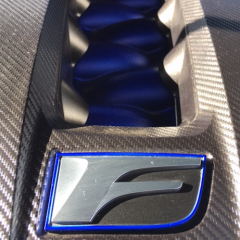
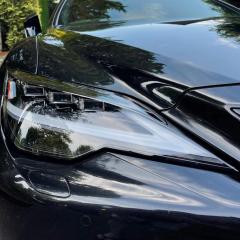
Black’s a sod to keep clean, but when it is, it looks great!!!!
 5 points
 -
I have recently replaced all my rear suspension arms with genuine parts and my rear hub bushes, ARB bushes, steering rack bushes and changed the diff oil on my 1998 ls400. Also did the strut rods and new tyres and a full alignment. It's transformed the handling. Much more stable and corners better with less roll. Still stock but refreshed. The rear end was pretty shot. It's my daily so needs to be safe and ride well.3 points
-
Everything now back in the garage 😊
2 points
-
Hi All I've had my IS300h for 3.5 years under a company car lease scheme. I thought I'd post a quick review of my own observations. Having had a stream of German cars for many years I changed to the Lexus IS300h advance. Driving an auto and hybrid was a major change for me but after a few months I was very happy with my choice. The car still feels fresh as it did on day one with no fade in performance or handling. In my view, the car is the intelligent mans choice for a changing landscape with anti diesel rhetoric and ULEZ about to be rolled out. I will most likely stick with the Lexus brand as build and overall quality are my main criteria. Well done Lexus for building such a great car. My next car is likely to be another IS300h or the ES300h. Nick1 point
-
Looking into mid pipe and valved system from GTHAUS, I read the mid pipe is the worst area for restriction, so I was gonna start there and see if I want to go further! Sounds amazing in that clip.1 point
-
These cars sound so much better with the aftermarket exhausts.1 point
-
Not folding correctly? Normally just need cleaning around the pivots - spray wd40 to loosen dirt, operate a few times and then clean off any excess.1 point
-
^ those are correct. Minimum for pads is 1mm, discs are 31mm front and 26mm back - this is actually stamped on the rotor.
1 point
-
In 2003 the suspension was revised to improve ride and the runflat tyres were replaced with conventional ones. In 2005 the suspension was revised again to improve body roll and steering response. I prefer the look of the 2006 facelift models plus you get the better performance of the 6 speed transmission. I'd try and get as young a model as you can. What do you mean by hand-built? Sheets of medal rolled into body panels - no. Production of the SC started in 2001, so I doubt there was a major production line change after just 12 months but I'm sure things were more automated as time went on.1 point
-
and the brakes are on, next step calliper refurb!
1 point
-
Yep - it's not that tight - all the original fittings can be kept. Sent from my PSP7551DUO using Tapatalk1 point
-
I fitted DRL's to mine last week, annoyingly the camera on my phone doesn't show how bright they are but they work well. About 90mins to fit.
1 point
-
In all honesty these cars cost b*gger all to maintain properly so I don't think I'd bother going elsewhere. I admit that some aftermarket parts are better than originals and some are better suited to specific tasks but for everyday road use I'll stick to OEM. Try running a V12 twin turbo AMG they eat front pads and discs too, I was quoted £2800 from Brooklands Mercedes for them that was the proper AMG items.1 point
-
£393 to £491 depending on the dealer. LexusPartsDirect quoted the £393.1 point
-
Have you tried a local upholsterer for your seat Vlad ?1 point
-
That's the correct battery and as you suggest the terminals go at the back with + nearest the engine and - close to the wing. It's a fairly tight fit but everything is correct - watch out for the temperature sensor between battery and engine - you need to disconnect it to get the old battery out and reconnect it once the new battery is in place.1 point
-
I will go first: On Friday I checked the air filter if needs changing, computer pre set says it is good for another year and like 12k miles but based on a condition of it I will be changing it soon, my service is due in 2-3 weeks. Also, last week I took apart my rear brakes, unfortunately I did not take any pictures, cleaned them as they were quite rusty, lubricated them and not I am happy that pins were looked after, just piece of mind. Last Friday I did the same with front brakes, so happy chappy! I was really surprised how easy it was to remove front discs and pads, just 2 bolts to remove the caliper which also frees the disc, nice and easy! After that I washed the car but was very annoyed to see yellow dust on it straight after, I was hoping that storm from Sahara has passed but obviously not! And then a short rain started! Grrr! In old times you had to kill a goat or a virgin and pray a lot to get rain not all you need to do just wash a car! 🙂
1 point
-
This is the one you need: S4 026 Bosch Car Battery 12V 70Ah Type 068 S40261 point
-
With the windows, press and hold the down button until the window stops at the bottom, but keep holding the switch for a couple of seconds after it hits the bottom. Then lift and hold the switch to lift the window and keep holding the switch for a couple of seconds after the window hits the top. Repeat for each window. Now the sunroof. Pull and hold the switch back to open the sunroof and keep holding it for a couple of seconds after it hits the back position. The push and hold the switch forward to close the sunroof and hold it for a couple of seconds after it closes. The sunroof should be reset. The tilt switch shouldn't need reesetting. If you get any nasty noises like slipping cogs, release the switch immediately and sort the cause of the noise.1 point
-
Cool car and plate, mate 😎👊1 point
-
Another 80 miles today on A and B roads driving steady, now up to 53mpg over 700 miles.1 point
-
some better pics
1 point
-
Looking forward to the bank holiday, plans for a wheels off full clean and detail! 😄
1 point
-
Ready for sports cars in the park this weekend 😎😎
1 point
-
Bit of feedback. Went in and a new a/c condenser fitted. Seems to have been a hole/leak and all covered under warranty. Excellent dealer service as always.1 point
-
Well the next mod is bound to cause a few raised eyebrows, it is certainly a Marmite issue..... Wooden steering wheels..... My 2p worth.... I hate them, I can think why anyone would want to hold something so hard and cold, the steering wheel should be tactile and a pleasure to hold, after all it is the one part of the car you touch the most, a wood wheel is hard all the time, they are usually thinner than a leather one and this makes it worse, your hands sweat on them in summer and they are freezing in the winter, they serve absolutely no purpose and are just a fashion icon... And the only thing I hate more than a wooden wheel is a wood and leather one...!!! Another 2p.... They remind you what a decent wheel would feel like but then ruin it with wood where you need to touch it... If you let the wheel feed through your hands it sticks and then runs free depending on which bit passes through your hands.... So you have probably guessed what I've done.... Gone from this... (Google pic but you get the idea...!!) To this... I had it recovered in leather by http://royalsteeringwheels.com/ They charged around £160 and it took a couple of weeks... It is about as close a colour match as you can get and it feels superb.... If you want to know how to change or remove the wheel, read on.... I bought a cheap wheel from eBay for about £20, it is in terrible condition but was still round and worked, I sent mine to be covered so they would have the colour (the one I bought was a beige one) my wheel had a lot of crazing on the wood part of the rim, not sure if this was an impact or sun damage but the colour had been sun bleached To remove the wheel first disconnect the battery and wait a few minutes for the capacitor in the airbag to lose charge.. Use a trim tool to remove the piece of trim around the cruise knob, it has fixings front and back that will just unclip with a bit of persuasion.. you will then see the T30 torx screw on that side... The bright silver screw... Then you have to remove the switch panel on the other side, place you finger where mine is in this picture and you can feel an edge, it doesn't take much to pop the switch panel off, it's only the top bit that comes off... This is what comes off, don't worry the rest is fine as it is and no bits will fall out... Then you can see the airbag bolt that side, the bolts are tight so be careful you don't slip off and damage something with the spanner.. When they are both undone (they are held captive so they won't fall out) you can lift off the airbag, just turn it over, top towards you and unclip the horn wire from the bottom, you then have to remove the two airbag connections that look like this... You have to prize up the yellow tag in the middle, I used a fine screwdriver, they are an all plastic plug so no bother with shorting it out or effecting it with static... This shows the yellow tag on the orange connection where it needs to be to remove the plug, pull the plug straight up off the airbag, I used a small plastic trim tool to prize it off... remove both of them and put it somewhere safe... You then have this in front of you... To remove the wheel unplug the connector at the top of the wheel that goes to the squib (clock spring) then undo the 19mm nut but leave it on a few turns, make sure the wheel is straight, grab it both sides and yank it quickly to remove it from the splines, mine came off reasonable easily, if yours doesn't then a cheap three prong puller would work... Remove the wheel feeding the airbag wire through the wheel.. You are then left with this... DO NOT PLAY WITH THE SQUIB, DO NOT TURN IT.... It is like a clock spring inside and will only tolerate turning a few turns each way, if you turn it you can damage or snap the wires inside and they are not cheap to replace... I then took the wheel apart to send it off but you can send it as is, if you want to take it apart it is easy to do, just take some pictures so you route the wires correctly on reassembly. Refitting is the above in reverse, if you put the wheel on a couple of splines out and it's not straight when you drive it, don't go far before you correct it, the clock spring is a steering wheel sensor as well and it will through fault codes if it's not straight.... That's it... IF ANYONE WANTS TO BORROW MY SPARE WHEEL THEN LET ME KNOW...
1 point
-
I paid 100£ in www.fastlanestyling.co.uk supply and fit, great customer service and brilliant results. and on top of that you get a fancy key ring :D its in Romford, Essex.1 point


.thumb.jpg.2a51647832f96058b5b5e478518006f6.jpg)


