Leaderboard


Popular Content
Showing content with the highest reputation on 09/28/2018 in all areas
-
Sooooo...... Best news ever, my baby son has been born today!! 7 weeks early and only 4.7lbs but he and mum are both doing fine and recovering well 😃 Which brings me onto the worst news ever, clearly I won’t be there this weekend now 😭 Have fun guys and bring me some photos back. I’ll let Lexus Derby know the score but somebody else will have to be lead driver! I’ll post a simplified step by step route plan later today that I finished off last night so you can all reference it tomorrow if you get lost!! Have fun!!!9 points
-
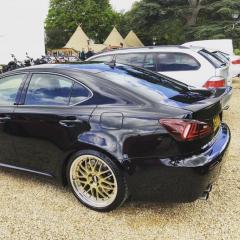
all clean, ready to rock!!!
 5 points
 -
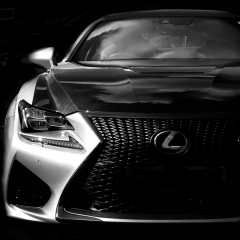
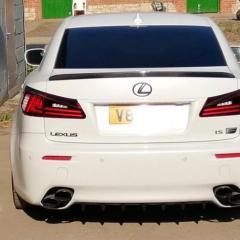
Had an impromptu photo shoot (phone camera only though) after getting the car washed and cleaned. Thought i'd share it here.
5 points
-
Just to let everyone know I took the liberty of printing off ten copies of the detailed instructions Dan was kind enough to put together for us. Will bring them tomorrow to hand out. Just wanted to share now so others don’t waste their time/ink doing the same thing! 😉😂😂 See you Guys tomorrow. Cheers, Pete 😎4 points
-
That's amazing news Dan! Huge congrats to you and the missus and your tiny son. Sorry to lose you after all the graft and hard work you put in making all of this happen, but obviously understand why you need to bail out. If no one else wants to assume lead car role, I am happy to do it mate. Just send me what I need and we can take it from there. Again, well done and wishing you and yours well with the new addition fella. Cheers! Pete4 points
-
Congratulations on the baby news ☺.... Hopefully someone will pick up the reins.4 points
-
Congratulations.to you both & glad all is well with your wife & newly arrived son. As others have said, sad you will not be there, especially after all the hard work you have put in, but i’d say you have a pretty stellar excuse by any standards 😂😉 Wishing you all the very best👍🏻3 points
-
Congratulations chap! Great news.3 points
-
Congratulations!!3 points
-
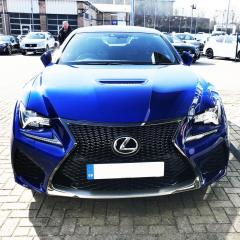
@Ashrez Looks superb matey if I’d gone Gsf rather than Rcf it’s the colour I’d have gone with 👍 Big Rat3 points
-
The rehabilitation of my GS300 continues - first under bonnet job was rocker cover gaskets. Symptoms of a problem: quite an oil leak from the top of the block, all the way round the rocker covers, block permanently wet with oil, pooling in areas of the head and burning off the exhaust manifold. Presumably also a fair degree of vacuum loss from the crankcase? Anyway, on to the job: Air box and hose work removed: Throttle body and Y-Pipe removed to reveal spark plug valley: Coil packs and inition leads removed: The coolant is from unclipping hoses on the throttle body during removal - but generally speaking, the valley was a mess - loads of of oil and muck, brittle plastic etc. There was a lot of oil in each plug well and on the coil pack caps. Everything was taken out, cleaned up and dried off. Left (As you look at the block) side off first: Easy enough to go round the entire cover and undo all the bolts - then a delicate tap to loosen it from the head. Here you can see how the problem arises: Old gasket is on the left, new on the right - you can see how it shrinks and goes brittle with age. Easy to pick the gasket from the cover, ensure mating surfaces are clean, and put the new gasket in ready for installation back on the head. Some dabs of black RTV on the corners of the half moon sections at the front of both covers - to aid sealing: Putting the cover back is simple - used a criss-cross pattern to tighten the bolts down to 9nm - other side of the engine is just as easy. One thing I was specifically prepared for was brittle coil pack connectors on the car's wiring loom. As it turns out, all 3 of the connectors on my car were previously damaged - two were completley missing the inner sections of the connectors, leaving just the pins inside the hollow outer casing of the connector; it's a wonder the car was still running acceptably. Fortunately, these connectors can be depinned and replaced - or in my case just snap off the old brittle conector casings and replace with new: You can push the pins in to the rear of the new connector and snap it shut - I also took care of a little frayed insulation right by the grommet for the connector; here's the part number for these connectors from Toyota: and for the rocker cover gaskets (Which are handed): And finally the gasket for the y-pipe to the rest of the intake manifold: Everything is back together with ease - left the block to stand for 24hrs to let the RTV cure. I might be kidding myself, but I feel it's idling more smoothly, and spends less time at inexplicably high revs after a cold start. At any rate, the block should dry up, and it should hopefully smelling of burnt oil everytime I come to a stop! Next up is a teardown and replacement of the front suspension and brakes - all of which is utterly knackered...3 points
-
Looks superb, definitely my next car3 points
-
Looks like you had plenty of sunshine today, car looks fantastic 🙂3 points
-
Awesome Dan, but you said your last update was your last update......2 points
-
Congratulations!! We welcomed our 9th grandchild this week .. the 6th granddaughter2 points
-
Top man!2 points
-
Congratulations Dan, super news (just as well the baby didn't choose tomorrow to arrive) We'll miss you tomorrow but here's to the next time.2 points
-
Congrats mate!2 points
-
Check out the latest new thread for some great (and not so great) news from the @NothernDan household!2 points
-
@Ashrez very nice😎 Having had a white ISF myself I’m obviously a fan of that colour combo👍🏻2 points
-
Hello all, I have recently purchased a 2001 GS300. This car is very much a project for me - and a venture in to Japanese cars from my principal hobby car brand of choice - BMW. I own a '98 BMW 740i which has been my main hobby to date, but have always hankered after a Lexus, from teenage years and onward. It was purchased using my usual rule of trying to find something interesting for under a grand... enter the car in question: It has pretty high miles - 184k and a complete lack of stamped service history, with the notable exception of a cambelt change at a Lexus main dealer at 160k miles. Engine oil is reasonably clean, transmission functions as intended - but I bought with my eyes well and truly open, which leads me to the discoveries... I have a pathological fear of rust, so first thing was to strip of all the sill covers and asses things down below. Here's a couple of shots of the rear jacking points as I found them: NSR: OSR: Given 17 years on the road and some likely abuse through being jacked improperly, I was happy to find that the corrosion is just surface stuff. I've hammered the pinch welds straight again, scrubbed everything down, and given the length of the affected areas a coating with POR-15 (https://www.por15.com/) and stonechip primer: I don't have pictures of the final product, but basically any grey area was covered with black stonechip - and with the colour coded sill covers on, this area isn't visible - so I'm not fussed about the difference in colour. I've scrubbed and treated all 4 jacking points onthe car, and any area on the length of the sill that looked like it was rusting. Unfortunately, the same couldn’t be said of the inner wheel wells, and I was able to push holes in them in the area where they meet the sill section – thankfully the rot doesn’t affect the sills– so I got the wheel wells inspected by a local underbody welder whom I trust – and repaired wherever rust was found: Looking from the hole down the sill (!): As before, the sill looks good, just the wheel wells not so much! I plan to get some waxoyl and a flexible applicator and thoroughly treat the inside of the sills once I have the car back from the body shop. I’ve also found some curious examples of previous owners/those in their employ attempting to hide faults – rather than fix them. Can you see what’s missing in this shot of the rear of the instrument cluster? Yes – the telltale bulbs for the VSC system have been removed. Putting replacement bulbs in immediately showed up that the system was deactivated and faulty, as was the ABS; I can only assume a PO did this to hide the faults and pass an MOT test. The other frustration was that the MIL light had been painted over with black nail varnish (!) – lightly removing this from the outside of the cluster (no I didn’t spot it on the test drive) of course revealed the MIL was illuminated. I’m thankful I was able to get codes using my OBDII reader – and the damage could have been worse – 2x separate lambda sensor faults. One traced to *really* poor workmanship on a presumed universal sensor installation: Fixed as (self amalgating tape added to the length of the repair afterward): That was fixed by remaking the wire joints with solder/heat shrink insulation. The other sensor needed to be replaced entirely and then the MIL light could be extinguished; an easy fix for the sake of some time with a soldering iron, and £50 for a new DENSO universal sensor. The VSC/ABS system was easily brought back to life with a trick for resetting zero point calibration using a paper clip that I found somewhere on a USA Lexus forum post – bingo, no more warnings on the dash. The plan for this car will be to give it a complete brakes and suspension renewal, and service everything I can, before making some subtle modifications. Broadly, I want to lower it, give it a slightly louder exhaust note (actually there has already been some work done as the silencer tips are not original to the car), and some nice deep dish wheels. I’ll post up my progress on here, mention any useful part numbers; if anything for my own records. I’m a keen DIY’er so largely I’ll be doing this in the garage/ driveway. First service item was to a drain/refill the ATF. I use a suction/syphon drain and got some Type 4 ATF from Toyota: Coming from BMWs it was great to have a dipstick to work with. Fluid removed was dark, but didn’t smell burned; I think I managed to put about 4 litres of fluid in to the box – definitely I put in more than I removed so I think the box was lower on fluid level than it should have been. I’ve also put a new radiator on the car, as the plastic cores on the old part appeared very brown and mottled – like you could touch them and they’d spring a leak. New part from Ad-Rad.co.uk, delivered next day – made by Koyorad; fitted in under an hour: Next up will be to replace the rocker cover gaskets, as there’s a fair old oil leak from the top of the engine. I’ll post on that when I have the car back from the body shop. I'm hoping this car will be some fun to work on - and broadly speaking a valuable learning experience on a vehicle that isn't German/ a Land Rover! Thanks, John1 point
-
I'm going to carry this on from my post in the 'new members area'..... Hi and good evening I wanted to join the forum and introduce myself, my name is Michael, 33 from North Lincolnshire. I have just become the 3rd owner of this very very tidy IS250 SE-L that I bought from my local Marshall's Honda garage in Hull. For an old motor, wow has this got some kit! I have recently learned that it is the top spec model or very close to, it has every gadget I could possibly ask for and more. This car was bought as a 'stop gap' between other cars and I had planned on selling it after approx 4-5 months, but after under a week of ownership I think I'll hang on to this gem 😁 A few details and spec: 42K miles 2 previous owners Full and comprehensive Lexus service history Sat Nav Reversing camera ML premium sound system Electric everything Xenon's etc etc The very first thing I did was give the exhaust trims a sorting out and polish, they clearly hadn't been cleaned since new 😳🙊 I am fitting a new pollen filter tomorrow as I suspect that needs doing, I have also just ordered a set of boot gas struts as mine are clearly worn with the effort it takes to open the boot 🤣 I am also on the lookout for an updated sat nav disc. The dealers photos: And I took these when I went to view the car The car was faultless on the test drive and I was immediately impressed with it, would silver have been my first choice....no not really, but the car does look well in it and with the car's history, mileage, condition and spec there was no way I was going to let it go. I am a professional detailer by trade so please forgive how ridiculous I am with the cleanliness of my cars 🙈 but it's my hobby, passion and business and thoroughly enjoy making my cars beyond immaculate. Ok so the car is home, there are a few surface scratches here and there I need to take care of, paint correction and ceramic coating to be carried out but these will happen once I've moved house and have my own garage in a couple of months. First job, sort out the awfully kept exhaust tips 😳 Before and after There was some staining around the tips also which I have now removed. The first thing I actually bought for the car was a new genuine pollen filter, fitted today and took less than 5 minutes Before / after Not too bad but worthwhile replacing it. I gave the housing a clean up too while it was out I have been on a buying spree today, my first jobs are to ensure the car has everything it should have from factory, in my case it does apart from its missing the fabric wallet with the tools in which is kept with the spare wheel, I've now got one on order so that's that sorted, it is also missing the polystyrene holder that sits on top of the spare wheel, struggling to locate one of those. Apart from that the other parts I've ordered are as follows: • Upgraded xenon bulbs to 8000k • Boot liner to protect original boot fabrics • Complete LED interior light kit • New number plates • 2 new batteries for both remote fobs • Genuine Lexus first aid kit • x2 new rear boot struts I will be removing the 'Lexus' and 'IS250' badges from the boot, just personal preference really I prefer the less cluttered look, I'll be updating every bulb on the exterior too to LED. That's it for now, I'll keep this up to date as things happen 😁 Michael.
1 point
-
Hey all. Back from the hospital to pick up supplies! Did this last night so I hope it will come in useful tomorrow. It's basically a simplified route planner broken down into the 3 Legs of the journey. Should be simpler to follow than the other ones as I've removed a lot of the unecessary "waffle"!. Hope you all have a great time tomorrow! LEG-1 - Aiming to leave at 10:30 - Lexus Derby, Orient Way, Pride Park, Derby, DE24 8BY Duffield (T) Milford (T) Belper (T) Ambergate (T) Whatstandwell (T) Cromford (T) Matlock Bath (T) Matlock – (P) Darley Dale (T) Rowsley (T) Bakewell (T) Ashford in the Water (P) Brushfield (P) Taddington (P) Blackwell (P) King Sterndale (P) Buxton - Follow signs for Parking near the Opera House and Pavilion Gardens. The Opera House is straight on over a few roundabouts then up a short hill past the train station (on your right) before heading down a short decline with the Opera House in front of you Please park up near the Opera House – We are due to arrive here at about 12:15 and we have 2 hours or so here for lunch LEG-2 - Aiming to leave at about 14:15 - Buxton Fairfield (T) Dove Holes (T) A6 towards Chapel-En-Le-Frith and Castleton Take a right at the roundabout (the first one after we’ve gone through Dove Holes) Onto the A623 towards Castleton IMPORTANT - Along the A623 take a sharp left at “The Wanted” Pub towards Speedwell Cavern and Blue John Cavern - IGNORE green sign saying that Castleton is to the right Peak Cavern (P) RIGHT at the junction (on the bend) for Castleton, NOT left towards Blue John Cavern Winnats Pass (T) Castelton (T) Hope (T) Bamford (T) Hathersage (T) - Awesome views over your right shoulder all along here Millstone Country Inn on your right (P) Then round a long sweeping walled left hand bend and take the next sharp left up a slight incline towards Ringinglow - Awesome views over your left shoulder all along here Striding Edge - Not signposted (P) You’ll know you’re approaching Ringinglow as you’ll see views of Sheffield in the distance on the left, as soon as you see houses and the 30 signs that’s Ringinglow although there are no actual “Ringinglow” signs – Immediate left turn here just after the 30 signs If you pass the Norfolk Arms Hotel (big car park on the left) in Ringinglow you’ve missed the left turn onto Fullwood Lane, so turn around and head back!! Continue down Fullwood Lane Mayfield Alpacas (P) Very sharp right-hand bend up ahead IMPORTANT - The next 2 miles or so includes some pretty narrow B-Roads, winding downhill off camber corners and sheep in the road so please take care. After the sharp right hand bend take the second right onto Andwell Lane - you can’t see the sign for Andwell Lane it until you are on it but it’s immediately after Greenhouse Lane Next turn is quite a way along here and is Ieft onto Blackbrook Road - Small triangular junction Continue to and over crossroads with Redmires Road onto Lodge Lane Follow Lodge Lane down more steep stuff to the T-Junction onto Manchester Road (This is the A57 Snake Pass) at Rivelin (Not signposted) Head West (left turn) onto the A57 (Snake Pass) towards Manchester Hollow Meadows (T) Ladybower Inn - Stop We are due to arrive here at about 15:30 We should all be in convoy but if you hit the traffic lights at the corner of the reservoir you’ve gone slightly too far! The Inn is about 100 metres back up the road you’ve just come down. If you’ve not missed it then you’ll easily spot The Inn on the right as the car park (on the left) will be full of F-Cars! We’ll stop here for refreshments and toilet break before the last leg of the journey. Let’s take 45 minutes to an hour here before we head off LEG-3 - Aiming to leave at about 16:30 – Ladybower Inn All the way along the A57 towards Glossop Glossop (T - Outskirts) Left Turn at the Train station junction – You’ll see The Howard Arms on the right (before the junction), followed by Lloyds bank on the left (on the junction) and The Norfolk Arms diagonally opposite Lloyds on the right Howard Town Shopping centre (P) Little Hayfield (T) – Great views around here Hayfield (T) - Two Speed Cameras opposite each other! Chinley (T) - Left at the T-Junction under the railway bridge at Chinley Left at the next roundabout Right at second roundabout towards Buxton Follow A6 back to Buxton via Dove Holes – We drove the opposite way down this bit of road just after lunch Buxton – Stop We can park by the Opera House again to say farewell to the day trippers or head straight to the Premier In at the following address; 131 London Rd, Buxton SK17 9NW - 0871 527 9682 ENJOY!!!!!1 point
-
1 point
-
really pleased for you Dan and the Good Lady, congrats. I really dont want your good work to go down the pan, I know I am brand new to the forum, but would be happy to lead if no one else fancies it...1 point
-
Good evening all I didn't think it would be this long until I posted again but work and renovating a house mean very little time for the Lex sadly 😫 The car has been filthy and I've hated it, I haven't even had the time to fit all the little bits I've bought for it, apart from the new number plates, I fitted these today. So I had a spare few hours to tickle the outside and fit my new naughty tinted raised gel number plates 🙈 And my new tinted, raised gel lettering number plates, I have these on every vehicle I have, got them on the van too, really freshens things up, they are naughty, and Mr plod probably wouldn't be too happy if they were bored and wanted something to do, but 🤷♂️ Some 'arty' ones Hoping to get a few more bits fitted over the weekend 😊
1 point
-
1 point
-
Just done my final engine checks so all ready for tomorrow.1 point
-
@NothernDan Congratulations to you both, there’s always a next time........👍 Big Rat1 point
-
I really like the Cayman GT4, but can’t help thinking it looks a bit bland next to your carbon IMHO. Great picture - I do like the black & silver combo 👍🏻1 point
-
Once a year, but its normally just a change of filters. Profess in South Wales have a lead which you can patch into their computer and any changes to the setup and send you filters if needed in the post.1 point
-
Those look correct to me.
1 point
-
Not necessarily. I had a breakdown policy before and I read the terms and it clearly stated that cover wouldn't be provided in the event of a flat tyre if the spare wheel was missing. At the time I had a 1 Series that didn't have a spare wheel bay never mind a wheel so I queried it with them and they said that if the car was never supplied with a wheel by the manufacturer then they would still cover you. I'm just saying that people need to check the terms with their own provider if they are thinking of leaving the spare at home. As for the insurance, some companies don't charge anything extra for LPG converted cars and when they say that the LPG equipment is "covered" what they mean is that the components are covered individually so for example if your car was rear-ended and the tank got damaged then they would cover the cost of a replacement tank. In the event of a total loss however they are not going to pay you for the value of a petrol car plus £1400 for the LPG conversion because they just pay you the market value of the whole car which is the same regardless of whether it is petrol or LPG. So if your LPG system takes 2 years to pay for itself and the car gets written off after just one year then you've lost a lot of money which is why I prefer a quicker payback time. It is a very small risk but nevertheless it does exist. It is purely down to the individual as to whether they want to take that risk as well as considering other factors such as availability. I wouldn't have an LPG car now because where I live availability is poor and the only station I drive past daily that sells it has recently bumped the price up by 10p per litre in one jump from 65.9p to 75.9p and that to my mind is too expensive. I can get it at 65.9p but that would involve taking a longer route home which is inconvenient. It is probably best to buy a car that has already been converted if possible to save on the outlay but there are no converted RX's for sale at the moment that I am aware of.1 point
-
Thanks jumpingjehovahs. Decisions decisions....but I am gearing more towards the higher mileage car.1 point
-
OK, so maybe I got the figures a bit wrong. It is a while ago now and I haven't got the paperwork to refer back to because I included it with all other paperwork for the new owner when we traded up to our RX450h - perhaps it was closer to two years. Either way, it paid for itself and started saving money in two years or less - certainly not a long time, especially if you're keeping the car for a long time like we tend to do. I just like looking at the end figures where a journey that would have cost over £900 in petrol was actually about £437 because the LPG is cheaper. I seem to remember someone on here doing a comparison on fuelly.com and finding that a petrol only RX300 came in at 22.6p per mile, an RX400h (nearest equivalent as it's built on the same body etc) was 19.5p per mile and his LPG RX300 was running at 12.6p per mile. As for your other points, my insurance company added £25 per year to the policy but I had it in writing from them that this was to cover the LPG equipment and the breakdown company had no problem at all with providing cover for a car without a spare wheel, even though there should have been one. LPG has been around for many, many years and although these may have been valid points at one time, that's no longer the case.1 point
-
So for a £1400 conversion to be paid off in 14 months means a saving of £100 per month in fuel. If you're only spending £150 per month on petrol then you can't possibly save that much so it would be more like a £50-£60 per month saving meaning that it will take over 2 years to pay for itself which in my opinion is too long. Don't forget too that if you have a prang and your car gets written off then the insurance company won't cover the cost of your conversion, they'll just give you the value of a standard petrol car so if that happens just after you've driven the car out of the LPG converters then you've just lost £1400 or after 1 year £700. I would also check the T & C's of your breakdown cover too because if your car came equipped with a spare wheel and you choose not to carry it around with you then some companies won't rescue you or will charge for doing so. LPG conversions work out great for some people but not for others. As for Euro Tunnel - stuff them and go on the ferry instead!1 point
-
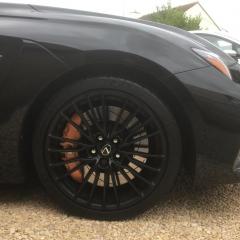
Mine is completely stock. Although, seriously considering an aftermarket exhaust at the moment. Something that isnt obnoxiously loud. So i can enjoy the V8 in low revs1 point
-
Totally stock. Except for the front license plate having been knocked off at the local Sainsbury’s car park. 🤔1 point
-
Prior to new MOT changes that came into effect in May this year, if your existing MOT had not passed expiry date, then it was still a valid MOT certificate and the failure did not revoke that. New rules since May makes things tougher. https://www.moneyadviceservice.org.uk/blog/new-mot-vehicle-test-may-2018 A dangerous fault under new rules means it must come off the road right away and any time left on the existing MOT is revoked. It cannot be driven until repairs done and a pass is re-issued. They can't hold you hostage, you have every right to leave with your car. You need to take your car away on a trailer to do it legally. If not and you get caught (or the garage reports you) then you can get a hefty fine, a ban and are driving illegally (and uninsured as your insurance isn't valid without an MOT). It's worth noting that possession of a valid MOT certificate is not proof your car is roadworthy.1 point
-
Brought a set of tyres and fitted all 4 last night, washed the car tonight and parked inside my garage to work on the car, heard air leaking out from the tyre valve tube. There is also no screw left on the tip so therefor i cannot screw a plastic dust cap on. Looking to fix this problem, could i fix this going to a local tyre garage or would there be a sensor that i will need to order with it? Problem after problem --_--!!
0 points


.jpg.d7c3008218b2fe60565ae484aea06423.thumb.jpg.acd03711e7ee8dd3ab51445472b05a9d.jpg)


.jpg.4d17dd6ba1a39539002b05a0c001c6af.jpg)