Leaderboard


Popular Content
Showing content with the highest reputation on 06/18/2020 in all areas
-
Not wishing to continue hijacking member Collins (Crow1342) post "Wheels, and workshop manuals GS450H" I am staring a thread on retro fitting radar distance control to the GS 350, and GS450H 2006/2011. It will almost certainly apply to other variants in the Lexus range. I have not as yet completed this but I am at a stage where I can pass on my findings so far. I must thank member Chris (Mihanicos) for his invaluable help with supplying circuit diagram information, that I could not find. A problem I have now resolved. So just to wet your appetite my progress so far. After studying the circuit diagrams for both versions of the cars "those fitted, and those not fitted" with radar cruise control known as "ACC automatic cruise control" I came to the following conclusions:- As long as the required wiring was fitted the concept was feasible. The hardware that is missing amounts to four items:- The distance control module ECU 88240-30410. The millimeter radar cruise unit transmitter 88210-62010 The steering wheel switch that sets the distance. Part number not known at the moment. A replacement Lexus logo badge for the front grill suitable for radar to pass through. After checking in the dashboard above the accelerator pedal where the distance control module should be I found the wiring, and plug for this unit just taped to the loom to be in place along with mounting threaded pins. This plug was live in that there were 12 volt feeds, and grounds at the relevent pins. All that is required to fasten the ECU is two 10mm spanner size nuts, and plug the unit in. Following the circuit diagram I found the wiring goes through two plug, and sockets joining sections of the loom. The first plug, and socket designated (AL2) then the wires continue on to plug, and socket (BA2). These are gray components mounted in the main fuse/relay box under the bonnet positioned in the centre front of this box. On inspection of this plug with multiple wires going into it I found that there were no wires fitted on the outlet side "top" for connecting pins 1 to 5. These pins are marked 1 to 5 and are the connections required to extend the wiring loom to radar transmitter that sits in front of the radiators, and behind the Lexus front badge. This part of the wiring loom is not fitted. I have bought of Ebay both the ECU 88240-30410 for £20 delivered from Lithuania advertised at £45, and the radar unit 88210-62010 for £45 advertised at £120. Do not be afraid to low bids on items marked "Make an offer". Both my bids were accepted immediately I made them meaning I did not have to wait for the seller to accept the offer. I have made up the section of wiring loom missing from the socket (BA2) to the radar unit using some old computer motherboard plugs removing the pin connectors for fitting to the (BA2) loom plug. As this only consists of five wires, and about three feet long it is not difficult to make up. The other wiring that is missing along with a micro switch is in the steering wheel. The wiring into the steering wheel through the clock spring is there, but to select the set distance the wire must be grounded each time the operating switch is pressed.I may make up my own switch mechanism, and single wire if I cannot find a secondhand switch on line. The control ECU has been fitted to the existing mounting points under the dash, and the existing wiring plugged in. When the weather improves "it's been wet here the last three days" I will fit the DIY loom, and the radar transmitter. Then I will dismantle the steering wheel to fabricate the distance control switch mechanism. I have already noted that there is a knockout in the wheel where the switch should be mounted. I will also take some pictures so that the positions of the various components can be seen, and how they are connected. Total cost so far is £65. This may rise a little if I can find a steering wheel control switch, but I am sure I can fabricate something if required or until I can obtain one. The expensive item looks like it will be the cheapest looking item. The front Lexus L badge that seems to be around £110. I may have to see what I can come up with printing wise to overcome this. I am hoping that the existing ECU's have the software already installed, and that no further ECU replacement is required. I do not think this is the case as all the ECU's on the two versions have the same part numbers. John.3 points
-
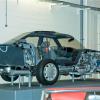
Here's the before and after (remaining beauty panels to be put on once I've tested everything) (and battery holder to be fitted) (and air intake)
 3 points
 -
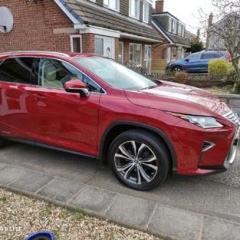
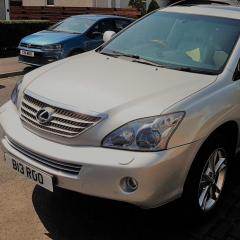
Evening everyone, nice to be here! I have recently bought a one-owner, fsh 2003 RX300 in great nick and I'm really chuffed with it. Only real problem was a hissing radio which I was aware of when I bought it. I eventually narrowed down to a fault in the amplifier so I replaced it with one from a scrapper (£90) and all good now. It was a nightmare to access mind, I expected over-engineering but really.....! Other than that there's condensation in one of the headlamps which i'll sort at some point (I made a half hearted attempt with a hair dryer and a tube of sealant but it steamed straight up again next time I drove the car!) and a slightly irritating clicking noise behind the dash which I presume is that servo thing that seems to be an issue on these from what I've read. I'll sort it if it actually fails but it's working fine atm. And that's it. An amazing car for not a lot of money, couldn't be happier!
2 points
-
That is really good work and commendable. I can turn my hand to most things but electronics baffle me. I did however find my distance control switch, it looks like this....
2 points
-
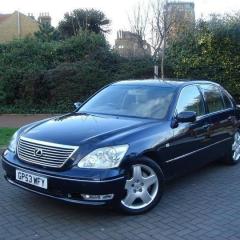
Forgot to show you my new toy!
2 points
-
you mean what is she spending it on!😅2 points
-
Few more... Sent from my SM-G975F using Tapatalk2 points
-
Thousands! *3 weeks of tinkering officially justified*2 points
-
Hi Jay. I did at lot of work on my RX300 suspension. I learned loads thru working on it and my research. So here we go. If it's only the one that is lowering then it is a result. You say you had the unit replaced, so I'm worndering why. Was it lowering before, hence the replacement. Has the garage fitted the unit properly, or not connected the air pipes correctly. If we assume the refit was done ok, then there is only two things that can be at fault. The sensor or the ECU. Either is cheap and one can be tested and repaired. The ECU can't. The first one to test is the sensor. I pray for you that it's not the front one as it's not easy to remove. The rear one is simple and quick to remove. To test the sensor you will need a multimeter. If you need to check it there's a good youtube video https://www.youtube.com/watch?v=pDFBm3AkVEs2 points
-
Hi Guys, I said I would stick up pics of my newly refurbished wheels once I had the grey inserts and wheel nut covers, so here they are (the wheel nut covers were wrong size first time round so had to wait for the correct ones). I think they finish off the light anthracite wheels perfectly, just a pity the locking wheel nuts are a tad rusty....
1 point
-
Thanks chaps! I have 2 friends with extremely elderly Lexuses and they are amazing cars (both have been bulletproof) which sowed the seed as it were. The RX has still surpassed expectations, drives like a new car.1 point
-
Well, there's moisture or water coming from somewhere ,,,1 point
-
Perhaps the steering wheel is straight Howard, could it be that you have not parked it correctly ? (LOL)1 point
-
I know, but there's something about a big car with a genuine bit of grunt carrying them. I'll be mocking the thing up in Photoshop before taking this any further 😉1 point
-
Yet another grey one! Oh dear. I've just noticed the steering wheel isn't straight!
1 point
-
@Britprius, the stalk that toggles the cruise control on/off is also different for cars with ACC - you push the stalk forward (away from you) to toggle between radar cuise mode or normal cruise mode. The part number for that ACC toggle switch is: 84632-580111 point
-
Hi Lee. Yes that is the distance control switch, but for the later model than my 2007. The switch on my version is a flap that sticks out just below the speek, and display buttons to the right of your red arrow. There is a cutout or knock out line where the switch should be. I can find a number of complete steering wheels on Ebay for £75/100. It may be worth finding the price of a new switch. I could drill a small hole in the back of the steering wheel and fitt a micro switch out of sight for the moment or even put a switch in the little pull off cover for the airbag fastener. John.1 point
-
Those are part numbers for the facelifted steering wheel. I believe John's car is pre-facelift, in which case the the part number for the distance control toggle switch is: 84244-30121-C0 for black steering wheel 84244-30121-E0 for "orchid brown" steering wheel1 point
-
84250A SWITCH ASSY, STEERING PAD 84250-30400-C0 PRE-COLLISION SYSTEM-MILLI-WAVE RADAR TYPE, BLACK, TRIM04, 1*, 2* 84250-30400-E0 PRE-COLLISION SYSTEM-MILLI-WAVE RADAR TYPE, ORCHID BROWN, TRIM00, 01, 021 point
-
If this list comes off, would be looking for someone in the Portsmouth/Hampshire/West Sussex area👍1 point
-
They look rather smart Brian. (I won't show your pictures to my wife, for I have encouraged her to believe that any scuffs on the wheels will necessitate brand new wheels, (for reasons of metal stress! 😉 ) and that they'd have to be paid for out of 'housekeeping.) 'Mum's the word' eh?1 point
-
Adrian Flux covered mine on a limited mileage policy with agreed value cover for £200 less than any other quote I had. They might be worth a call? The provider as they are a broker was ERS.1 point
-
Slide pins next. Out of the four, one was free, one stuck solid, two quite "tight". Manage to loosen then all up a bit but not ideal.1 point
-
Further to the quote above, below is a link to a YouTube video showing how to test if the aircon clutch is knackered. Testing Aircon Clutch1 point
-
Lexus labour charge is around £130 + VAT per hour, so you're well justified there my friend1 point
-
Is it because Stoke is dead posh?1 point
-
Mine is pretty much there Andrew. I'm sure a few on here would be [emoji4]. It's a 1993. Sent from my SM-G975F using Tapatalk1 point
-
Just spoken to Paul re giving his details. He has no problem his details going into any Indy listing for members. He is based in Guildford and offers a brilliant service.1 point
-
A kidney or lung ....1 point
-
Well Peter - good job... I do hope your work and substantial cost saving is appreciated. I fear that the tariff level for car repair is lower than say painting and decorating/doing what one is told/supporting other half in a pointless argument with off-spring... 🤧1 point
-
Thank god they haven’t put those ridiculous horns on top of the speedo, puts me off any newer Lexus.1 point
-
what I told the missus 😄 now I can show her this! 😄1 point
-
Yup, mine has the 2016 disk which is I believe the most recent for the LS430, and it still looks like it was designed with crayons in the 1990s. I use a TomTom that sits on top of the dash to the right of the instrument binnacle. Occasionally, when bored, I will have a competition and set the same destination on both systems and see which I prefer. The Lexus system does like to suggest some strange routes sometimes.1 point
-
The answer is simple, if not a bit cheeky. One is a VW, the other is a Lexus, so your worries are over mate.1 point
-
It turns out mine does have ML on the build sheet. Something odd must have been happening a couple of years ago with the spec sheet1 point
-
Hi Simon, apologies, my bad - that rear strut at £122 is for the GS430 and GS460. I cross-checked the part number with Amayama. In summary: Rear shock for GS450h pre-facelift: www.lexuspartsdirect.co.uk/parts/lexus-gs/lexus-gs-phase-iii-2005-2012/lexus-gs-3-steering-suspension/lexus-gs-phase-3-rear-shock-absorber-2/ post-facelift: www.lexuspartsdirect.co.uk/parts/lexus-gs/lexus-gs-phase-iii-2005-2012/lexus-gs-3-steering-suspension/lexus-gs-phase-3-rear-shock-absorber/ Rear shock for GS300 www.lexuspartsdirect.co.uk/parts/lexus-gs/lexus-gs-phase-iii-2005-2012/lexus-gs-3-steering-suspension/lexus-gs-phase-3-rear-shock-absorber-for-3l-petrol/ Rear shock for GS430 and GS460 www.lexuspartsdirect.co.uk/parts/lexus-gs/lexus-gs-phase-iii-2005-2012/lexus-gs-3-steering-suspension/lexus-gs-phase-3-rear-shock-absorber-strut In any case, if you email your vehicle reg to Lexus Parts Direct, you will be advised of the correct rear shock absorber for your car.1 point
-
David, I've not exactly the same problem, and it doesn't occur as reliably as yours, but there are some similarities.. I s'pose the best place to start is with a question . . . Do you give your car garlic bread? The reason for asking is, I hope, fairly obvious. For a fair portion of garlic bread will cause (what I like to refer to as ) anal burps. At least, that is most certainly my experience with my nearest and dearest (my wife, Josi - not the car- Lancelot!) For after a decent Mediterranean meal, with plenty of garlic bread, she gets in the car and, well - - you get the picture Hope this may have some relevance with your quest for clues1 point
-
I’ve filled mine up twice since the lockdown and covered some amazing mileage, the battery was a bit flat the other day but a quick charge sorted things out so it now starts on the button. I also did all the service maintenance, cleaned it and checked all the tyre pressures. I also ran it through all the height positions. The grass hasn’t looked this good for years. 😀
1 point
-
The point is that I asked them to be careful and make it so that only the tow hitch point and Electrical plug showed through the rear underbody tray, most of the things you see in the picture other than the tow hitch connector and 13 pin plug lay below the tray , so there should have been no need to cut them out , or such a big holes around the main points
0 points


.thumb.JPG.67166e824aaba2340443e9c5beac2b06.JPG)


.thumb.jpg.f22745b97884560f08007d4ab75c4aa5.jpg)